摘要:[jQuery Mobile]JQM的控制項群組與小圖示如何使用
 想必很多人在一開始使用JQM的時候都被官方文件裡面的一些展示所吸引,簡單以上手的特性也讓他的使用者越來越多
新手從官方下載的JQM zip檔案能找到JS跟CSS外裡面還有幾個圖檔
- ajax-loader.gif(非同步時預設的Loading動畫效果)
- icons-18-black.png
- icons-18-white.png
- icons-36-white.png(HD版本)
- icons-36-white.png(HD版本)
一般在套用JQM後的網頁應該長相如下
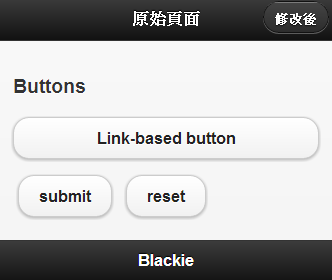
原始碼如此:
		<section id="page1" data-role="page">
		  <header data-role="header"><h1>原始頁面</h1><a data-role="button" href="#page2" class="ui-btn-right">修改後</a></header>
		  <div class="content" data-role="content">
			<h3>Buttons</h3>
			<a href="#" data-role="button">Link-based button</a>
			<input type="submit" value="submit" data-inline="true">
			<input type="reset" value="reset" data-inline="true">
		  </div>
		  </div>
		  <footer data-role="footer"><h1>Blackie</h1></footer>
		</section>
在這邊我們可以透過設定控制項群組與設定icon的方式來添加畫面上的配置,使UI更容易讓使用者清楚功能是在幹嘛 群組設定的方式是透過data-role="controlgroup"的方式來設定而後可以針對 data-type來設定horizontal(水平)或是vertical(垂直)
icon設定的方式是透過data-icon="home"的方式來設定而後可以針對data-iconpos來設定上(top)、下(bottom)、左(left)、右(right)或無文字(notext)
而以下是全部可用的圖示的清單
| Value | Icon |
|---|---|
| alert |
 |
| arrow-d |
 |
| arrow-l |
 |
| arrow-r |
 |
| arrow-u |
 |
| back |
 |
| check |
 |
| delete |
 |
| forward |
 |
| gear |
 |
| grid |
 |
| home |
 |
| info |
 |
| minus |
 |
| plus |
 |
| refresh |
 |
| search |
 |
| star |
 |
套版完後的樣式就可以長這樣摟
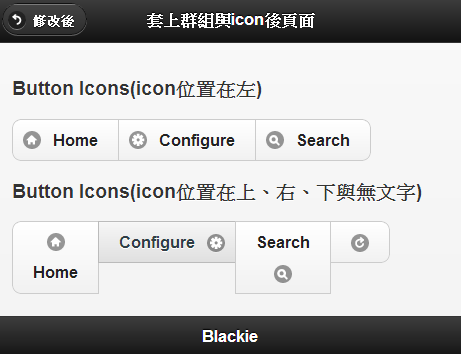
		<section id="page2" data-role="page">
		  <header data-role="header"><a data-role="button" data-icon="back" href="#page1" class="ui-btn-left">修改後</a><h1>套上群組與icon後頁面</h1></header>
		  <div class="content" data-role="content">
			<h3>Button Icons(icon位置在左)</h3>
			<div data-role="controlgroup" data-type="horizontal" data-inline="true">
			  <a href="#" data-role="button" data-icon="home" data-iconpos="left">Home</a>
			  <a href="#" data-role="button" data-icon="gear"
				 data-iconpos="left">Configure</a>
			  <a href="#" data-role="button" data-icon="search"
				 data-iconpos="left">Search</a>
			</div>
			<h3>Button Icons(icon位置在上、右、下與無文字)</h3>
			<div data-role="controlgroup" data-type="horizontal" data-inline="true">
			  <a href="#" data-role="button" data-icon="home" data-iconpos="top">Home</a>
			  <a href="#" data-role="button" data-icon="gear"
				 data-iconpos="right">Configure</a>
			  <a href="#" data-role="button" data-icon="search"
				 data-iconpos="bottom">Search</a>
			  <a href="#" data-role="button" data-icon="refresh"
				 data-iconpos="notext">Refresh</a>
			</div>
		  </div>
		  </div>
		  <footer data-role="footer"><h1>Blackie</h1></footer>
		</section>
如果針對以上的預設icon覺得不夠用或是想要客製的話其實也很簡單
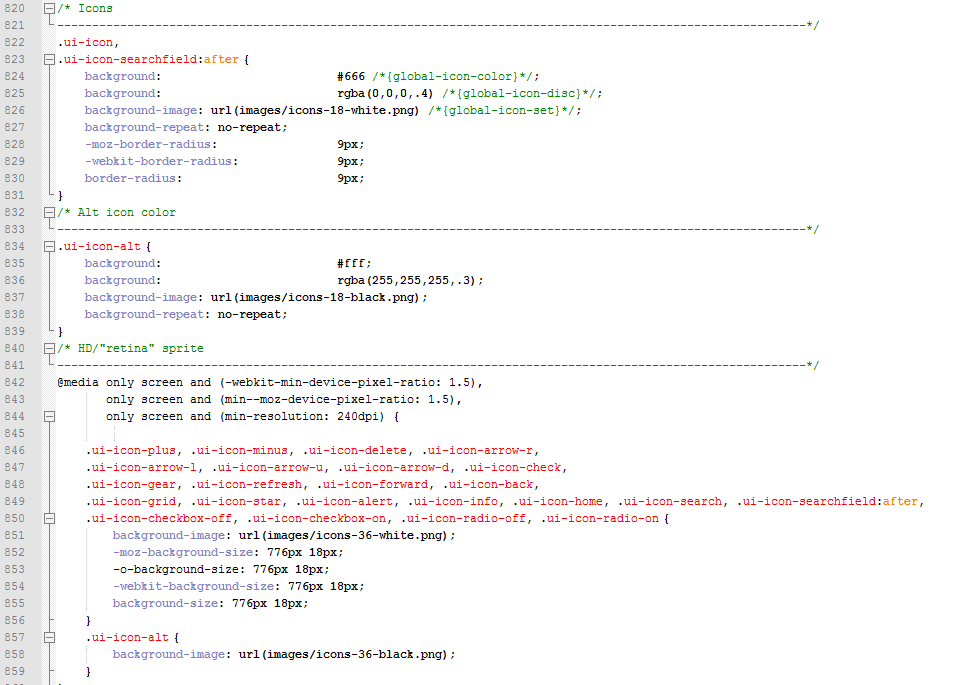
流程只需更換圖片後在將你圖片上各區塊的icon寫好對應的CSS class對應的圖片位置
修改方式為先打開JQM的CSS找到/* Icons的註解部分先將指定的圖片換成你的再根據下方的各icon類型做擴充或修正即可,如下圖處

如果覺得文章還不錯麻煩請在文章最上面給予推薦,你的支持是小弟繼續努力產出的動力!