實現 DataGridView 的拖曳調整順序
使用 DataGridView 來顯示資料是一個非常方便的模式,雖然 DataGridView 本身已經有提供排序功能,但總是會有一種情況就是無法依照自己的想法來排列。
基於這個想法,就來實做在 DataGridView 中透過拖曳方式來調整行的順序。
必要條件:
- DataGridView 控制項
- 必須強制設定為單選
- 必須啟用 DataGridView 的 AllowDrop 功能
首先來分析一下動作,第一先使用滑鼠左鍵來點選某個欄位或是某一行,然後滑鼠鍵按住後開始移動游標,此時游標要呈現拖曳中的圖樣,移動到目的行後放開滑鼠鍵,將先前點選的行資料剪下來,然後插入到目前行之後。
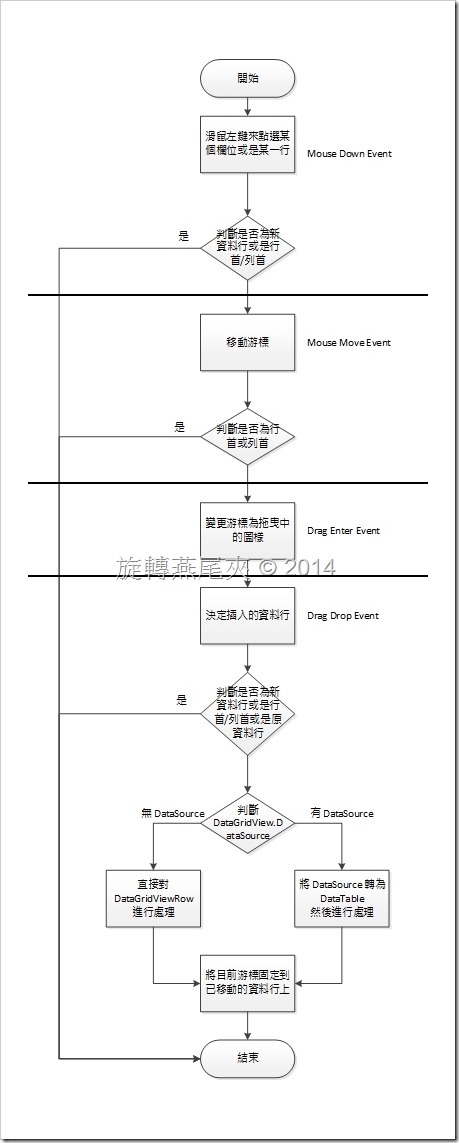
滑鼠點選與移動時,可以使用 DataGridView.HitTest 代入滑鼠目前X,Y座標,來取回目前游標於 DataGridView 所在位置的資訊,就可以判斷是處於行首或是列首了。
其中判斷是否為新行,則是可以透過 DataGridView.Rows.IsNewRow 屬性來得知。至於產生拖曳效果則是在 MouseMove 事件中處理,使用 DoDragDrop 方法,並且將已選取的資料行代入,如此就可以產生拖曳行為。
接下來緊接著觸發了 DragEnter 事件,在這個事件中只需要定義拖曳時的效果模式。
最後當放開滑鼠左鍵之後,就引發了 DragDrop 事件,這也是最後的關鍵。先判傳進來的資料是否為 DataGridViewRow 型態,不是的話就直接結束不做處理。再由 PointToClient 取回目前所點選到的位置,判斷目前位置如果是行首、列首是新增行,又或是原本的資料行時就立刻結束不做處理。
- DataGridView 沒有設定 DataSource 直接由使用者輸入資料
直接對 DataGridViewRow 來進行處理。
將已選取的資料行取出,然後在 DataGridView 中刪除該行,最後將取出的資料行插入到目前點選位置之後。
- DataGridView 透過 BindingSource 來繫結資料或是直接連結 DataTable
先將 DataSource 物件轉為 DataTable,再設定 DataTable 的 PrimaryKey,透過目前選取的資料在 DataTable 中找出符合的資料行。複製一份該資料行,然後刪除 DataTable 中所符合的資料行,完成後再將剛剛複製的資料行插入到目前所點選位置之後。
例:
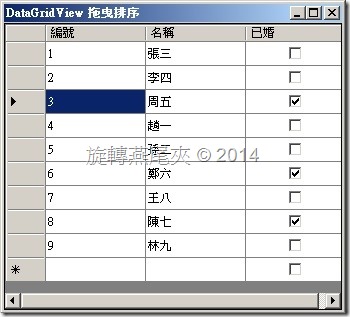
將 3.周五 拖曳到 7.王八 的位置上
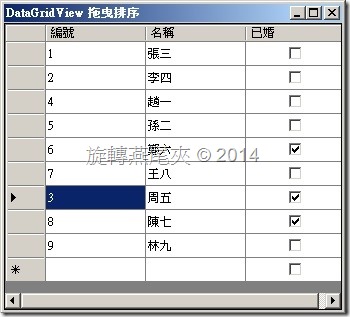
3.周五 就會擠在 7.王八 與 8.陳七 中間。
MousDown 事件
{
    if (dataGridView1.HitTest(e.X, e.Y).Type != DataGridViewHitTestType.Cell) return;

    if (e.Button == MouseButtons.Left)
    {
        if (dataGridView1.Rows[dataGridView1.HitTest(e.X, e.Y).RowIndex].IsNewRow) return;
    }
}
MouseMove 事件
{
    if (dataGridView1.HitTest(e.X, e.Y).Type != DataGridViewHitTestType.Cell) return;

    if (e.Button == MouseButtons.Left)
    {
        dataGridView1.Rows[dataGridView1.SelectedCells[0].RowIndex].Selected = true;
        dataGridView1.DoDragDrop(dataGridView1.SelectedRows[0], DragDropEffects.Move);
    }
}
DragEnter 事件
{
    e.Effect = DragDropEffects.Move;
}
DragDrop 事件
{
    if (((DataObject)e.Data).GetData(typeof(DataGridViewRow)) == null) return;

    Point TargetPoint = dataGridView1.PointToClient(new Point(e.X, e.Y));
    if ((dataGridView1.HitTest(TargetPoint.X, TargetPoint.Y).Type != DataGridViewHitTestType.Cell)) return;

    int TargetRowIndex = dataGridView1.HitTest(TargetPoint.X, TargetPoint.Y).RowIndex;
    if ((dataGridView1.Rows[TargetRowIndex].IsNewRow) || (dataGridView1.SelectedRows.Contains(dataGridView1.Rows[TargetRowIndex]))) return;

    if (dataGridView1.DataSource == null)
    {
        DataGridViewRow SourceRow = dataGridView1.SelectedRows[0];
        dataGridView1.Rows.Remove(SourceRow);
        dataGridView1.Rows.Insert(TargetRowIndex, SourceRow);
    }
    else
    {
        DataTable SourceData = dataGridView1.DataSource.GetType() == typeof(BindingSource) ? ((DataSet)((BindingSource)dataGridView1.DataSource).DataSource).Tables[0] : (DataTable)dataGridView1.DataSource;
        SourceData.PrimaryKey = new DataColumn[] { SourceData.Columns[0] };

        DataRow OriginRow = SourceData.Rows.Find(dataGridView1.SelectedRows[0].Cells[0].Value);
        if (OriginRow == null) return;

        DataRow SourceRow = SourceData.NewRow();
        int InsertIndex = SourceData.Rows.IndexOf(SourceData.Rows.Find(dataGridView1.Rows[TargetRowIndex].Cells[0].Value));
        SourceRow.ItemArray = OriginRow.ItemArray;
        SourceData.Rows.Remove(OriginRow);
        SourceData.Rows.InsertAt(SourceRow, InsertIndex);

        SourceData.AcceptChanges();
    }
    dataGridView1.CurrentCell = dataGridView1.Rows[TargetRowIndex].Cells[dataGridView1.CurrentCell.ColumnIndex];
}
程式是運氣與直覺堆砌而成的奇蹟。
若不具備這兩者,不可能以這樣的工時實現這樣的規格。
修改規格是對奇蹟吐槽的褻瀆行為。
而追加修改則是相信奇蹟還會重現的魯莽行動。
