介紹 WinForm 應用程式如何處理當需要版本升級時的做法。
前言
最近在寫些 Win Form 的東西,正好碰到有需要客戶端應用程式版本升級的需求,稍微研究了一下一般這種需求會使用何種方式來處理,看了一下大概有使用 ClickOnce、第三方升級套件、自製升級等做法,在此紀錄一下最後使用自製升級方式的做法。
情境如下,首先準備三個專案,WinAP 主要程式、WinAPUpgrade 更新程式、VersionAPI 做下載升級之程式之用,運作的方式為在 WinAP 上執行版本升級確認,WinAP 將會呼叫 VersionAPI 提供的版本確認方法,如有新版的話就會結束 WinAP 程式再啟動 WinAPUpgrade 程式進行更新,而更新完成後再啟動 WinAP 程式讓使用者繼續操作,以下就依照上述步驟開始建立範例專案。
建立專案
首先先在方案裡建立上述三種專案如下:
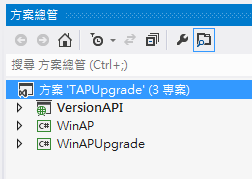
VersionAPI:主要功能為提供客戶端應用程式需要更新時檢查版本與下載版本。
WinAP:主要客戶端執行的應用程式。
WinAPUpgrade:提供客戶端 WinAP 進行版本升級作業的程式。
讓 Web API 提供版本檢查與版本下載
在專案建立好後,首先先處理 VersionAPI 的部分,在此 VersionAPI 的中將需要提供兩個方法讓客戶端呼叫,如下
- 版本檢查方法
- 版本下載方法
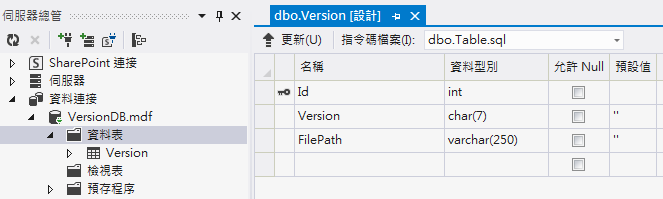
先建立一個用來記錄版本的資料庫,名為 VersionDB。

接著建立一個資料表名為 Version 後加入 Id, Version, FilePath 三個欄位,Id 為流水號、Version 為記錄版本號、 FilePath 為要下載到客戶端的程式檔案。
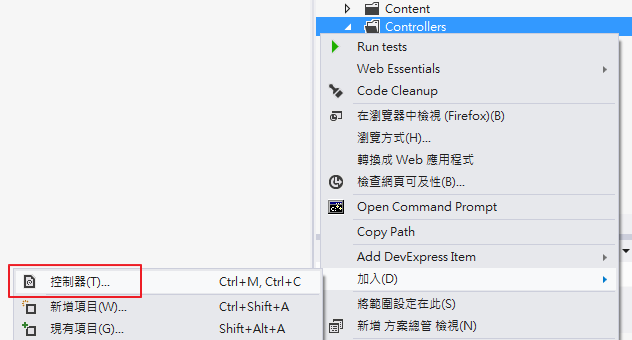
繼續點選 Web API 的 Controller 加入一個新的 Controller 名為 UpgradeController,之後在 UpgradeController 中加入檢查版本與下載版本的方法 。

檢查版本
檢查版本為取得最新的一筆版本號後回傳客戶端,讓客戶端可以與自己的程式版本進行比對。
[HttpGet]
public HttpResponseMessage CheckVersion()
{
    UpdradeDao dao = new UpdradeDao();
    string ver = dao.GetLastVersion();
    if (!string.IsNullOrEmpty(ver))
    {
        HttpResponseMessage response = new HttpResponseMessage(HttpStatusCode.OK);
        response.Content = new StringContent(ver);
        response.Content.Headers.ContentType = new System.Net.Http.Headers.MediaTypeHeaderValue("text/plain");
        return response;
    }
    else
        throw new HttpResponseException(HttpStatusCode.NotFound);
}
下載版本
下載的方法由客戶端傳入版本號後再去取得該版本號的檔案,返回一個檔案串流供客戶端下載。
[HttpGet]
public HttpResponseMessage DownloadVersion(string ver1, string ver2, string ver3, string ver4)
{
    string ver = string.Format("{0}.{1}.{2}.{3}", ver1, ver2, ver3, ver4);

    UpdradeDao dao = new UpdradeDao();
    string path = dao.GetVersionPath(ver);
    if (!string.IsNullOrEmpty(path))
    {
        HttpResponseMessage response = new HttpResponseMessage(HttpStatusCode.OK);
        FileStream stream = new FileStream(HostingEnvironment.MapPath(path), FileMode.Open);
        response.Content = new StreamContent(stream);
        response.Content.Headers.ContentType = new MediaTypeHeaderValue("application/zip");
        return response;
    }
    else
        throw new HttpResponseException(HttpStatusCode.NotFound);
}
修改路由
接著要修改 WebApiConfig 路由,加入檢查版本與下載版本的路由,如下。
config.Routes.MapHttpRoute(
    name: "CheckVersionApi",
    routeTemplate: "api/{controller}/CheckVersion"
);

config.Routes.MapHttpRoute(
    name: "DownloadVersionApi",
    routeTemplate: "api/{controller}/DownloadVersion/{ver1}/{ver2}/{ver3}/{ver4}",
    defaults: new { ver1 = RouteParameter.Optional,
                    ver2 = RouteParameter.Optional,
                    ver3 = RouteParameter.Optional,
                    ver4 = RouteParameter.Optional
    }
);
由 WinAPUpgrade 下載新版本並且更新 WinAP
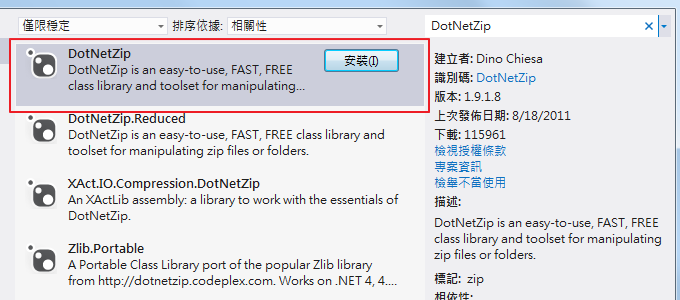
當 VersionAPI 建置好後,就可以來撰寫 WinAPUpgrade 的程式,在這個專案裡需要去呼叫 Version API 的 DownloadVersion 方法,下載最新的版本回來客戶端後再進行升級覆蓋,在此需要使用到 DotNetZip 套件,因為需要將下載後的檔案進行解壓縮,DotNetZip 可以透過 NuGet 進行安裝。
首先在 WinAPUpgrade 專案加入 DotNetZip 套件。
在表單中加入 ProgressBar 與 Label 用來顯示目前更新進度。

再來撰寫相關的程式碼,接下來的程式碼因為只是測試範例,所以將代碼都放置在 Form 內請見諒,在升級程式裡加入以下程式碼,如下。
取得最新版本
此方法為呼叫 VersionAPI 取得最新版本號。
/// <summary>
/// 取得最後版本
/// </summary>
/// <returns></returns>
private string GetLastVersion()
{
    HttpWebRequest request = (HttpWebRequest)HttpWebRequest.Create(
        System.Configuration.ConfigurationManager.AppSettings["CheckVersionUrl"].ToString());
    request.UserAgent = "Mozilla/4.0 (compatible; MSIE 6.0; Windows NT 5.2; SV1; .NET CLR 1.1.4322; .NET CLR 2.0.50727)";
    request.Method = "GET";
    request.ContentType = "application/x-www-form-urlencoded";
    using (StreamReader sr = new StreamReader(
                request.GetResponse().GetResponseStream(), Encoding.UTF8))
        return sr.ReadToEnd();
}
下載更新檔
此方法為呼叫 VersionAPI 下載指定版本的更新檔
/// <summary>
/// 下載新版本
/// </summary>
/// <returns></returns>
private string DownloadVersion()
{
    SetAction(ActionType.CheckVersion);
    string lastVersion = GetLastVersion();
    if (!string.IsNullOrEmpty(lastVersion))
    {
        SetAction(ActionType.DownloadVersion);
        string fileName = string.Format("Ver_{0}", lastVersion.Replace(".", "_"));
        string fileExtension = ".zip";
        string filePath = GetSaveFilePath() + fileName + fileExtension;

        HttpWebRequest request = (HttpWebRequest)HttpWebRequest.Create(
            string.Format("{0}/{1}",
            System.Configuration.ConfigurationManager.AppSettings["DownloadVersionUrl"].ToString(),
            lastVersion.Replace(".", "/")));
        request.UserAgent = "Mozilla/4.0 (compatible; MSIE 6.0; Windows NT 5.2; SV1; .NET CLR 1.1.4322; .NET CLR 2.0.50727)";
        request.Method = "GET";
        request.ContentType = "application/x-www-form-urlencoded";

        HttpWebResponse response = request.GetResponse() as HttpWebResponse;
        Int64 responseSize = response.ContentLength;
        using (Stream stream = response.GetResponseStream())
        {
            using (Stream file =
                    new FileStream(filePath, FileMode.Create, FileAccess.Write, FileShare.None))
            {
                int byteSize = 0;
                byte[] byteBuffer = new byte[responseSize];
                while ((byteSize = stream.Read(byteBuffer, 0, byteBuffer.Length)) > 0)
                    file.Write(byteBuffer, 0, byteSize);
            }
        }
        return filePath;
    }
    else
        return string.Empty;
}
進行版本升級
在實際進行版本升級時,首先先呼叫 VersionAPI 取得目前最新版本號,再將版本號帶入呼叫 VersionAPI 的下載方法,當確定檔案有下載完成時就進行解壓縮的動作,因為下載回來的檔案是個 Zip 檔,當檔案也解壓縮完成後就將檔案複製到主程式的目錄下覆蓋原本的程式,最後再透過 Process.Start() 方法來啟動主程式後再關閉本身更新程式。
/// <summary>
/// 升級版本
/// </summary>
private void UpgradeVersion()
{
    SetAction(ActionType.Start);

    Directory.Delete(GetSaveFilePath(), true);

    string upgradeFile = DownloadVersion();
    if (!string.IsNullOrEmpty(upgradeFile))
    {
        if (File.Exists(upgradeFile))
        {
            SetAction(ActionType.ExtractFile);

            var options = new ReadOptions { StatusMessageWriter = System.Console.Out };
            using (ZipFile zip = ZipFile.Read(upgradeFile, options))
                zip.ExtractAll(GetSaveFilePath(), ExtractExistingFileAction.OverwriteSilently);

            File.Delete(upgradeFile);

            SetAction(ActionType.UpgradeFile);

            if (Directory.Exists(Application.StartupPath) && Directory.Exists(GetSaveFilePath()))
            {
                string[] files = Directory.GetFiles(GetSaveFilePath());
                foreach (string file in files)
                {

                    string targetFile = string.Format(@"{0}{1}",
                        Application.StartupPath,
                        file.Substring(
                            file.LastIndexOf("\\"), file.Length - file.LastIndexOf("\\")));
                    File.Copy(file, targetFile, true);
                }
            }
        }
        else
            SetAction(ActionType.Error);
    }
    else
        SetAction(ActionType.Error);

    SetAction(ActionType.End);
    Thread.Sleep(1000);
    Process.Start(string.Format(@"{0}\\{1}", Application.StartupPath, "WinAP.exe"));
    Application.Exit();
}
調整建置輸出路徑
由於為了測試方便,在此要先將 WinAPUpgrade 專案的建置輸出路徑更改到與 WinAP 的建置輸出路徑相同目錄,修改後才能夠在同目錄底下尋找到這個兩個程式。

WinAP 主程式檢查是否需要更新
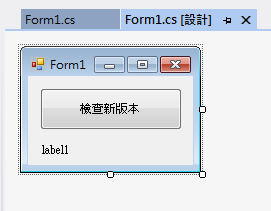
前兩個前置步驟都處理完成後,就可以開始處理主程式的檢查更新了,首先一樣拉個測試用的畫面,如下。
接下來針對檢查版本的事件進行處理,程式碼如下。
private void button1_Click(object sender, EventArgs e)
{
    if (this.ProductVersion != GetLastVersion())
    {
        DialogResult result =
            MessageBox.Show("發現新版本,是否進行升級", "注意", MessageBoxButtons.YesNo);
        if (result == System.Windows.Forms.DialogResult.Yes)
        {
            Process.Start(
                string.Format(@"{0}\{1}", Application.StartupPath, "WinAPUpgrade.exe"));
            Application.Exit();
        }
    }
    else
        MessageBox.Show("已是最新版本", "注意");
}
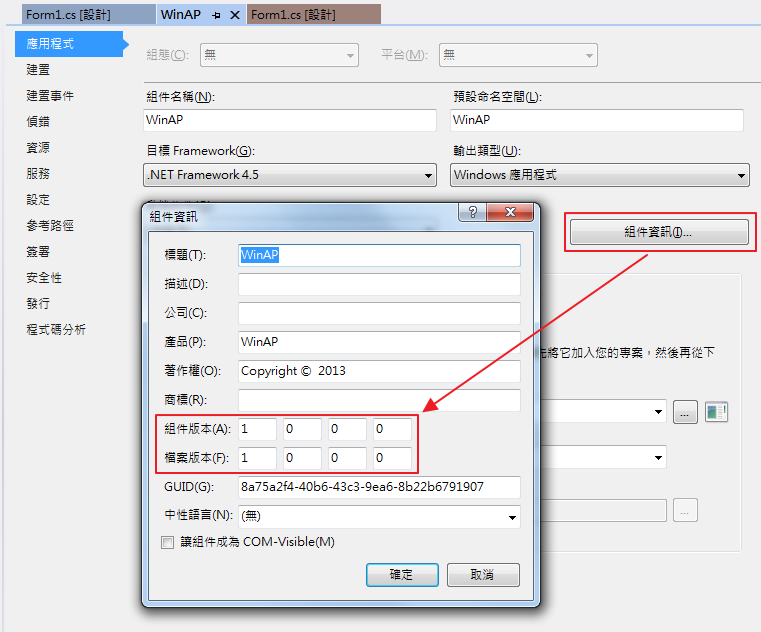
經過以上這些步驟的處理,就已經完成三個專案的設置了,接著先產生一個版本更高的執行檔供之後更新使用,於 WinAP 專案上點選滑鼠右鍵開啟「屬性」視窗,修改組件版本為 1.0.0.1 後進行建置。
建置完成後將 Bin 資料夾底下的 WinAP 專案產出的檔案取出後壓縮成 Zip 檔,放入 VersionAPI 的下載資料夾中,再把 WinAP 專案版本改回 1.0.0.0 。

於 VersionAPI 第一步驟所建立的 VersionDB 的 Version 資料表中建立一筆新版本資料,如下。

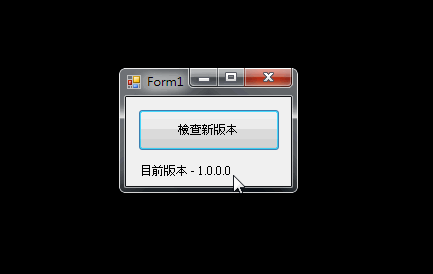
更新檔已經準備好了,接著就可以開始進行測試了,測試結果如下圖。
範例程式碼
以上文章敘述如有錯誤及觀念不正確,請不吝嗇指教
如有侵權內容也請您與我反應~謝謝您 :)