[vue]覺得.net mvc的驗證機制很方便好用嗎?用vue來實現一樣的機制吧
前言
筆者用前端框架開發四年有了,雖然web api結合前端框架在開發上很方便,但是驗證的機制就是比.net mvc預設提供的麻煩不少,因為我們可能需要為前端找一些驗證的套件,而後端也需要再做驗證的機制,如果前後端開發是分開的話,只要有新增或修改了驗證的規則,就等於兩邊都要修改,而.net mvc只要為model定義好驗證規則,在搭上razor helper的使用,真的是比起用前端框架方便許多,這邊我就想要使用vue來完成類似.net mvc的驗證效果,驗證規則只定義在後端,前端只需要綁定顯示就好了,接下來就看一下筆者的做法吧。
實做.net mvc的驗證機制
先來看一下.net mvc預設是怎麼實做驗證機制的,在此我實做了一個Employee和Company的Model,如下格式
CompanyModel
    public class CompanyModel
    {
        public int Id { get; set; }

        [Display(Name ="Company Name")]
        [Required]
        public string Name { get; set; }
        [Required]
        public string Address { get; set; }
    }
EmployeeModel
    public class EmployeeModel
    {
        public int Id { get; set; }

        [Display(Name="Employee Name")]
        [Required]
        public string Name { get; set; }

        [Required]
        [EmailAddress]
        public string Email { get; set; }
    }
我們都知道複雜一點的頁面,.net mvc會實做view model,接著來定義一個EmpViewModel吧
    public class EmpViewModel
    {
        public EmployeeModel Employee { get; set; }
        public CompanyModel Company { get; set; }
    }
完成了之後,接著我們新增一個EmpController,並加入Create相關的程式碼
    public class EmpController : Controller
    {
        // GET: Emp/Create
        public ActionResult Create()
        {
            EmpViewModel model = new EmpViewModel
            {

            };
            return View(model);
        }

        // POST: Emp/Create
        [HttpPost]
        public ActionResult Create(EmpViewModel model)
        {
            try
            {
                if (ModelState.IsValid)
                {
                    return RedirectToAction("Index");
                }
                return View(model);
            }
            catch
            {
                return View();
            }
        }
    }
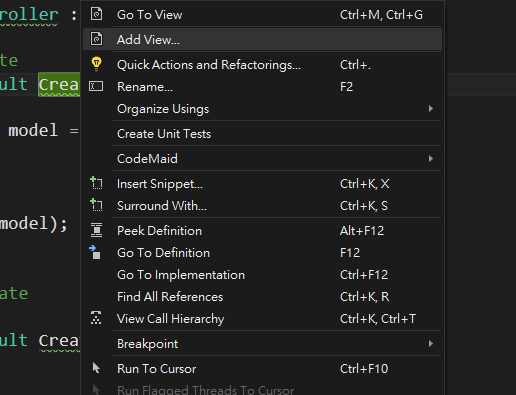
接著我們可以很方便的自動產生View的頁面
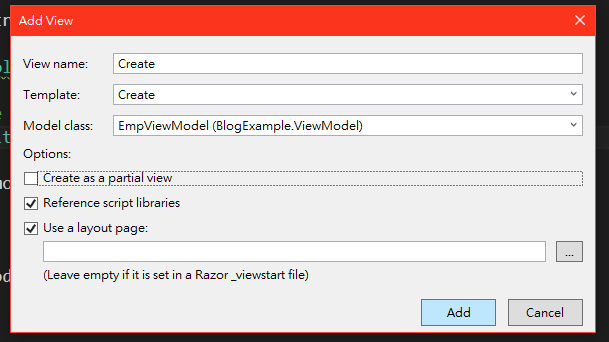
但是工具無法幫我們自動產生ViewModel類別的頁面,所以必須自行實做view的內容區塊,看一下重點關於顯示和驗證的部份,在.net mvc只要如下定義就行了
        <div class="form-group">
            @Html.LabelFor(model => model.Employee.Name, htmlAttributes: new { @class = "control-label col-md-2" })
            <div class="col-md-10">
                @Html.EditorFor(model => model.Employee.Name, new { htmlAttributes = new { @class = "form-control" } })
                @Html.ValidationMessageFor(model => model.Employee.Name, "", new { @class = "text-danger" })
            </div>
        </div>
Html.ValidationMessageFor綁定了Model所定義的屬性,就會去檢查Model上的驗證機制,效果如下。

使用Vue來完成驗證機制
接著我們就用vue和web api來完成類似.net mvc的驗證機制吧,首先新增一支web api的controller,其餘就延用原本的model,先看一下Web Api的部份
    public class EmployeeController : ApiController
    {
        public EmployeeController()
        {

        }

        public IHttpActionResult Post(EmpViewModel model)
        {
            if (ModelState.IsValid)
            {
                return Ok(model);
            }
            return BadRequest(ModelState);
        }
    }
當我們驗證不符合的話會response 400並吐回不符合的細節給前端
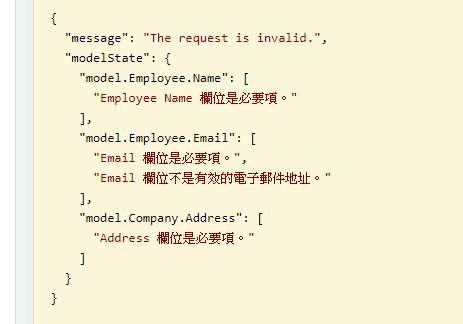
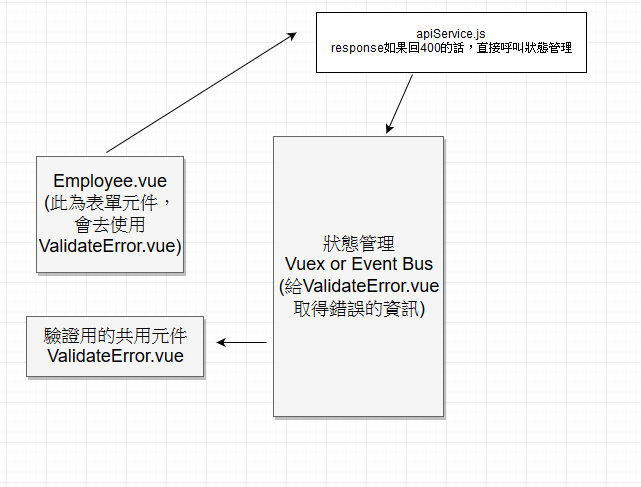
所以我們可以利用這樣的資訊,再透過vuex來幫助我們實現類似mvc的驗證方式,整個思想大概會如下
底下則是bus.js的程式碼
import Vue from 'vue'
export default new Vue()
接著我定義另一支js來放ajax,當有錯誤為400的時候,使用eventbus來發送一個錯誤格式
import axios from 'axios'
import bus from './bus'

export default {
  post (form) {
    return axios.post(`http://localhost:64508//api/Employee`, form).then(x => x.data).catch(x => {
      if (x.response.status === 400) {
        bus.$emit('modelError', x.response.data.modelState)
      }
    })
  }
}
接著來定義一下ValidateError.vue
<template>
  <div>
    <span style="color:red" v-for="(item,index) in errorColumn" :key="index">
      {{item}}
    </span>
  </div>

</template>

<script>
import _ from 'lodash'
import bus from '../bus'
export default {
  name: 'validateError',
  props: ['column'],
  data () {
    return {
      errorColumn: []
    }
  },
  mounted () {
    bus.$on('modelError', (x) => {
      // _.result可以去取得深層的值,for example of model.Employee.Name
      this.errorColumn = _.result(x, `model.${this.column}`)
    })
  }
}
</script>

<style>

</style>
再看一下Employee.vue的部份
<template>
  <div class="hello">
    <div>
      <label>name</label>
      <input v-model="viewModel.employee.name" @change="nameChange">
      <validate-error column="Employee.Name"></validate-error>
    </div>
    <div>
      <label>email</label>
      <input v-model="viewModel.employee.email">
      <validate-error column="Employee.Email"></validate-error>
    </div>
      <div>
      <label>company name</label>
      <input v-model="viewModel.company.name">
      <validate-error column="Company.Name"></validate-error>
    </div>
      <div>
      <label>address</label>
      <input v-model="viewModel.company.address">
      <validate-error column="Company.Address"></validate-error>
    </div>

    <button @click="submit">submit</button>
  </div>
</template>

<script>
import apiService from '../apiService'
import ValidateError from './ValidateError.vue'

export default {
  name: 'Employee',
  components: {
    ValidateError
  },
  data () {
    return {
      viewModel: {
        employee: {
          id: 1,
          name: '',
          email: ''
        },
        company: {
          id: 1,
          name: '',
          address: ''
        }
      }
    }
  },
  methods: {
    async submit () {
      await apiService.post(this.viewModel)
    }
  }
}
</script>

<!-- Add "scoped" attribute to limit CSS to this component only -->
<style scoped>
</style>
完成之後,就可以看到我們在前端只有binding,驗證的規則都是由後端所定義的
.net mvc開啟ajax驗證方式
上面.net少了一些步驟,所以每次submit總是會直接整個頁面重讀,並未使用ajax的方式,所以我們來把這個部份改成ajax,首先確認一下web.config這兩個部份有開啟
    <add key="ClientValidationEnabled" value="true" />
    <add key="UnobtrusiveJavaScriptEnabled" value="true" />
我們在新增view的時候,預設會在最底下加入
@section Scripts {
    @Scripts.Render("~/bundles/jqueryval")
}
而這部份我們需要從nuget下載相關的package

接著為App_Start/BundleConfig.cs新增如下的程式碼
 bundles.Add(new ScriptBundle("~/bundles/jqueryval").Include(
                      "~/Scripts/jquery.validate.js",
                      "~/Scripts/jquery.validate.unobtrusive.js"));
完成之後我們就可以啟用client端的驗證了
使用vue來模擬.net mvc的client驗證
其實之前用vue完成的就已經是ajax的方式,但只針對在submit的時候,如果我們想要為每個控制項做即時反應,就必須再改用比較麻煩的做法了,先看一下web api的部份,在viewmodel的部份我們會需要多加一個modelstate的物件,預先丟給client端做綁定,為了取得類別所定義的attribute,並組成對應的dictionary,所以先建立一支ModelStateHelper來專門處理這類型的事情。
    public class ModelStateHelper
    {
        public static Dictionary<string, Dictionary<string, string>> GetModelStates<T>()
        {
            Dictionary<string, Dictionary<string, string>> modelStates = new Dictionary<string, Dictionary<string, string>>();
            foreach (var prop in typeof(T).GetProperties())
            {
                object[] attrs = prop.GetCustomAttributes(true); //取得所有自訂attribute
                if (attrs == null || attrs.Length == 0) continue;
                Dictionary<string, string> values = new Dictionary<string, string>();

                foreach (Attribute attr in attrs)
                {
                    var getAttributeInfo = GetAttributeInfo(prop, attr);
                    if (getAttributeInfo != null) values.Add(getAttributeInfo.Item1, getAttributeInfo.Item2);
                }
                modelStates.Add(prop.Name, values);
            }
            return modelStates;
        }

        private static Tuple<string, string> GetAttributeInfo(PropertyInfo prop, Attribute attr)
        {
            var dic = new Dictionary<string, string>();
            if (attr is RequiredAttribute)
            {
                return Tuple.Create("Required", (attr as RequiredAttribute).ErrorMessage ?? $"{prop.Name} 必須得輸入");
            }
            if (attr is EmailAddressAttribute)
            {
                return Tuple.Create("Email", (attr as EmailAddressAttribute).ErrorMessage.Replace("{0}", prop.Name) ?? $"{prop.Name} 欄位不是有效的電子郵件地址。");
            }
            return null;
        }
    }
因為我的類別目前只定義required和email,但是實務上絕對會有很多個,就不一一列舉了,接著看一下EmpViewModel的部份,再加入一個我們會回傳的ModelState
    public class EmpViewModel
    {
        public EmployeeModel Employee { get; set; } = new EmployeeModel();
        public CompanyModel Company { get; set; }=new CompanyModel();
        public Dictionary<string,Dictionary<string, Dictionary<string, string>>> ModelStates { get; set; }
    }
這個ModelStates包了多層的Dictionary,最後產生的結果會類似如下格式
  "modelStates": {
    "employeeModel": {
      "name": {
        "required": "Name 必須得輸入"
      },
      "email": {
        "required": "Email 必須得輸入",
        "email": "Email 欄位不是有效的電子郵件地址。"
      }
    },
    "companyModel": {
      "name": {
        "required": "Name 必須得輸入"
      },
      "address": {
        "required": "Address 必須得輸入"
      }
    }
  }
再來是web api的部份,主要是組裝所有前端用到的資訊而已
        public IHttpActionResult Get()
        {
            Dictionary<string, Dictionary<string, Dictionary<string, string>>> emp = new Dictionary<string, Dictionary<string, Dictionary<string, string>>>();

            var empViewModelState = ModelStateHelper.GetModelStates<EmpViewModel>();
            if (empViewModelState.Count > 0) emp.Add(nameof(EmpViewModel), empViewModelState);
            var employeeModelState = ModelStateHelper.GetModelStates<EmployeeModel>();
            if(employeeModelState.Count>0) emp.Add(nameof(EmployeeModel), employeeModelState);
            var companyModelState = ModelStateHelper.GetModelStates<EmployeeModel>();
            if (companyModelState.Count > 0) emp.Add(nameof(CompanyModel), companyModelState);
            EmpViewModel viewModel = new EmpViewModel
            {
                ModelStates = emp
            };
            return Ok(viewModel);
        }
再來看一下前端的部份如何實做,首先為apiService新增一個Get的ajax,再頁面一開啟就去跟後端拿modelState的資料
import axios from 'axios'
import bus from './bus'

export default {
  get () {
    return axios.get(`http://localhost:64508//api/Employee`).then(x => x.data)
  },
  post (form) {
    return axios.post(`http://localhost:64508//api/Employee`, form).then(x => x.data).catch(x => {
      if (x.response.status === 400) {
        bus.$emit('modelError', x.response.data.modelState)
      }
    })
  }
}
接著筆者會再定義一支專門去綁定modelstate的元件,專門做驗證的狀態,我命名為ValidateClient.vue
<template>
  <div class="error-text">
    <div v-show="required">
      {{column['required']}}
    </div>
    <div v-show="email">
      {{column['email']}}
    </div>
  </div>

</template>

<script>
import is from 'is_js'
import bus from '../bus'

export default {
  name: 'clientValidate',
  data () {
    return {
      isDirty: false,
      isSubmitted: false
    }
  },
  props: ['column', 'model'],
  computed: {
    isCheck () {
      return (this.isDirty || this.isSubmitted)
    },
    required () {
      return !this.model && this.isCheck && this.column['required']
    },
    email () {
      return !is.email(this.model) && this.isCheck && this.column['email']
    }
  },
  mounted () {
    bus.$on('submitted', () => {
      this.isSubmitted = true
    })
  },
  beforeUpdate () {
    this.isDirty = true
  }
}
</script>

<style scoped>
.error-text {
  color: red;
}
</style>
因為筆者想要有輸入過值或有submit過之後才會啟用驗證狀況,所以在beforeUpdate事情去偵測,如果綁定的值有異動過,就把isDirty設為true,而這邊一樣使用eventBus來接收調用的元件,如果有按下submit之後,會觸發submitted來通知驗證元件,再驗證的部份client端需要自行實做驗證patten,為求方便筆者這邊使用了is.js來幫忙做驗證的部份,對is.js有興趣者可至(http://is.js.org/)參考。
接著來看一下表單的部份如何實做
<template>
  <div class="hello" v-if="viewModel.employee">
    <div>
      <label>name</label>
      <input v-model="viewModel.employee.name">
      <client-validate :column="viewModel.modelStates.employeeModel.name" :model="viewModel.employee.name">
      </client-validate>
    </div>
    <div>
      <label>email</label>
      <input v-model="viewModel.employee.email">
      <client-validate :column="viewModel.modelStates.employeeModel.email" :model="viewModel.employee.email"></client-validate>
    </div>
    <div>
      <label>company name</label>
      <input v-model="viewModel.company.name">
      <client-validate :column="viewModel.modelStates.companyModel.name" :model="viewModel.company.name">
      </client-validate>
    </div>
    <div>
      <label>email</label>
      <input v-model="viewModel.company.address">
      <client-validate :column="viewModel.modelStates.companyModel.address" :model="viewModel.company.address"></client-validate>
    </div>

    <button @click="submit">submit</button>
  </div>
</template>

<script>
import apiService from '../apiService'
import ClientValidate from './ClientValidate.vue'
import bus from '../bus'

export default {
  name: 'Employee',
  components: {
    ClientValidate
  },
  data () {
    return {
      viewModel: {}
    }
  },
  methods: {
    async submit () {
      await apiService.post(this.viewModel)
      bus.$emit('submitted')
    },
    async get () {
      this.viewModel = await apiService.get()
    }
  },
  async mounted () {
    await this.get()
  }
}
</script>

<!-- Add "scoped" attribute to limit CSS to this component only -->
<style scoped>

</style>
當sumit之後去emit了submitted,並且調用ClientValidate,把modelState和input輸入的值丟進clientValidate使用,最後成果如下。
結論
最後想要完成的事情就是把每個欄位的驗證邏輯,都定義在後端,而不是前後端都需要去定義驗證規則,在這部份.net mvc實做的很好,但我們其實也有很多方式可以自行去完成類似的機制,如果有任何更好的想法或做法,再請給予筆者建議哦。
