Angular生命週期是個重要的東西,了解其執行順序,對於日後開發前端程式時。也能更準確地把程式寫在對應的生命週期實作function裡面。
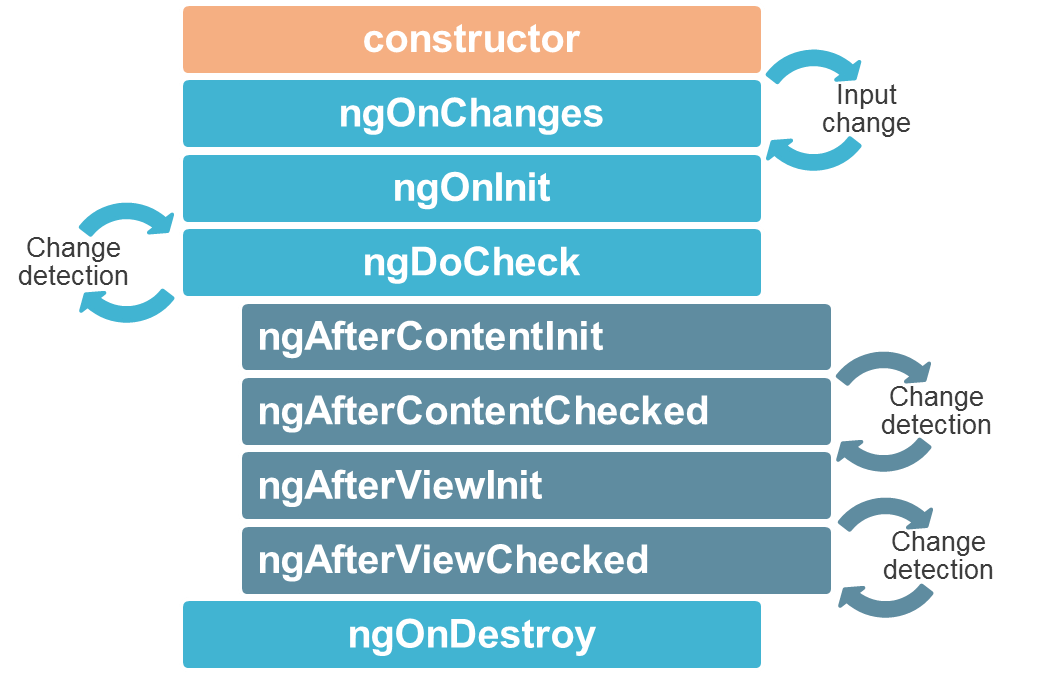
下面是一張常見的Angular Life Cycle流程圖,就用頁籤這個前端功能搭配下面這張圖來解釋一下Angular的生命週期的執行順序。
- 一个运行的 Angular 程序其实是一个组件(元件)树。
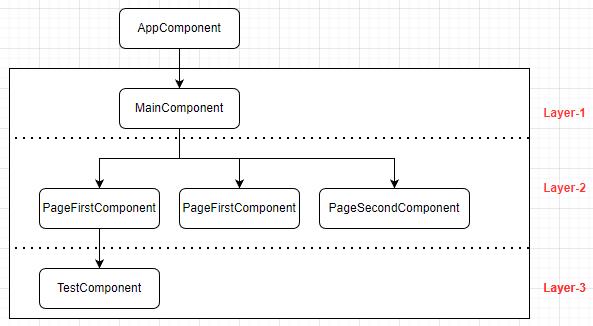
要了解Angular的生命週期必須要先了解其執行的順序,用下面這個簡單的頁籤功能來看的話。路由元件樹大概會長的如下面這樣。

可以看到由四個元件構成的路由元件樹,我們分別在這四個元件裡插個別元件的入Life Cycle Hook實作方法,來看看執行的順序會是怎樣。
- AppComponent
<router-outlet></router-outlet>export class AppComponent implements OnChanges, OnInit, DoCheck, AfterContentInit, AfterViewInit {
constructor(){
console.log('AppComponent.constructor');
}
ngOnChanges(): void {
console.log('AppComponent.ngOnChanges');
}
ngOnInit(): void {
console.log('AppComponent.ngOnInit');
}
ngDoCheck(): void {
console.log('AppComponent.ngDoCheck');
}
ngAfterContentInit(): void {
console.log('AppComponent.ngAfterContentInit');
}
ngAfterViewInit():void{
console.log('AppComponent.ngAfterViewInit');
}
}- MainComponent
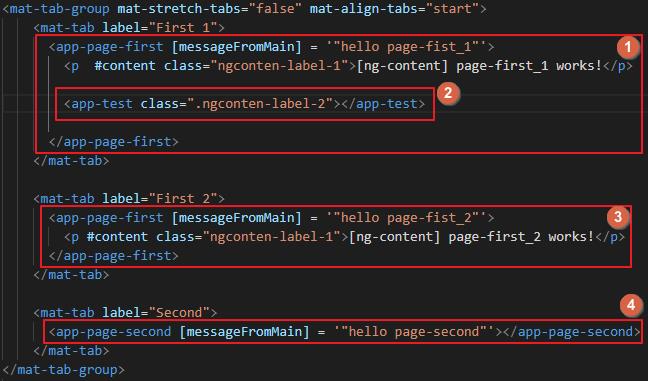
main.component.html則是加上Angular Material套件的MatTabsModule。Angular Material的安裝以及引用的詳細內容這裡就不多做介紹了。
<mat-tab-group mat-stretch-tabs="false" mat-align-tabs="start">
    <mat-tab label="First_1">
      <app-page-first [messageFromMain] = '"hello page-fist_1"'>
        <p  #content class="ngconten-label-1">[ng-content] page-first_1 works!</p>

      </app-page-first>
    </mat-tab>

    <mat-tab label="First_2">
      <app-page-first [messageFromMain] = '"hello page-fist_2"'>
        <p #content class="ngconten-label-1">[ng-content] page-first_2 works!</p>
      </app-page-first>
    </mat-tab>

    <mat-tab label="Second">
      <app-page-second [messageFromMain] = '"hello page-second"'></app-page-second>
    </mat-tab>
</mat-tab-group>
export class MainComponent implements OnChanges, OnInit, DoCheck, AfterContentInit, AfterViewInit {
constructor(){
console.log('MainComponent.constructor');
}
ngOnChanges(): void {
console.log('MainComponent.ngOnChanges');
}
ngOnInit(): void {
console.log('MainComponent.ngOnInit');
}
ngDoCheck(): void {
console.log('MainComponent.ngDoCheck');
}
ngAfterContentInit(): void {
console.log('MainComponent.ngAfterContentInit');
}
ngAfterViewInit():void{
console.log('MainComponent.ngAfterViewInit');
}
}- PageFirstComponent
<p>page-first works!</p>
<span>message from MainComponent:{{messageFromMain}}</span>page-first.component.ts裡面加上一個@Input裝飾器,用來接收父元件(MainComponent)傳過來的字串。
export class PageFirstComponent {

  @Input() messageFromMain: string = '';

  constructor(){
    console.log('PageFirstComponent.constructor');
  }

  ngOnChanges(): void {
    console.log('PageFirstComponent.ngOnChanges');
  }

  ngOnInit(): void {
    console.log('PageFirstComponent.ngOnInit');
  }

  ngDoCheck(): void {
    console.log('PageFirstComponent.ngDoCheck');
  }

  ngAfterContentInit(): void {
    console.log('PageFirstComponent.ngAfterContentInit');
  }

  ngAfterViewInit():void{
    console.log('PageFirstComponent.ngAfterViewInit');
  }

}
- PageSeconComponent
<p>page-second works!</p>
<span>message from MainComponent:{{messageFromMain}}</span>
page-second.component.ts裡面加上一個@Input裝飾器,用來接收父元件(MainComponent)傳過來的字串。
export class PageSecondComponent {

  @Input() messageFromMain: string = '';

  constructor(){
    console.log('PageSecondComponent.constructor');
  }

  ngOnChanges(): void {
    console.log('PageSecondComponent.ngOnChanges');
  }

  ngOnInit(): void {
    console.log('PageSecondComponent.ngOnInit');
  }

  ngDoCheck(): void {
    console.log('PageSecondComponent.ngDoCheck');
  }

  ngAfterContentInit(): void {
    console.log('PageSecondComponent.ngAfterContentInit');
  }

  ngAfterViewInit():void{
    console.log('PageSecondComponent.ngAfterViewInit');
  }
}
需要的元件都準備好之後,我們就來執行Angular專案,看看他們的生命週期順序會怎麼跑(這裡先忽略掉ngDoCheck)。
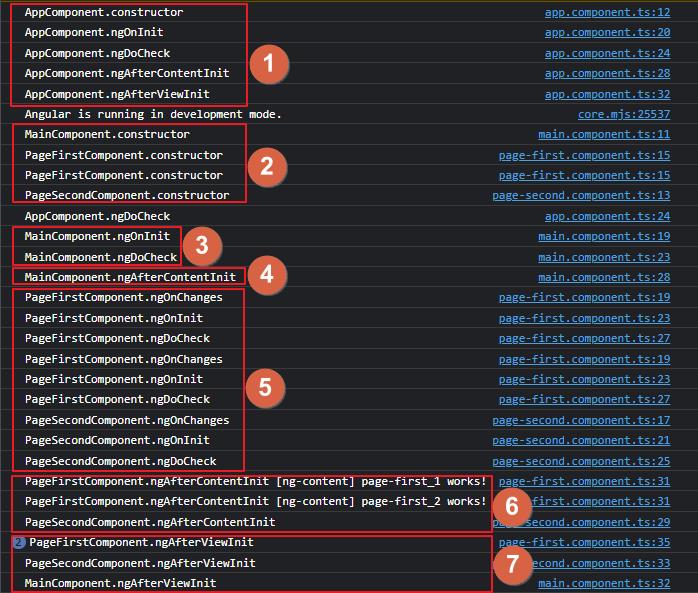
步驟1:可以看到AppComponent雖然不再路由元件樹裡面,但也是一個元件(初始元件),所以也會有自己的元件生命週期。
步驟2:執行元件樹裡面所有元件的constructor。
步驟3:依序執行元件樹Layer-1裡每個元件的ngChanges, ngOnInit, ngDoChecked這三個Hook。要注意的是,如果元件沒有@Input裝飾器的話,是不會執行ngChanges這個Hook的。
步驟4:執行元件樹Layer-1裡每個元件的ngChanges, ngOnInit, ngDoChecked這三個Hook後。開始執行各個元件的ngAfterContentInit Hook,這階段會載入<ng-content>的投影內容,我們也可以在這時候透過@ContentChild()來取得投影內容裡面的元素或是元件…元素或是元件…(@ContentChild應用請參考:[Angular 大師之路] Day 04 - 認識 Angular 的生命週期)
步驟5:依序執行元件樹Layer-2裡每個元件的ngChanges, ngOnInit, ngDoChecked這三個Hook。
步驟6:依序執行完元件樹Layer-2裡每個元件的ngChanges, ngOnInit, ngDoChecked這三個Hook後。開始執行各個元件的ngAfterContentInit Hook。
步驟7:執行元件樹裡所有元件的ngAfterVewInit Hook。到這裡就會Rendor出完整的前端畫面了。
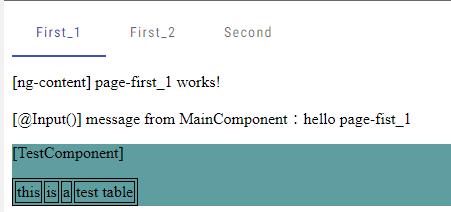
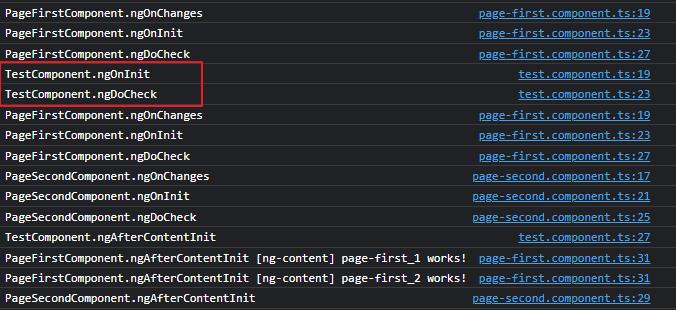
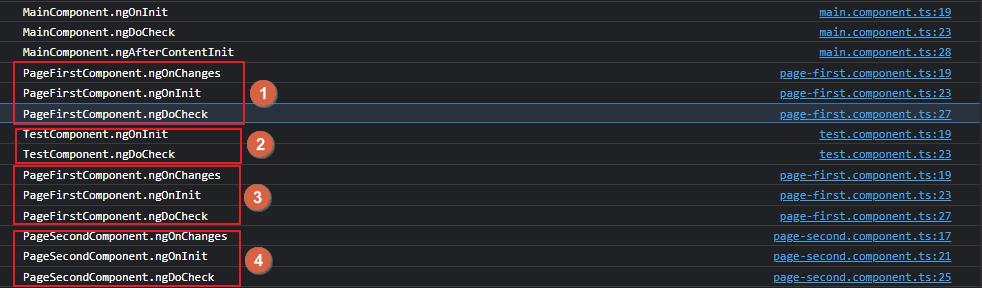
我們這邊再做一個測試,在第一個PageFirstComponent再加上一個下一階層的元件TestComponent。
接著執行Angular專案,再來觀察看看Life Cycle Hook的執行順序會有什麼變化。結果好像跟我們想像的不太一樣,這樣子的話TestComponent就變成是Layer-2的元件了。
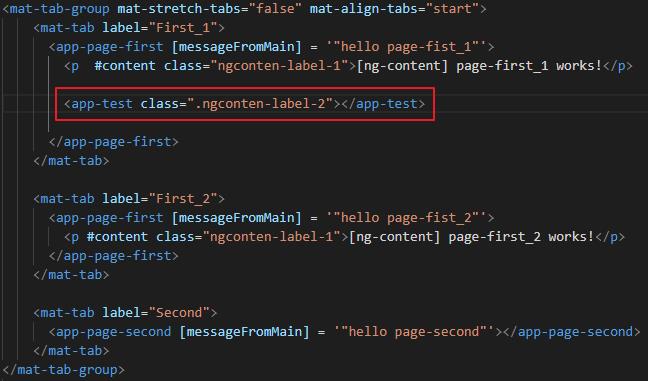
讓我們來看一下前端的程式是怎麼寫的。我們直接把<app-test>插在<app-page-first>的content裡面,並用內容投影的方式,把TestComponent的內容投射在PageFirstComponent上,依照這結果看來,TestComponent是被歸類在元件樹Layer-2裡面。
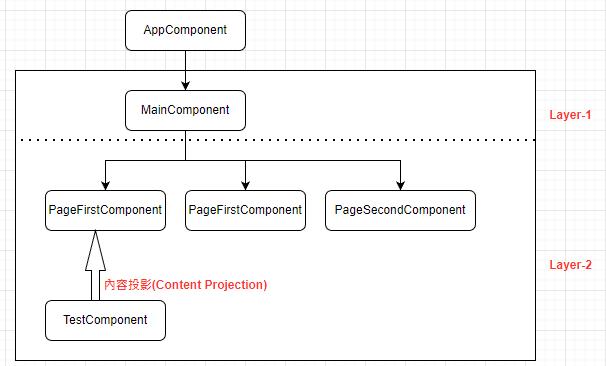
由此可知,只要是在元件的模板裡面有用到的元件標籤(tag),都會被歸類為其子元件
所以再回來看這張圖的Hook流程,好像就說得通了。MainComponent會依序執行子元件的ngChange, ngOnInit, ngChecked這三個Hook
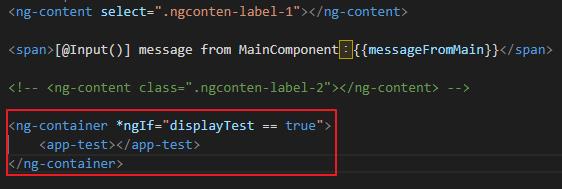
如果要達到下圖的這種架構的話,我們就要把TestComponent的標籤(tag)放在PageFirstComponent的模板裡面。並搭配<ng-container *ngIf>來做顯示的判斷,不然第二個PageFirstComponent也會顯示出TestComponent,這不是我們要的結果。
接著執行Angular專案,看看元件們的Hook執行順序會怎麼跑
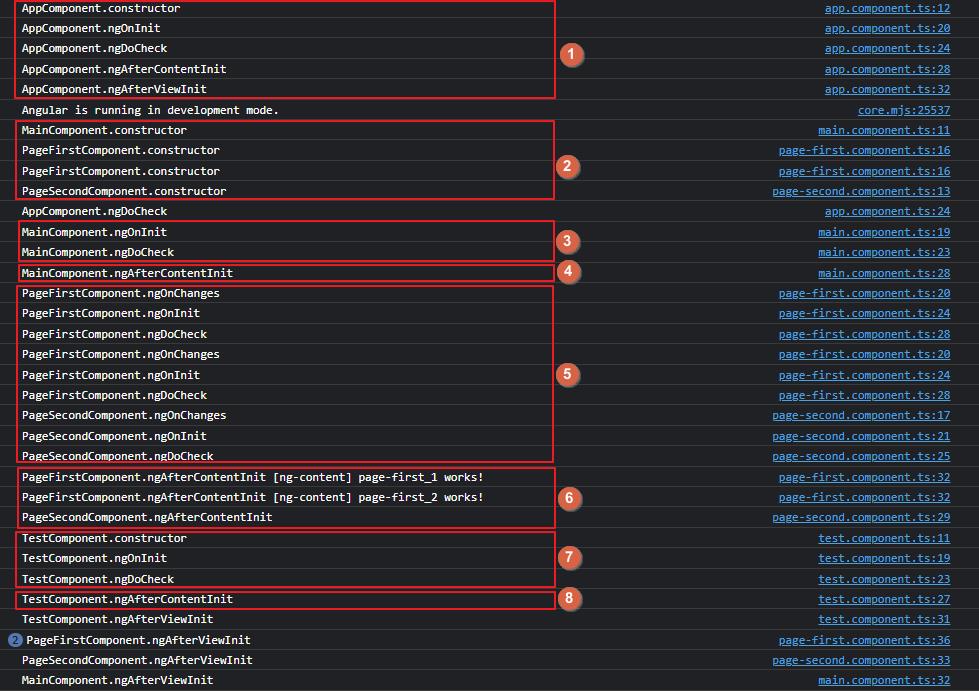
步驟1:可以看到AppComponent雖然不再路由元件樹裡面,但也是一個元件(初始元件),所以也會有自己的元件生命週期。
步驟2:執行元件樹裡面所有元件的constructor,但TestComponent的constructor還不會執行,因為這個元件是透過*ngIf來判斷是否需要顯示,在目前階段還不知道要不要被載入,所以不會有constructor這個Hook。
步驟3:依序執行元件樹Layer-1裡每個元件的ngChanges, ngOnInit, ngDoChecked這三個Hook。要注意的是,如果元件沒有@Input裝飾器的話,是不會執行ngChanges這個Hook的。
步驟4:執行元件樹Layer-1裡每個元件的ngChanges, ngOnInit, ngDoChecked這三個Hook後。開始執行各個元件的ngAfterContentInit Hook,這階段會載入<ng-content>的投影內容,我們也可以在這時候透過@ContentChild()來取得投影內容裡面的元素或是元件…元素或是元件…(@ContentChild應用請參考:[Angular 大師之路] Day 04 - 認識 Angular 的生命週期)
步驟5:依序執行元件樹Layer-2裡每個元件的ngChanges, ngOnInit, ngDoChecked這三個Hook。
步驟6:依序執行完元件樹Layer-2裡每個元件的ngChanges, ngOnInit, ngDoChecked這三個Hook後。開始執行各個元件的ngAfterContentInit Hook。
步驟7.8:執行PageFirstComponent子元件TestComponent的Hook流程
步驟9:執行元件樹裡所有元件的ngAfterVewInit Hook。到這裡就會Rendor出完整的前端畫面了。
- 注意事項
ngOnInit, ngAfterContentInit, ngAfterViewInit都只會執行一次而已
以我們的頁籤範例來說,當畫面Rendor完之後,你把頁籤由First切換到Second時,也不會再執行一次SecondPageComponent的ngOnInit了,因為SecondPageComponent的ngOnInit已經在
畫面Rendor完之前就執行過一次了。
這篇文章花了好久的時間才寫完,內容都是自己測試的結果,有觀念錯誤請提出並糾正我唷,感謝
Ref:
1.[Angular 大師之路] Day 04 - 認識 Angular 的生命週期
2.Day23 【牙起來】 元件執行順序 & 生命週期 - Angular
3.关于 `ExpressionChangedAfterItHasBeenCheckedError` 错误你所需要知道的事情
4.Lifecycle Hooks 學習筆記 (一)
5.[Day 21] 關於 Content Projection