[Android] Google Map(一)–Where am I ?
前幾天曾提及最近有機會玩了一下Android,感覺上還蠻有趣的,不過因為我不熟所以寫的亂七八糟的XD
所以以下是不負責任整理!如果寫錯了還麻煩請指正~
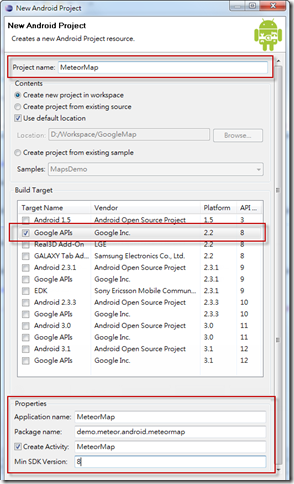
開發環境:
Android 2.2 + Google APIs
AndroidManifest.xml
因為需要用到網路和GPS或網路定位,所以需要允許以下三個權限:INTERNET、ACCESS_FINE_LOCATION、ACCESS_COARSE_LOCATION
另外,Google API有提供特別地圖控制項,所以需要加入library參考:com.google.android.maps
<manifest xmlns:android="http://schemas.android.com/apk/res/android"
	package="demo.meteor.android.meteormap" android:versionCode="1"
	android:versionName="1.0">
	<uses-sdk android:minSdkVersion="8" />
	<!-- 權限設定 -->
	<uses-permission android:name="android.permission.INTERNET"></uses-permission>
	<uses-permission android:name="android.permission.ACCESS_FINE_LOCATION"></uses-permission>
	<uses-permission android:name="android.permission.ACCESS_COARSE_LOCATION"></uses-permission>
	<application android:icon="@drawable/icon" android:label="@string/app_name">
		<!-- Google Map library -->
		<uses-library android:name="com.google.android.maps"></uses-library>
		<activity android:name=".MeteorMap" android:label="@string/app_name">
			<intent-filter>
				<action android:name="android.intent.action.MAIN" />
				<category android:name="android.intent.category.LAUNCHER" />
			</intent-filter>
		</activity>
	</application>
</manifest>
main.xml
於layout的xml中新增地圖控制項:com.google.android.maps.MapView,因為MapView需要使用到apiKey,所以需要先到google去申請一組;開發測試的時候可以直接拿debug.keystore的來產生,發佈的時候要以該專案使用的keystore再去申請一次。測試的debug.keystore預設路徑在:C:\Users\user_name\.android\debug.keystore,先利用keytool產生MD5指紋碼之後,再到Sign Up for the Android Maps API去申請key。
	android:id="@+id/mapView" android:layout_width="fill_parent"
	android:layout_height="fill_parent" android:apiKey="your_map_key"
	android:clickable="true">
</com.google.android.maps.MapView>
另外Activity必須繼承自MapActivity,並在地圖上加上定位點(MyLocationOverlay)以及地圖上顯示縮放的控制項,預設地圖縮放大小為16:
import java.util.List;

import com.google.android.maps.MapActivity;
import com.google.android.maps.MapController;
import com.google.android.maps.MapView;
import com.google.android.maps.MyLocationOverlay;
import com.google.android.maps.Overlay;


import android.os.Bundle;

public class MeteorMap extends MapActivity
{
	private MapView mapView;
	private MapController mapController;
	private MyLocationOverlay mylayer;

	/** Called when the activity is first created. */
	@Override
	public void onCreate(Bundle savedInstanceState)
	{
		super.onCreate(savedInstanceState);
		setContentView(R.layout.main);
		findControl();
	}

	private void findControl()
	{
		mapView = (MapView) findViewById(R.id.mapView);
		mapView.setBuiltInZoomControls(true);

		mapController = mapView.getController();
		mapController.setZoom(16);

		//定位點
		List<Overlay> overlays = mapView.getOverlays();
		mylayer = new MyLocationOverlay(this, mapView);
		//顯示羅盤
		mylayer.enableCompass();
		//啟動更新(如果坐標有變動會跟著移動)
		mylayer.enableMyLocation();
		mylayer.runOnFirstFix(new Runnable()
		{

			public void run()
			{
				mapController.animateTo(mylayer.getMyLocation());
			}
		});
		overlays.add(mylayer);
	}

	@Override
	protected boolean isRouteDisplayed()
	{
		// TODO Auto-generated method stub
		return false;
	}
}
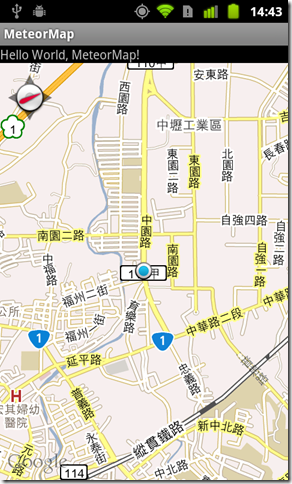
下面那個藍藍一閃一閃的圓圈就是當前位置了。簡單吧?
相關連結:
Dotblogs 的標籤: Android,Google Map

