前一章筆者大致介紹了什麼是ECO,以及基本概念。現在筆者來介紹在實務上的開發通常會怎麼進行,而看到這裡讀者一定覺得奇怪,怎麼突然間變成ECO 6了? 這是因為ECO已經於2011/4/17發表了ECO 6.0的版本,說來慚愧,由於最近筆者工作過於忙碌,事情好多,還來不及發第二篇,ECO 6.0都出來了..XD
前一章筆者大致介紹了什麼是ECO,以及基本概念。現在筆者來介紹在實務上的開發通常會怎麼進行,而看到這裡讀者一定覺得奇怪,怎麼突然間變成ECO 6了? 這是因為ECO已經於2011/4/17發表了ECO 6.0的版本,說來慚愧,由於最近筆者工作過於忙碌,事情好多,還來不及發第二篇,ECO 6.0都出來了..XD。而既然6.0已經推出,且直接支援Visual Studio 2010了,筆者就直接以ECO 6.0來進行接下來的範例解說。
首先我們先來看一下在ECO 6.0又新增了什麼功能:
- Support Visual Studio 2010
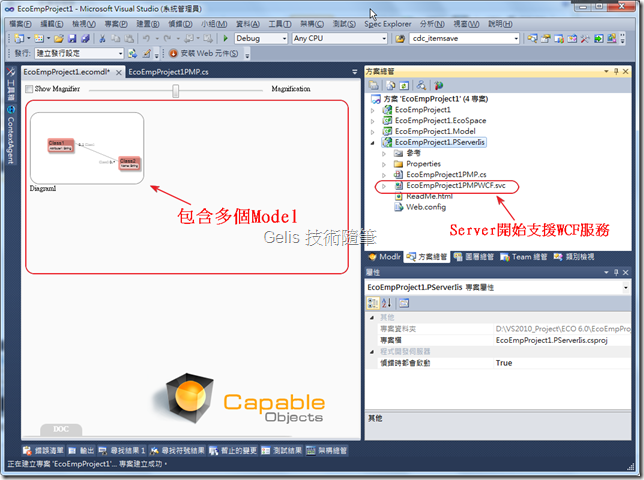
- 開始支援與(Middle-Tier/Server)間以WCF為主要通訊協定,原先ECO 5.0仍只支援.NET Remoting。
- Being declarative when it fits with the Model Driven Framework:在繪製類別圖時提供更強大的ViewModel Editor工具,新增Validation Rule等功能。
- AppComplete – Model for knowledge :在MDA的設計中產出的圖形都是都是溝通重要知識,在AutoComplete下提供更強大文件支援的,在ECO 6.0中AutoComplete為須另外安裝的套件。
由於ECO 6.0並不建議與舊版的ECO 5.0安裝在同一台機器中,在安裝ECO 6.0時會提示您移除掉舊版的ECO,完成ECO 6.0的安裝之後,開啟Visual Studio 2010後在已安裝的範本中即可見到ECO 6.0的範本,如圖一。
圖(一)、新增 ECO 6.0 C# Solution 專案
筆者以這的範本新增一個EcoEmpProject1 專案,主設定精靈的設定參照前篇文章的設定,這裡就不多做說明了,專案建立完成如下畫面會有EcoEmpProject1、EcoEmpProject1.EcoSpace、EcoEmpProject1.Model、EcoEmpProject1.PServerIis 等 四個專案。預設在EcoEmpProject1.Model的專案會有Class1與Class2兩個Model,在Model理設計的的Class為Persistance Layer物件,它有對應到DB的ORM的實作,熟悉Microsoft EDM的朋友可將它看作是EDM的Model物件。
圖(二)、建立 Eco Web Form應用程式
實作前先來探討為什麼要使用ECO ?
其實說穿了ECO並不是什麼特別框架,他也不全然是Design Pattern,它實際上是一種分散式應用平台的一個解決方案,以Model Driven方式設計企業物件,即不需要考慮在Middle-Tier中Model如何傳遞,或用什麼通訊協定傳遞,早期Borland的MIDAS也是一種類似的解決方案,當然類似的解決方案種類非常的多,有些人會自己實作,比如筆者以前任職的公司中就以.NET Remoting 的遠端物件的機制作為主要的通訊方式,Client下載遠端的介面檔案並操作遠端執行的物件,Client並不需要知道遠端物件如何實作,更不需要知道後端是使用什麼資料庫,只需要知道遠端提供什麼樣介面。可以做什麼事情等。
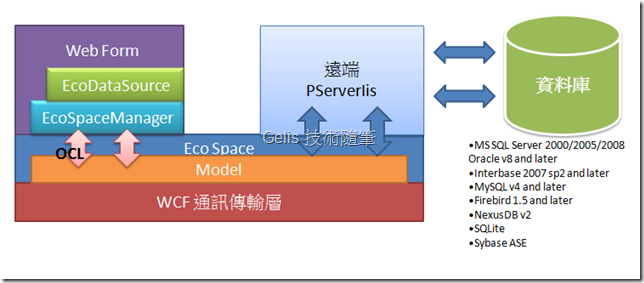
開發這類應用程式,若使用微軟的解決方案,如同使用EDM技術的RIA Service,以WCF作為主要通訊協定,最大的差別是RIA Service以LINQ操作遠端的EDM物件,而ECO使用OCL,而ECO使用Class Diagram來設計Model,可以實作方法,不全然只是資料庫的對應。筆者以下面簡單ECO的運作架構圖來說明。
圖(三)、ECO應用程式運作架構(簡圖) (以WCF作為遠端的服務的Web Form應用程式)
如上圖簡單的說明了ECO網頁應用程式的運作架構,其實EcoDataSource的使用方式如同使用SqlDataSource,只是EcoDataSource是使用OCL來存取遠端的Model,而Model必須放置在EcoSpace中,由EcoSpace來管理。因此網頁應用程式還需要透過EcoSpaceManager來存取(管理)Model。
前面的文章提到,在設計Model的時候可以使用Model專案的EcoEmpProject1.ecomdl來Generate Code,EcoSpace只負責與WCF的通訊部分。若要Generate Database Schema您要使用EcoEmpProject1.PServerIis專案的EcoEmpProject1PMP.cs 設計畫面來產生資料庫的設計。
在開始設計之前您可能必須先ReBuild一下專案,在建立專案之後仍有一些設定需要調整。各位可以依照下面的步驟進行。
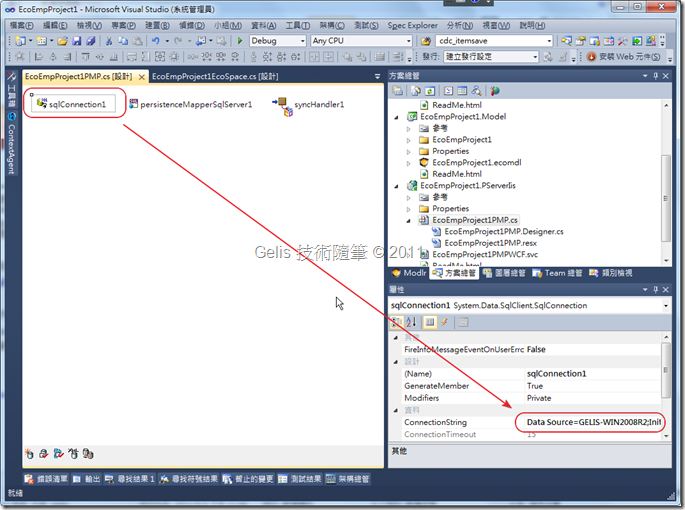
1.設定EcoEmpProject1.PServerIis專案的SqlConnection,設計好的Model也需透過這個連線來Generate Database Schema.
圖(四)、設定資料庫連線
EcoEmpProject1PMP.cs設計畫面中預設會有三個主要元件,缺一不可,元件的說明如下:
A.sqlConnection1
這個就不用說明了,就是主要的資料庫的連線。
B.persistenceMapperSqlServer
此元件會決定資料庫的種類,遠端執行的Persistance Layer物件與實際資料庫欄位的對應關係都必須藉由PersistenceMapper來處理。在Generate Schema時也需要此元件的補助。
C.syncHandler1
當PersistenceMapper接受任何一個來自遠端PersistenceMapperClient的呼叫時,包含了對EcoSpace資料的更新等處理,進行非同步處理的重要元件。由於同時存取遠端PersistenceMapper的PersistenceMapperClient除了Web Form之外也有可能是Win Form應用程式。
前面在B.persistenceMapperSqlServer提到在Generate Schema時需要此元件,這是因為在EcoEmpProject1PMP.cs裡實作了DoGenerateDB()方法,EcoEmpProject1PMP.cs 如下原始程式碼 (紅色部分):
1: namespace EcoEmpProject1
2: {
3: using System;
4: using System.Collections;
5: using System.Collections.Generic;
6: using System.ComponentModel;
7: using Eco.Handles;
8: using Eco.Services;
9: using Eco.Persistence;
10: using Eco.Wcf.Server;
11:
12: public partial class EcoEmpProject1PMP : Eco.Persistence.PersistenceMapperProvider
13: {
14: public EcoEmpProject1PMP() : base()
15: {
16: this.InitializeComponent();
17: }
18:
19: /// <summary>
20: /// Gets the singleton instance of the PersistenceMapperProvider.
21: /// </summary>
22: public static EcoEmpProject1PMP Instance
23: {
24: get
25: {
26: return GetInstance<EcoEmpProject1PMP>();
27: }
28: }
29:
30: /// <summary>
31: /// Regenerates the database schema, no questions asked.
32: /// </summary>
33: public static void GenerateDB()
34: {
35: Instance.DoGenerateDB();
36: }
37:
38: #region EcoSpace type reference
39: static EcoEmpProject1PMP()
40: {
41: // this registration is here to ensure that the
42: // ecospace type is not removed by the optimization in the compiler
43: // if you rename your ecospace, please update this reference too.
44: EcoSpace.RegisterEcoSpaceType(typeof(EcoEmpProject1.EcoEmpProject1EcoSpace));
45: }
46: #endregion
47: #region Eco Managed Code
48: private void DoGenerateDB()
49: {
50: if (PersistenceMapper is PersistenceMapperDb)
51: {
52: (PersistenceMapper as PersistenceMapperDb).CreateDatabaseSchema(GetTypeSystemService(true), new DefaultCleanPsConfig(true));
53: }
54: else
55: {
56: throw new InvalidOperationException("The PersistenceMapper is not a PersistenceMapperDb");
57: }
58: }
59: #endregion
60: }
61:
62: }
2.將EcoEmpProject1EcoSpace.cs 設計畫面中的persistenceMapperClient1改成persistenceMapperWCFClient,非常重要,如果要使用WCF作為主要通訊協定的話。
圖(五)、在EcoSpace中,改用PersistenceMapperWCFClient
接著還有一個非常重要的動作,就是必須將persistenceMapperWCFClient1的Uri屬性連結至正確的WCF服務,也就是EcoEmpProject1.PServerIis專案的EcoEmpProject1PMPWCF.svc服務。而筆者習慣將服務的屬性內容中將其設定為指定通訊Port。通常可以先測試EcoEmpProject1PMPWCF.svc是否可以正常的執行,若可以正常執行,再將網址列複製過來,如下圖。
圖(六)、設定persistenceMapperWCFClient1的Uri屬性
注意:
到這裡設定完成時務必記得ReBuild一下方案檔。
3.開始設計Model
接著就是Model Driven設計重點了,也是ECO比較迷人的地方,類別圖產生程式碼框架,怎麼產生呢?切換到EcoEmpProject1.Model專案的EcoEmpProject1.ecomdl 視覺化設計畫面,筆者將預設的Class1 以及 Class2修改成一個公司與部門員工的對應關係,設計完成如下圖所示。
圖(七)、Model Driven開發之公司與部門員工的對應關係
ECO也提供了類似Together的Modlr – model content 視窗,讓您可以方便的對Model中的Package、Diagrams、ViewModel 進行編輯,如下圖。
圖(八)、Modlr – model content 視窗
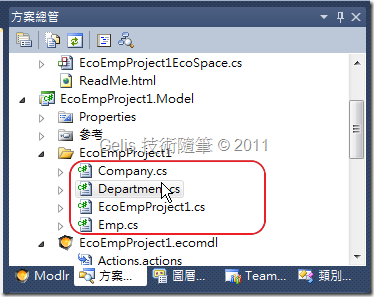
現在也是重頭戲,看看ECO如何產生程式碼框架。初次產生程式碼時請點選設計畫面上方的"Update All Code",因為它會整個重新產生程式碼,可以說是整個打掉重建,之後如果只是更動某些欄位、型態 等等,只要使用"Update Code"即可!另一種方式,也可以使用滑鼠右鍵選單的 Functions –> Generate Code 也可以達到相同的效果。
圖(九)、Generate Code完成後立即產生三個類別
ECO在這裡使用partial 關鍵字來區分客製化的部分與ORM底層實作的部分。筆者就順便介紹ECO的大致上的實作方式,直接打開Department.eco.cs 您可以看見在每一個Persistence Layer的物件一定會有一個宣告為 Eco.ObjectImplementation.IContent 的 eco_Content 物件,說穿了也是使用INotifyPropertyChanged 來告知屬性內容以變更,IContent 就是直接實作INotifyPropertyChanged 介面的,如下程式碼:
1: public interface IContent : INotifyPropertyChanged
2: {
3: IObjectInstance AsIObject();
4: void AssertLoopbackUnassigned();
5: object get_MemberByIndex(int index);
6: void LoopbackValid();
7: void set_MemberByIndex(int index, object value);
8: }
屬性部分當取資料時透過get_MemberByIndex(int index) 來取得,設定資料時則使用set_MemberByIndex(int index, object value) 來設定資料,完整的Department.eco.cs程式碼也不長,筆者就直接列出來,如下:
1: namespace EcoEmpProject1 {
2: using System;
3: using System.Collections;
4: using System.Collections.Generic;
5: using System.ComponentModel;
6: using Eco.Services;
7: using Eco.ObjectRepresentation;
8: using Eco.ObjectImplementation;
9: using Eco.Subscription;
10: using Eco.UmlRt;
11: using Eco.UmlCodeAttributes;
12:
13:
14: [UmlElement(Id="c98d5def-6f9f-4b7b-9ee7-87f6270b2f43")]
15: public partial class Department : Eco.ObjectImplementation.ILoopBack2, System.ComponentModel.INotifyPropertyChanged {
16:
17: #region *** Constructors ***
18:
19: public Department(Eco.ObjectRepresentation.IEcoServiceProvider serviceProvider) {
20: this.Initialize(serviceProvider);
21: try {
22: this.ObjectCreated();
23: }
24: catch (System.Exception ) {
25: this.Deinitialize(serviceProvider);
26: throw;
27: }
28: }
29:
30: // For framework internal use only
31: // Constructor public for one reason only; to avoid need for ReflectionPermission in reduced trust
32: public Department(Eco.ObjectImplementation.IContent content) {
33: this.eco_Content = content;
34: content.AssertLoopbackUnassigned();
35: }
36:
37: /// <summary>This method is called when the object has been created the first time (not when loaded from a db)</summary>
38: partial void ObjectCreated();
39:
40: /// <summary>This method is called before the object is deleted. You can perform custom clean up or prevent the deletion by returning false or throw an exception (preferably EcoObjectDeleteException)</summary>
41: partial void PreDelete(ref System.Boolean canDelete);
42:
43: #endregion *** Constructors ***
44:
45: #region *** ILoopback implementation ***
46:
47: public virtual void set_MemberByIndex(int index, object value) {
48: throw new System.IndexOutOfRangeException();
49: }
50:
51: public virtual object get_MemberByIndex(int index) {
52: throw new System.IndexOutOfRangeException();
53: }
54:
55: Eco.ObjectRepresentation.IObject Eco.ObjectRepresentation.IObjectProvider.AsIObject() {
56: return this.eco_Content.AsIObject();
57: }
58:
59: void Eco.ObjectImplementation.ILoopBack2.SetContent(Eco.ObjectImplementation.IContent content) {
60: if ((this.eco_Content != null)) {
61: throw new System.InvalidOperationException();
62: }
63: this.eco_Content = content;
64: }
65:
66: #endregion *** ILoopback implementation ***
67:
68: #region *** LoopbackIndex declarations ***
69:
70: public class Eco_LoopbackIndices {
71:
72: public const int Eco_FirstMember = 0;
73:
74: public const int DepartType = Eco_FirstMember;
75:
76: public const int Name = (DepartType + 1);
77:
78: public const int Emp = (Name + 1);
79:
80: public const int Company = (Emp + 1);
81:
82: public const int Eco_MemberCount = (Company + 1);
83: }
84:
85: #endregion *** LoopbackIndex declarations ***
86:
87: #region *** IObjectProvider implementation ***
88:
89: public virtual Eco.ObjectRepresentation.IObjectInstance AsIObject() {
90: return this.eco_Content.AsIObject();
91: }
92:
93: #endregion *** IObjectProvider implementation ***
94:
95: #region *** INotifyPropertyChanged implementation ***
96:
97: event PropertyChangedEventHandler INotifyPropertyChanged.PropertyChanged {
98:
99: add { eco_Content.PropertyChanged += value; }
100:
101: remove { eco_Content.PropertyChanged -= value; }
102:
103: }
104:
105: #endregion *** INotifyPropertyChanged implementation ***
106:
107: #region *** ECO framework implementations ***
108:
109: protected Eco.ObjectImplementation.IContent eco_Content;
110:
111: protected virtual void Initialize(Eco.ObjectRepresentation.IEcoServiceProvider serviceProvider) {
112: if ((this.eco_Content == null)) {
113: Eco.ObjectImplementation.IInternalObjectContentFactory factory = serviceProvider.GetEcoService<Eco.ObjectImplementation.IInternalObjectContentFactory>();
114: factory.CreateContent(this);
115: this.eco_Content.LoopbackValid();
116: }
117: }
118:
119: protected virtual void Deinitialize(Eco.ObjectRepresentation.IEcoServiceProvider serviceProvider) {
120: if ((this.eco_Content == null)) {
121: Eco.ObjectImplementation.IInternalObjectContentFactory factory = serviceProvider.GetEcoService<Eco.ObjectImplementation.IInternalObjectContentFactory>();
122: factory.CreateContentFailed(this.eco_Content, this);
123: this.eco_Content = null;
124: }
125: }
126:
127: #endregion *** ECO framework implementations ***
128:
129: [UmlElement(Id="3bd1c375-d973-40c6-ac5e-f4b93dc822b6", Index=Eco_LoopbackIndices.DepartType)]
130: public short DepartType {
131: get {
132: return ((short)(this.eco_Content.get_MemberByIndex(Eco_LoopbackIndices.DepartType)));
133: }
134: set {
135: this.eco_Content.set_MemberByIndex(Eco_LoopbackIndices.DepartType, ((object)(value)));
136: }
137: }
138:
139: [UmlElement(Id="cff5ff4f-3654-4539-b2e7-7c2d9c41f75b", Index=Eco_LoopbackIndices.Name)]
140: public string Name {
141: get {
142: return ((string)(this.eco_Content.get_MemberByIndex(Eco_LoopbackIndices.Name)));
143: }
144: set {
145: this.eco_Content.set_MemberByIndex(Eco_LoopbackIndices.Name, ((object)(value)));
146: }
147: }
148:
149: [UmlElement("AssociationEnd", Id="5978e7b7-3041-4976-8cf3-0d7b7d71d019", Index=Eco_LoopbackIndices.Emp)]
150: [UmlMetaAttribute("association", typeof(EcoEmpProject1Package.EmpEmpDepartmentDepartment), Index=0)]
151: [UmlMetaAttribute("multiplicity", "0..1")]
152: public Emp Emp {
153: get {
154: return ((Emp)(this.eco_Content.get_MemberByIndex(Eco_LoopbackIndices.Emp)));
155: }
156: set {
157: this.eco_Content.set_MemberByIndex(Eco_LoopbackIndices.Emp, ((object)(value)));
158: }
159: }
160:
161: [UmlElement("AssociationEnd", Id="61590530-4bcf-45c7-993d-a3ebdcffaf15", Index=Eco_LoopbackIndices.Company)]
162: [UmlMetaAttribute("association", typeof(EcoEmpProject1Package.CompanyCompanyDepartmentDepartment), Index=0)]
163: [UmlMetaAttribute("multiplicity", "1")]
164: public Company Company {
165: get {
166: return ((Company)(this.eco_Content.get_MemberByIndex(Eco_LoopbackIndices.Company)));
167: }
168: set {
169: this.eco_Content.set_MemberByIndex(Eco_LoopbackIndices.Company, ((object)(value)));
170: }
171: }
172: }
173: }
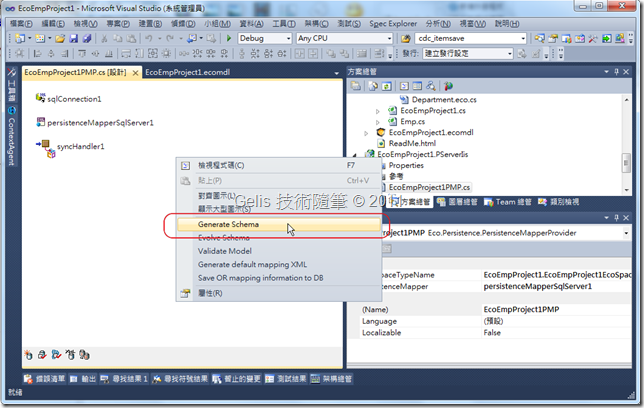
4.也是另一個重頭戲 (Generate Schema) 以類別圖自動產生資料庫設計 ER-Model
請直接在EcoEmpProject1PMP.cs的設計畫面中按下滑鼠右鍵,選擇 Generate Schema,如下圖(八)
圖(十)、Generate Schema
接著會出現如下對話框,共有三個Tab,Optionally Delete (選擇性刪除,不影響目前Table的建立)、Required drop/recresste (同名稱,必須刪除重新建立的Table)、New Table (全新的Table,目前資料庫中所沒有的),如下圖,這一次ECO共會幫我們建立8個Table,為什麼是8個呢,當中的參照有機會筆者再為各位介紹。
圖(十一)、Generate Schema對話框
如下,開啟SQL Server Management Studio即見到剛才ECO幫我們建立的Schema。
圖(十二)、在資料庫EcoEmp中以建立的Schema
這時應用程式其實已經可以執行,只是還不能夠新增資料,請切換到UI的EcoEmpProject1專案,有一個AutoForm.aspx,只要透過ECO 的AutoForm便可以幫我們呈現出Model的全貌,只要加入簡單的幾行程式碼,即可做出新增、修改、刪除 的應用程式。而什麼是AutoForm呢? 其實是一種UI的自動化,結合ViewModel與參考的EcoSpace就可以知道整個Model的情況,呈現Model的資料。如下是執行AutoForm的主畫面。
圖(十三)、AutoForm的主畫面
圖(十四)、點選Company的AutoForm執行畫面
不過當然,不是一定要使用AutoForm,您也可以建立自己的UI,透過EcoDataSource物件存取資料,如同使用SqlDataSource一般。這個就留給下一次吧!不然寫不完了。
參考資料:
http://theblog.capableobjects.com/
範例程式下載:
簽名:
學習是一趟奇妙的旅程
這當中,有辛苦、有心酸、也有成果。有時也會有瓶頸。要能夠繼續勇往直前就必須保有一顆最熱誠的心。
軟體開發之路(FB 社團):https://www.facebook.com/groups/361804473860062/
Gelis 程式設計訓練營(粉絲團):https://www.facebook.com/gelis.dev.learning/
如果文章對您有用,幫我點一下讚,或是點一下『我要推薦』,這會讓我更有動力的為各位讀者撰寫下一篇文章。
非常謝謝各位的支持與愛護,小弟在此位各位說聲謝謝!!! ^_^

