Windows Server 2012 (Hyper-V 3) 好文分享之Introduction to IIS 8
這標示怎樣在IIS8建立憑證的HTTPS網站,若想實際操作可以參考以下連結。
Windows Server 2012 Virtual Labs:Introduction to IIS 8
環境介紹:
Exercise 1: Install and Configure the Web Server (IIS) Role
首先就是安裝兩台的IIS,除了預設套件外,還會會安裝entralized SSL Certificate Support、IP and Domain Restrictions和Management Service,以下只會示範安裝web1,web2依此安裝。
![]() Install and configure IIS 8
Install and configure IIS 8
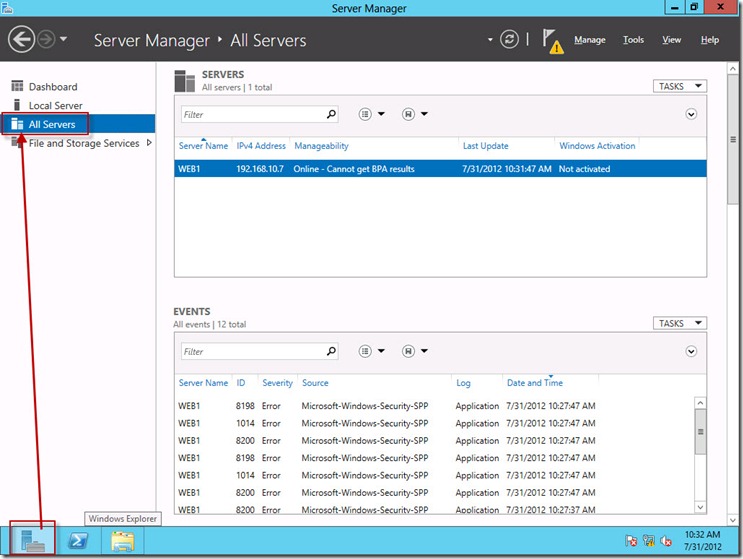
首先登入到web1主機,先將web2加入到web1,開啟Server Manager,然後點選【All Servers】。
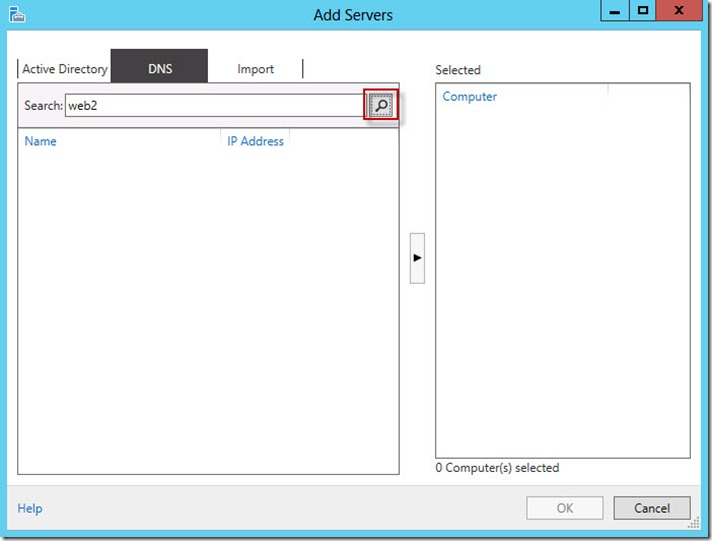
Add Servers視窗的DNS,Search輸入web2名稱,然後搜尋。
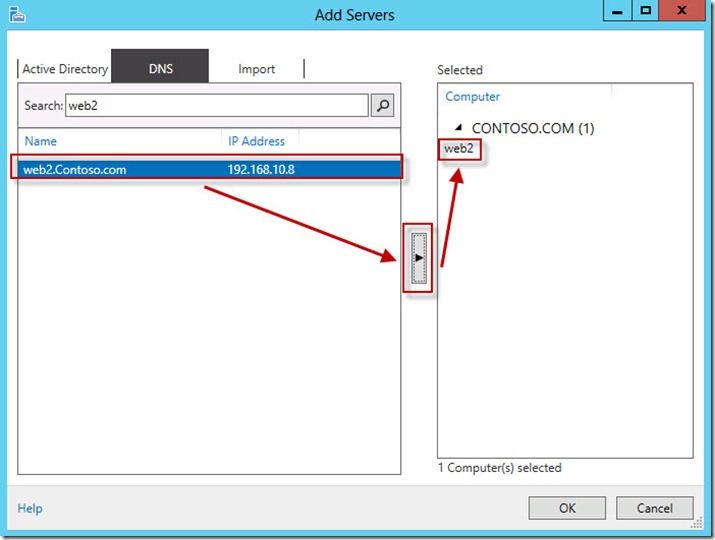
搜尋web2出來後,那就點選【>】,這樣就會加入,按【OK】。
web1的Server Manager內,All Servers就會看到web2主機。
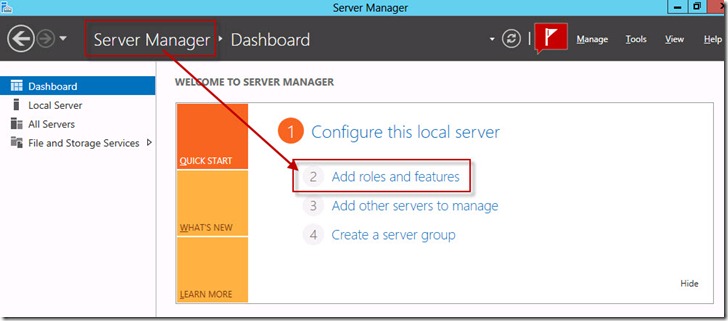
接下來就是新增web1和web2的IIS角色,這裡只示範web1安裝,那web2依此步驟安裝,Server Manager點選【Add roles and features】。
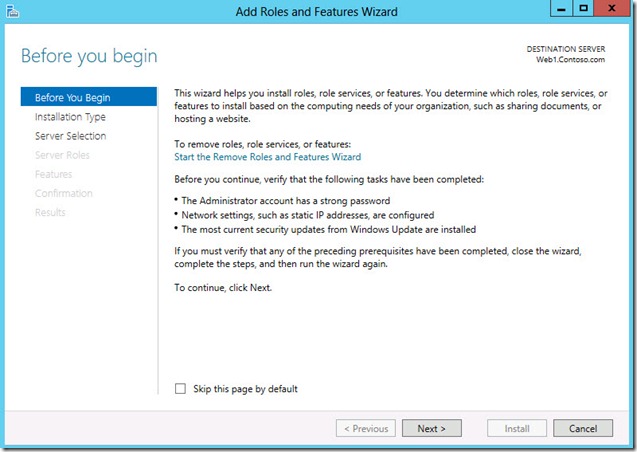
Add Roles and Features視窗,按【Next】。
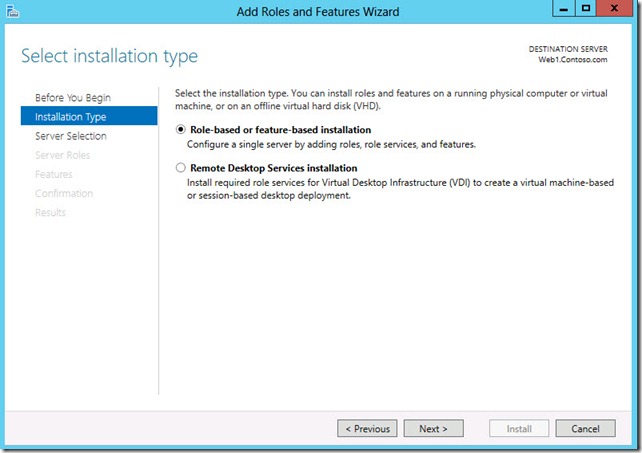
installation Type部分,按【Next】。
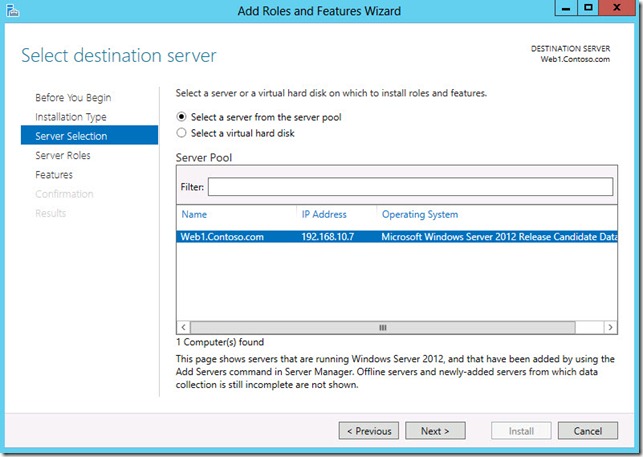
Server Selection部分,按【Next】。
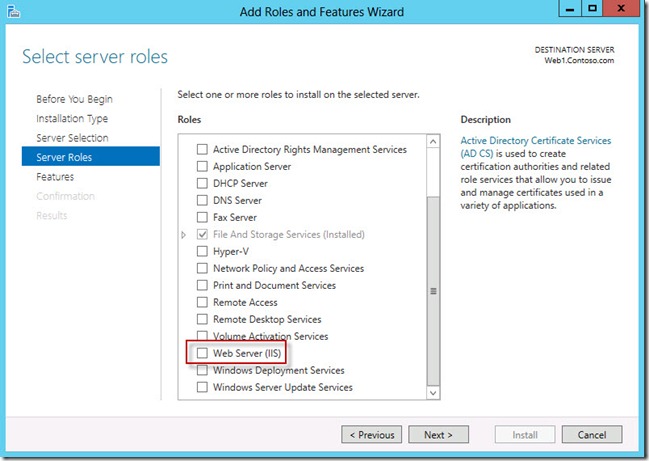
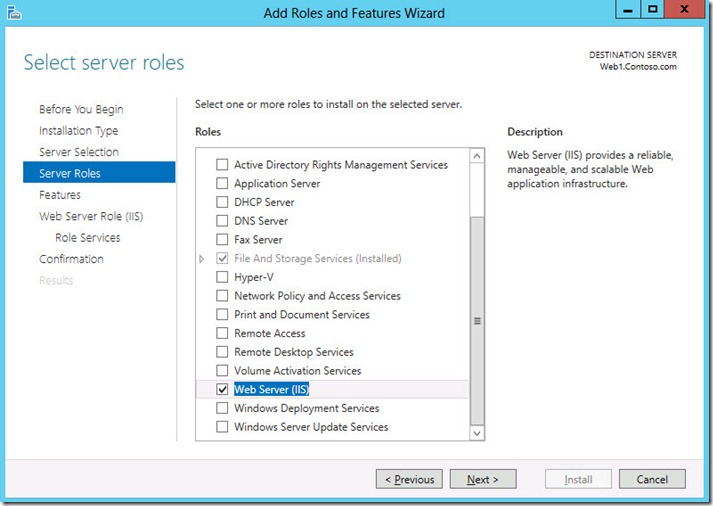
Server Roles部分,勾選【Web Server (IIS)】。
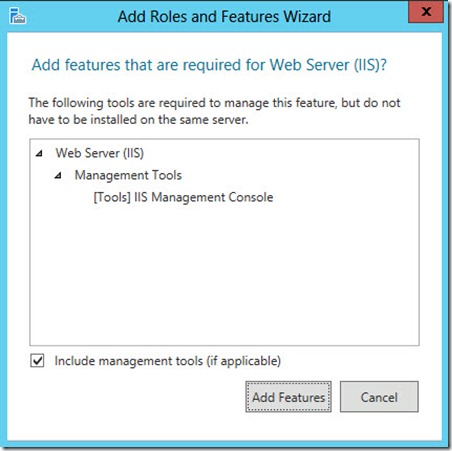
然後出現Add Features that are required for Web Server(IIS),按【Add Features】。
回到Server Roles,按【Next】。
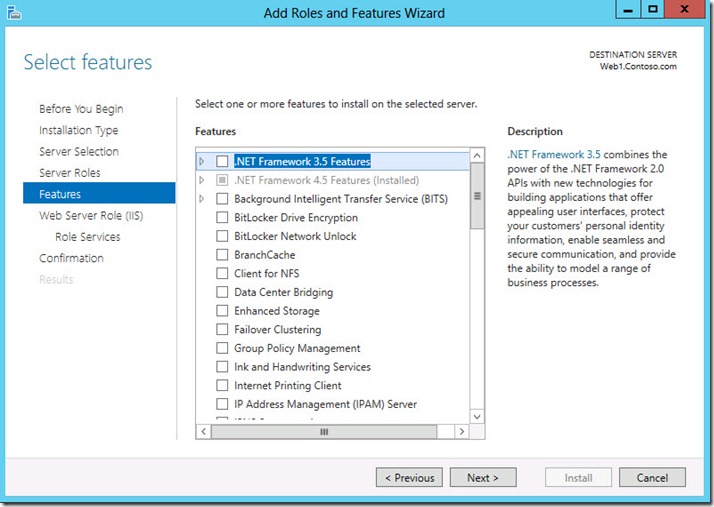
Features部分,按【Next】。
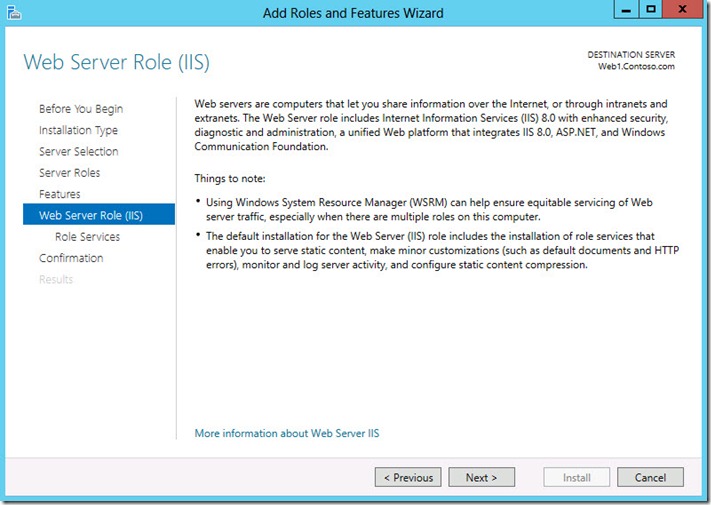
Web Server Role (IIS),按【Next】。
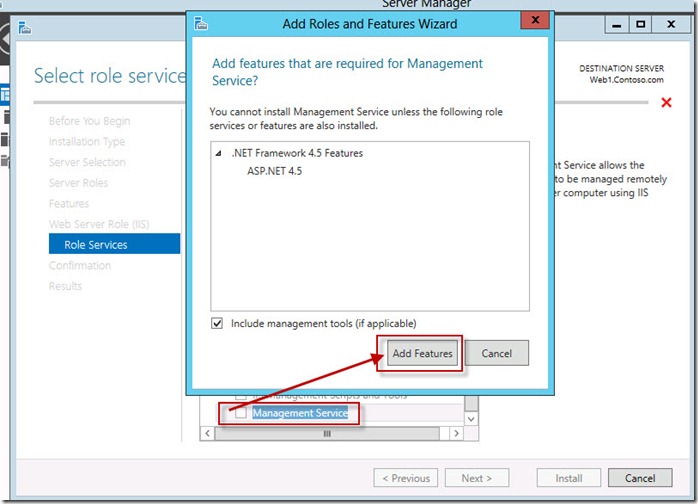
Role Services勾選Management的【Management Service】,然後按【Add Features】。
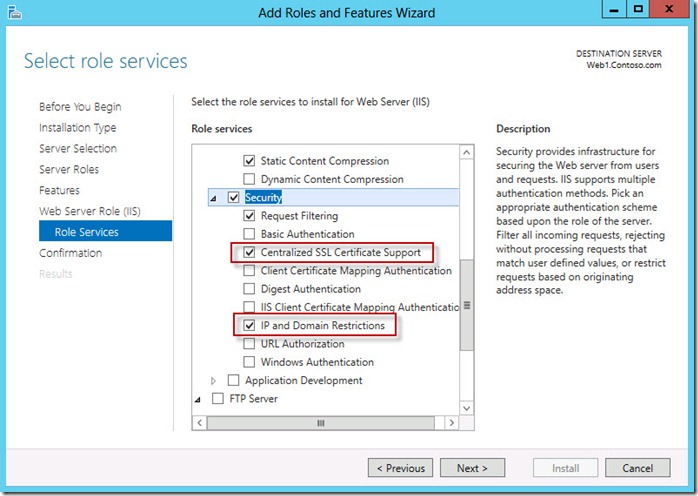
Security部分勾選【Centralized SSL Certificate Support】和【IP and Domain Restrictions】,勾選完成後,按【Next】。
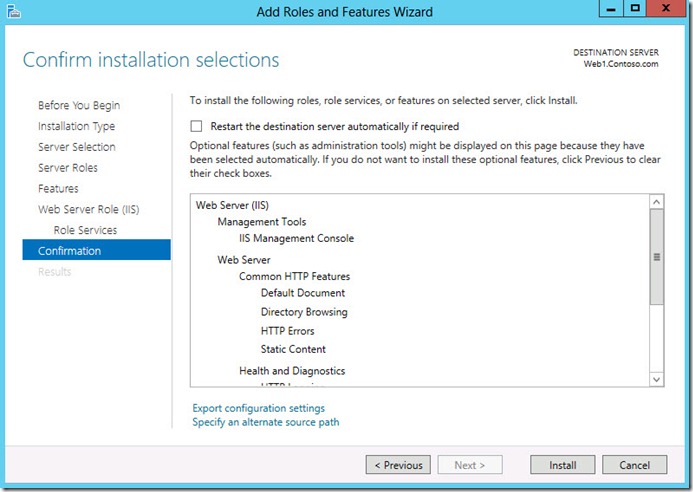
一切就緒後,按【Install】,開始安裝IIS 8。
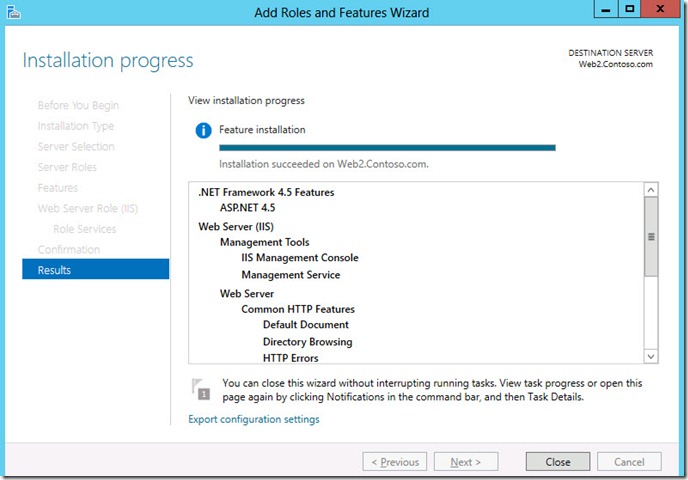
IIS 8安裝完成,按【Close】。
Exercise 2: Configure Dynamic IP Access Restrictions
![]() Configure Dynamic IP Address Restrictions
Configure Dynamic IP Address Restrictions
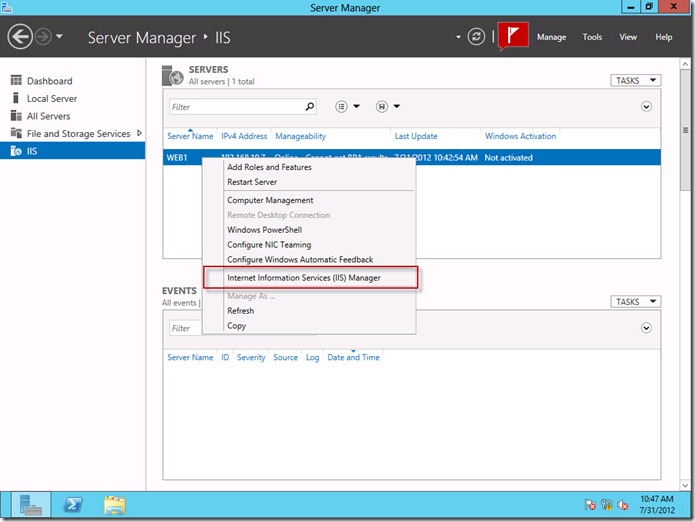
Web1的Server Manager點選IIS,選取WEB1按右鍵選單點選【Internet Information Services (IIS) Manager】。
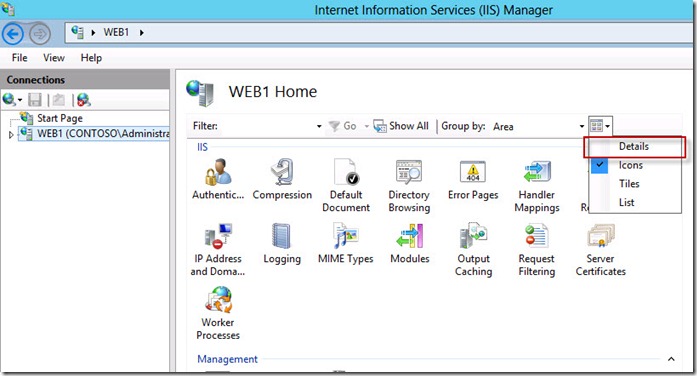
Internet Information Services (IIS) Manager點選WEB1,然後檢視方式選擇【Details】,這樣才可以看到更多功能。
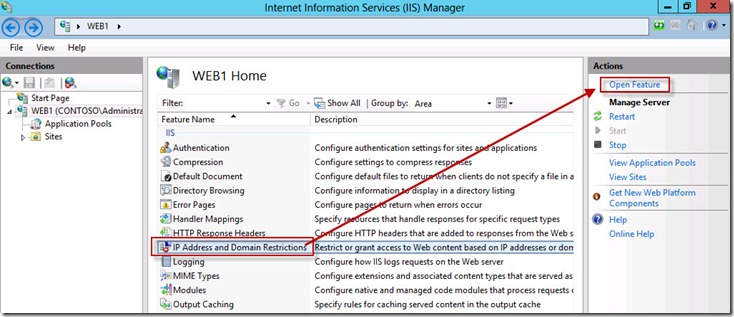
點選【IP Address and Domain Restrictions】,可以點擊兩下,或是點選【Open Feature】,一樣可以開啟。
IP Address and Domain Restrictions點選【Edit Dynamic Restriction Settings】。
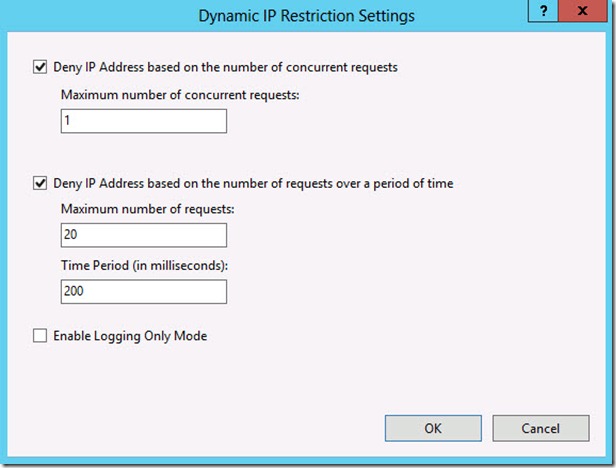
Dynamic IP Restriction Settings視窗,勾選【Deny IP Address based on the number of concurrent requests】,然後將Maximum number of concurrent requests設為【1】,再勾選【Deny IP Address based on the number of requests over a period of time】,然後按【OK】。
再點選【Edit Feature Settings】。
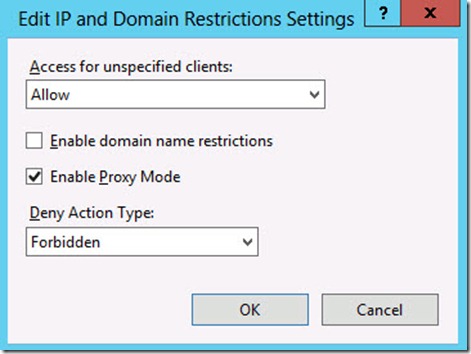
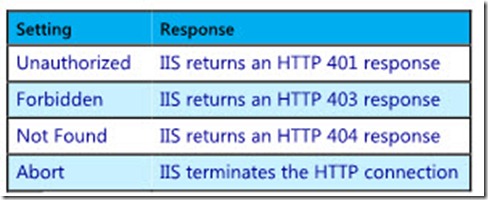
Edit IP and Domain Restriction Settings在Deny Action Type選擇為【Forbidden】,每個Type都有不同的意思,可以參考下表,最後勾選【Enable Proxy Mode】,按【OK】。
![]() Deny Action Type不同類型的解釋。
Deny Action Type不同類型的解釋。
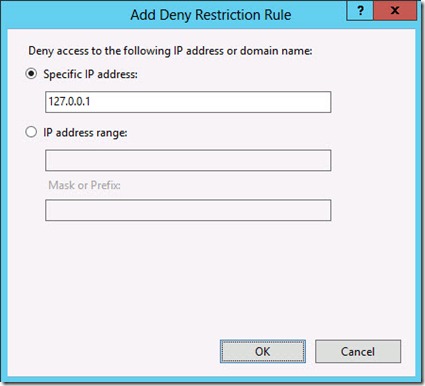
以下操作你可以選擇是否要操作,這只是筆者的一點小測試示範,這樣可以讓你更了解Deny Action Type作用,點選【Add Deny Entry】。
Add Deny Restriction Rule選擇Specific IP address,設定127.0.0.1本機IP不可以連線,按【OK】。
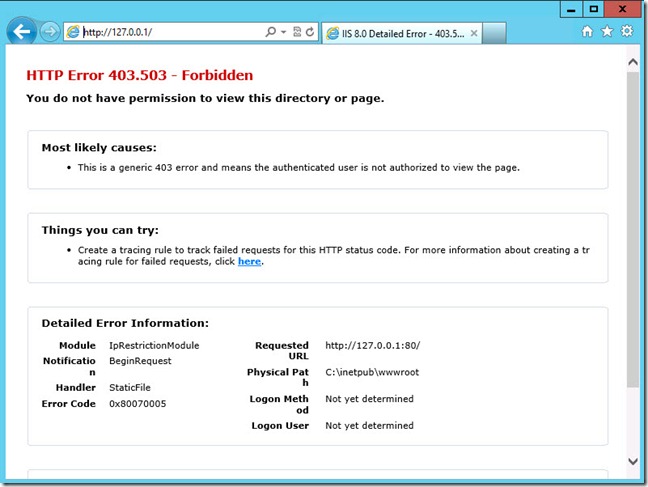
如下圖所示,那本機就不可以連線。
開啟瀏覽器測試看看,如下圖所示。
Exercise 3: Create an SSL Certificate
建立web1和web2的憑證。
![]() Create a self-signed certificate
Create a self-signed certificate
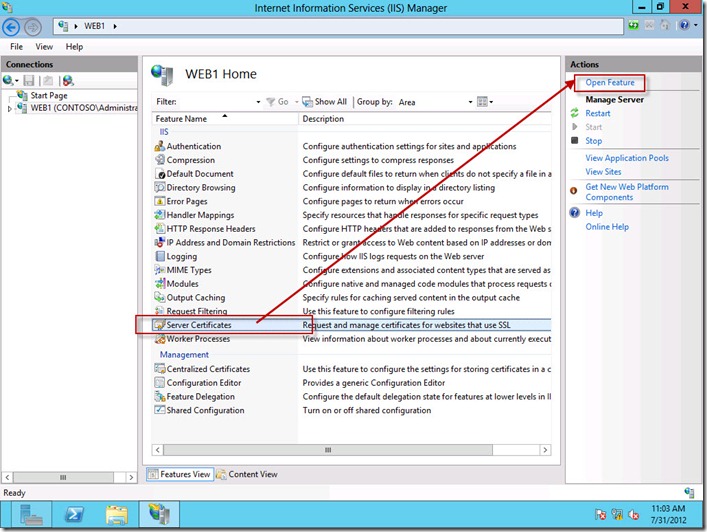
在web1點選Server Certificates,然後點擊兩下或是按【Open Feature】。
Server Certificates視窗點選【Create Self-Signed Certificate】。
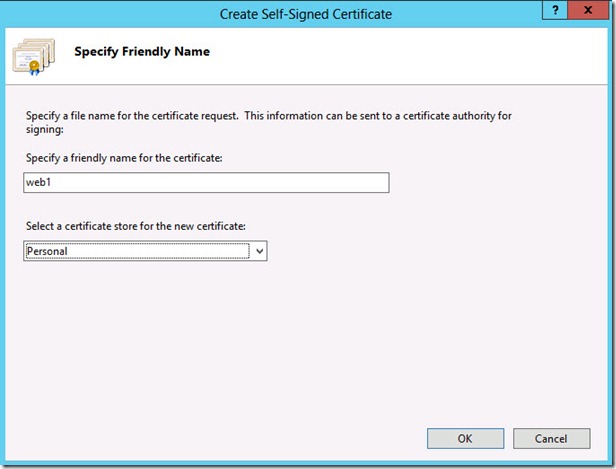
Specify a friendly name for the certificate輸入【web1】,Select a certificate store for the new certificate選擇【Personal】,按【OK】。
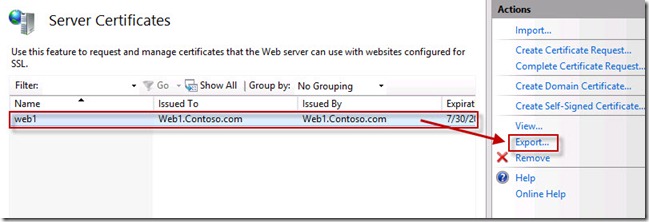
然後將web1憑證匯出,按【Export】。
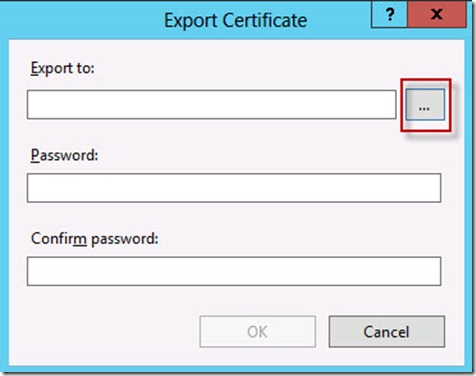
Export Certificate開啟憑證匯出資料夾。
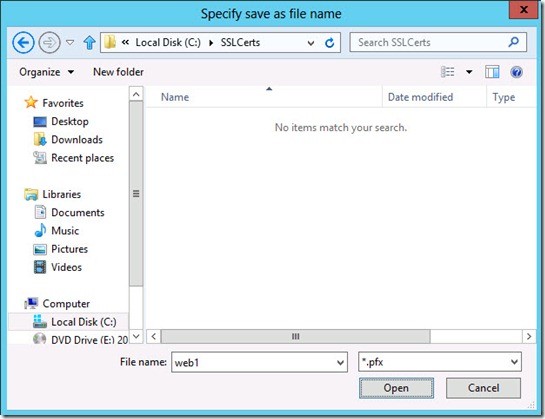
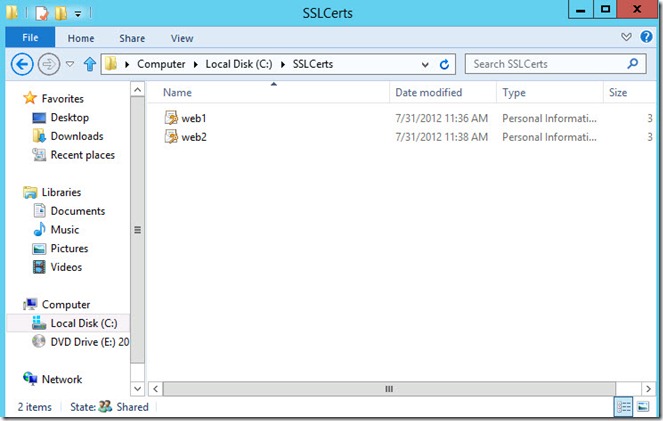
預設IIS會有一個憑證分享資料夾C:\SSLCerts,然後輸入匯出憑證的名稱web1,然後按【Open】。
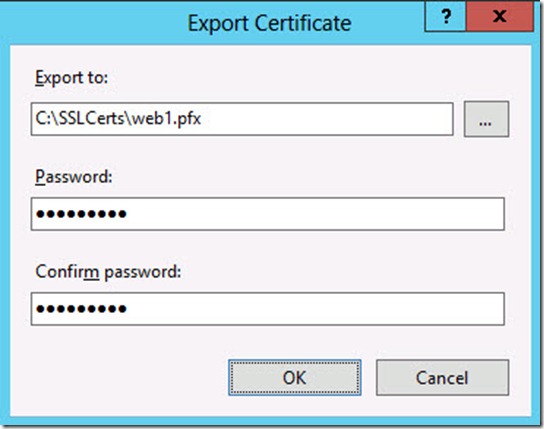
輸入兩次密碼後,按【OK】,預設輸入的密碼是Passw0rd!。
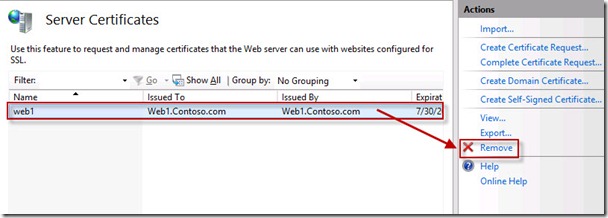
憑證匯出後,那就可以移除,按【Remove】。
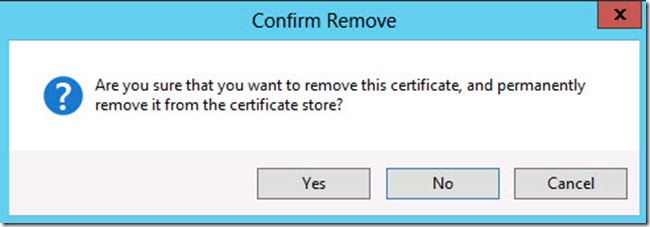
IIS就會詢問你是否確定要刪除,按【Yes】。
你就會看到裡面沒有任何的憑證,web2步驟也是依此操作,不過憑證匯出要放到web2的SSLCerts分享資料夾內。
Exercise 4: Configure Centralized SSL Certificate Management
![]() Configure centralized SSL certificate management
Configure centralized SSL certificate management
在web1主機上,C:\SSLCerts會有web1.pfx和web2.pfx兩個憑證。
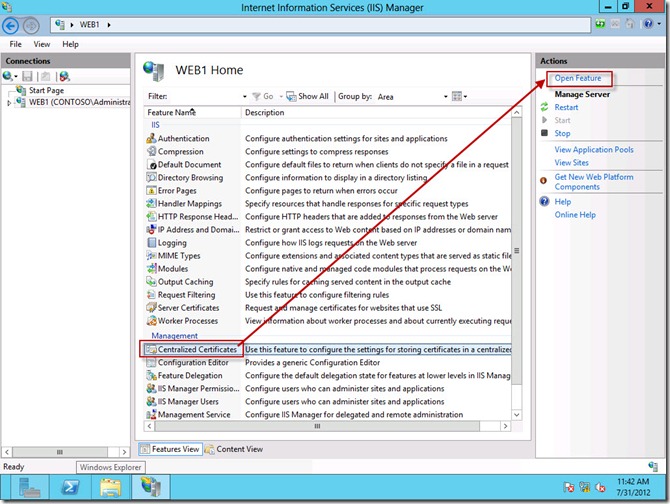
Internet Information Services (IIS) Manager點選Centralized Certificates,點擊兩下或是按【Open Feature】。
Centralized Certificates視窗按【Edit Feature Settings】。
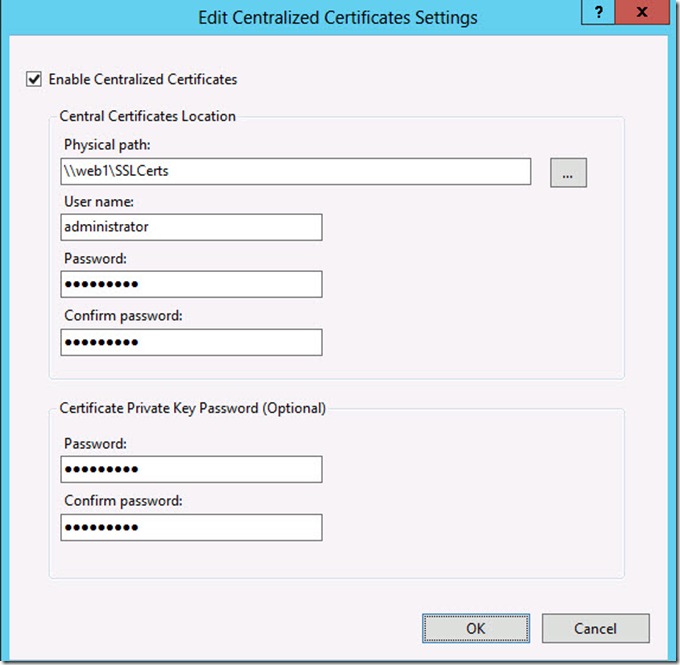
Edit Centralized Certificates Settings勾選【Enable Centralized Certificates】,然後Physical path輸入【\\web1\SSLcerts】,接下來輸入帳號administrator,密碼輸入【Passw0rd!】,若是web1你有修改過administrator密碼的話,那你就要照擬修改過的密碼輸入,Certificate Private Key Password則是輸入前面建立憑證時所輸入的密碼,否則會失敗,輸入完畢後,按【OK】。
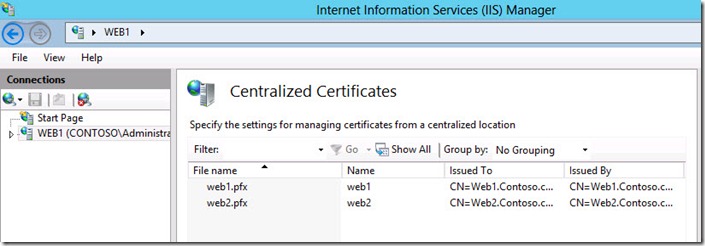
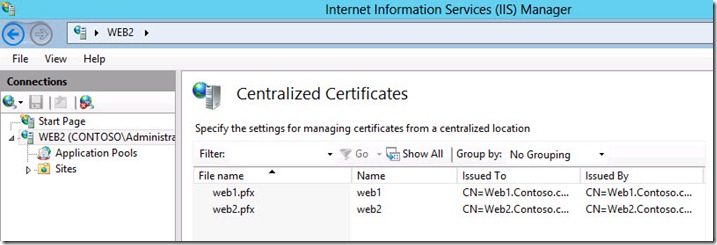
那Centralized Certificates就可以看到web1.pfx和web2.pfx兩個憑證,那也是C:\SSLCerts內的憑證。
web2也是依此操作,在Edit Centralized Certificates Settings的Physical也是輸入\\web1\SSLcerts.。
Exercise 5: Create a Secure Website
這裡是建立web1和web2的站台。
![]() Create a secure web site in IIS 8
Create a secure web site in IIS 8
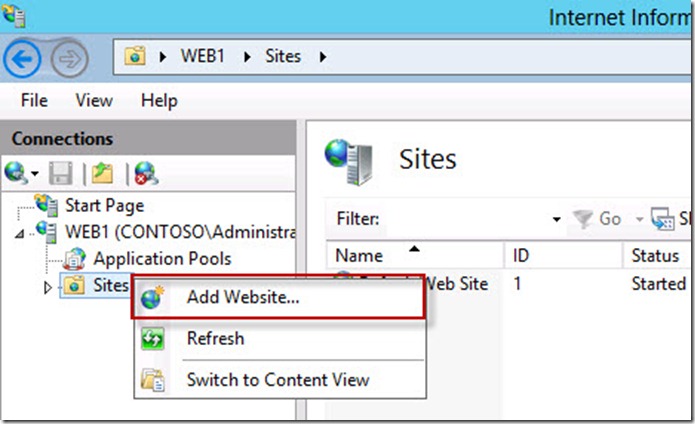
在web1的Internet Information Services (IIS) Manager,Sites按右鍵選單,點選【Add Website】。
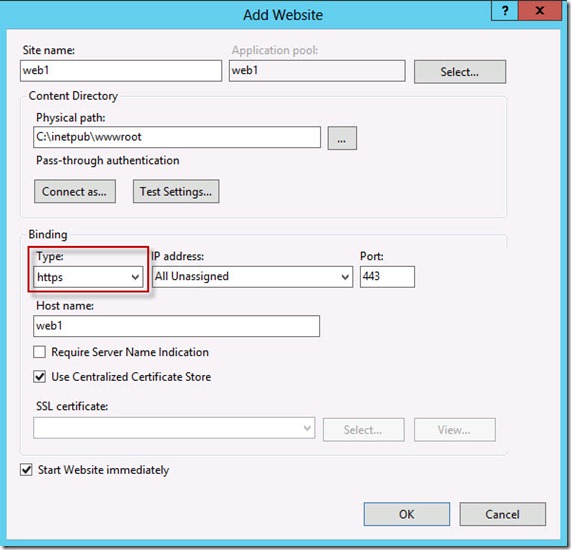
Add Website視窗,Site name名稱輸入web1,Physical path設定網站路徑為【c:\inetpub\wwwroot】,Binding的Type選擇【https】,Host name名稱輸入web1,然後勾選【Use Centralized Certificate Store】,按【OK】。
如下圖所示,就會看到剛剛建立好的web1的網站。
web2依web1步驟設定,只是名稱改成web2。
Exercise 6: Test the Secure Websites
![]() Test a secure website in IIS 8
Test a secure website in IIS 8
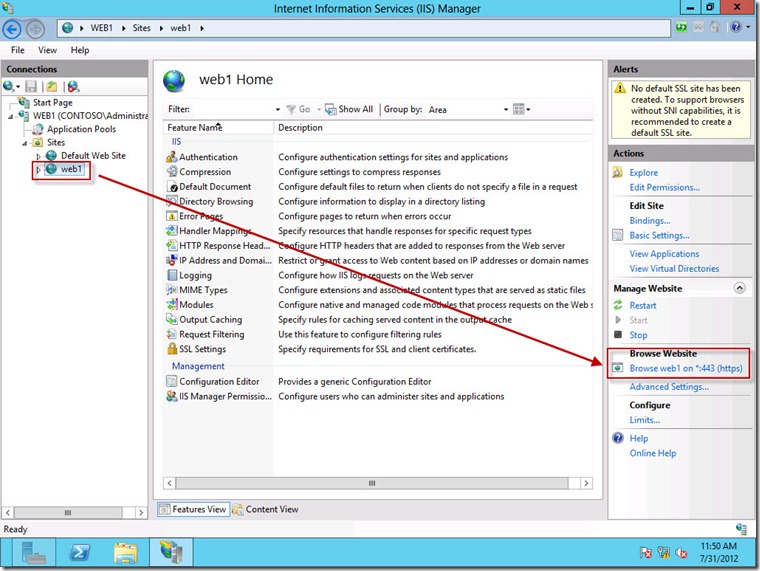
web1的Internet Information Services (IIS) Manager內,點選web1,然後在Browse Website按【Browse web1 on *:443 (https)】。
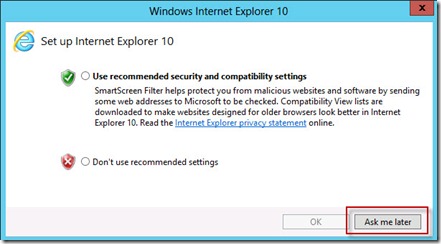
IE10會出現一個視窗,按【Ask Me Later】。
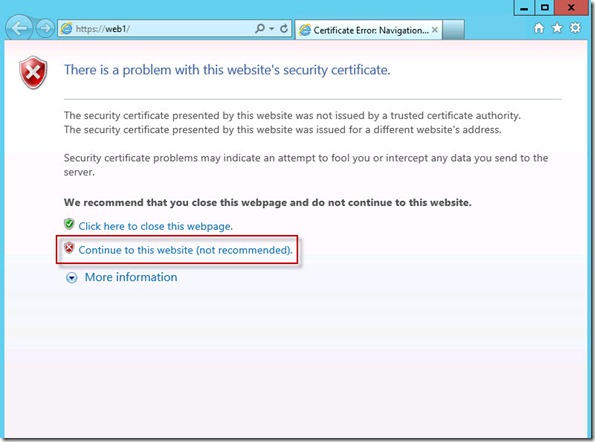
然後會出現憑證的訊問,點選【Continue to this website (not recommended)】。
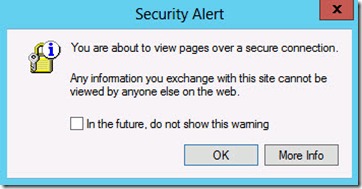
Security Alert視窗按【OK】。
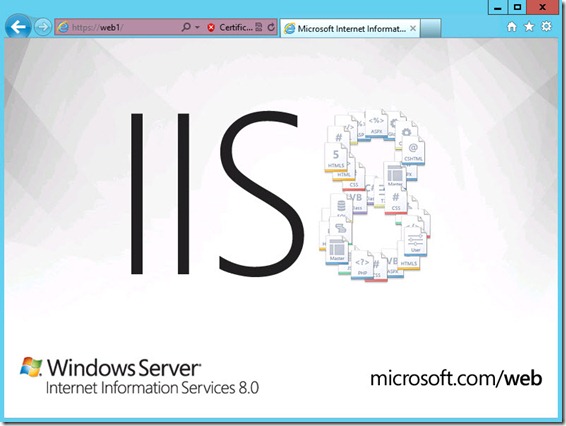
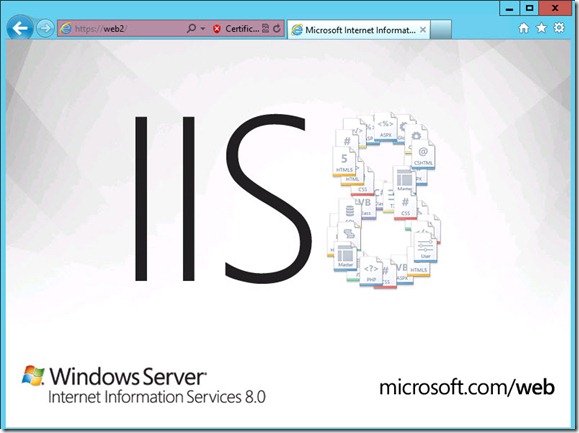
瀏覽器就可以看到https的IIS8首頁。
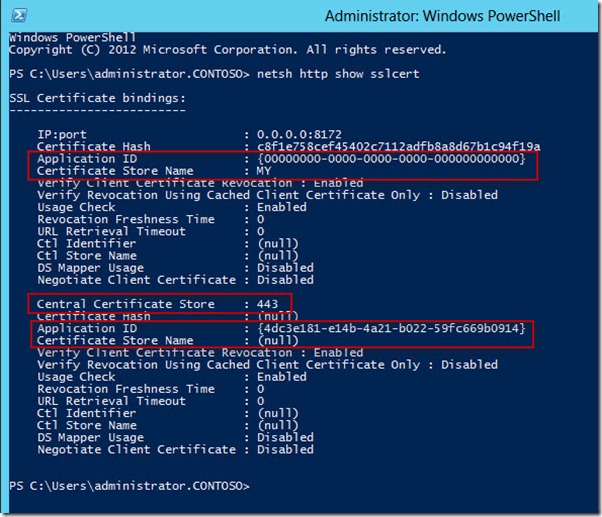
你也可以使用PowerShell來檢視IIS8的相關資訊,開啟PowerShell。
【Netsh http show sslcert】
web2也是依web1方式可以開啟IIS8首頁。
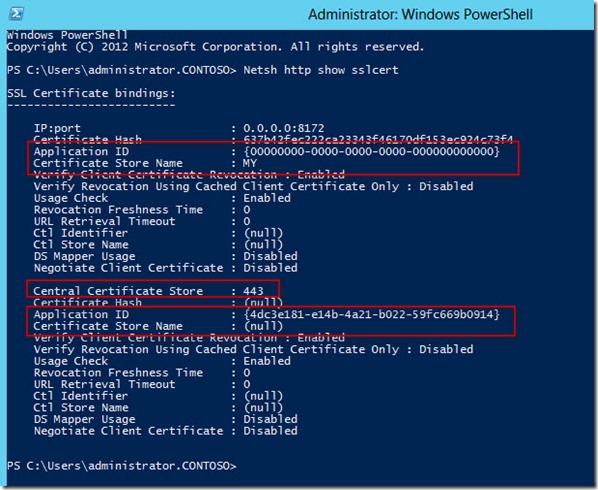
使用PowerShell也可以檢視web2的IIS8相關資訊。
【Netsh http show sslcert】
Exercise 7: Configure CPU Throttling
這個IIS8對於CPU的一些調整。
![]() Configure CPU Throttling
Configure CPU Throttling
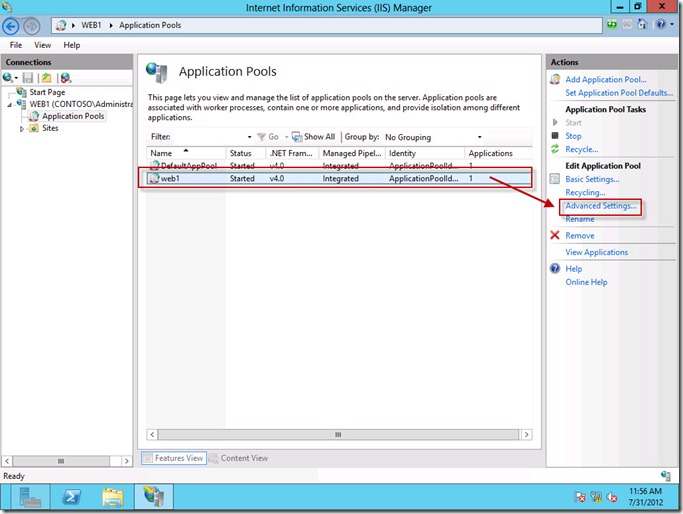
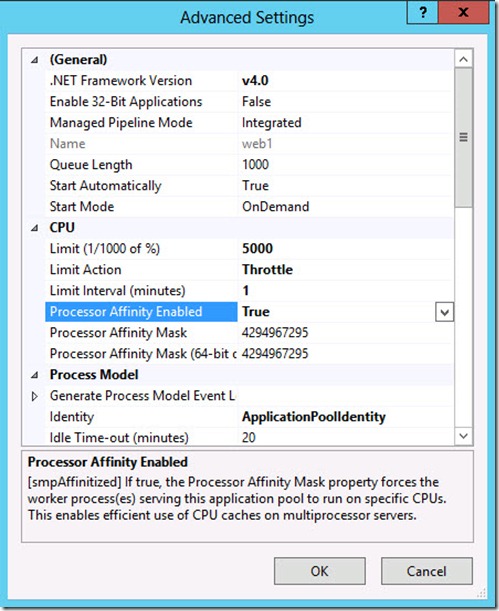
web1的Internet Information Services (IIS) Manager的Application Pools,點選web1,然後按【Advanced Settings】。
Advanced Settings的CPU部分,Limit (1/1000 of %)修改成【5000】,Limit Action設定為【Throttle】,Limit Interval (minutes)設為【1】,最後Processor Affinity Enabled設為【True】,然後按【OK】,這樣就完成了。

部落格:http://www.dotblogs.com.tw/jerry710822
My MVP Profile
https://mvp.support.microsoft.com/profile/Jerry

