[Robotics Studio] DSS with VSE -- Day10
第十天, 我們開始利用 DSS 玩弄虛擬環境...
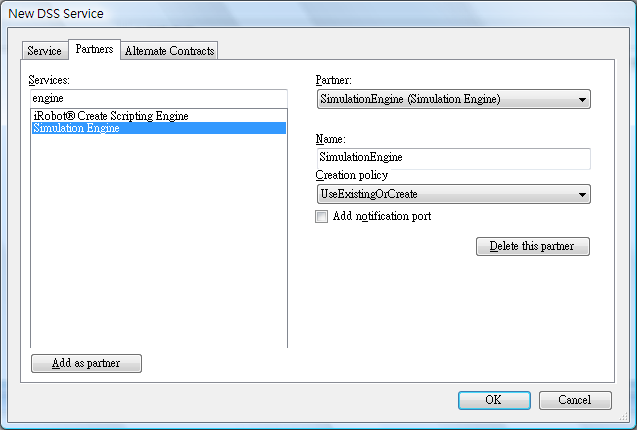
首先建立 VS 2008 DSS Service 2.0 專案, 就取名叫 VSE_Example 吧, 但是這回我們在專案建立時的對話框, 選擇我們要使用 "Simulation Engine" 這個內建的 DSS Service 作為 Partner Service, 你可以切換對話框的 tab 到 Partners , 然後在 Services: 下輸入 engine (就會過濾到只剩下有 engine 的 DSS Service) , 然後點選 Add as partner , 就會出現在右邊當中,
如下圖:
之後點選 ok, 你會注意到 VS 2008 幫你產生的專案多參考了 SimulationEngine.Proxy, 以及多了下面這樣的 code
/// <summary>
/// SimulationEngine partner
/// </summary>
[Partner("SimulationEngine", Contract = engine.Contract.Identifier, CreationPolicy = PartnerCreationPolicy.UseExistingOrCreate)]
engine.SimulationEnginePort _simulationEnginePort = new engine.SimulationEnginePort();
所謂的 Partner Service , 表示該 DSS Service 需要搭配的其他 DSS Service, 注意我們使用的 CreationPolicy (生成原則) 是 UseExistingOrCreate , 表示沒找到該 Service 的話就生一個新的, 否則就用現有的(跟其他 DSS Service 共用).
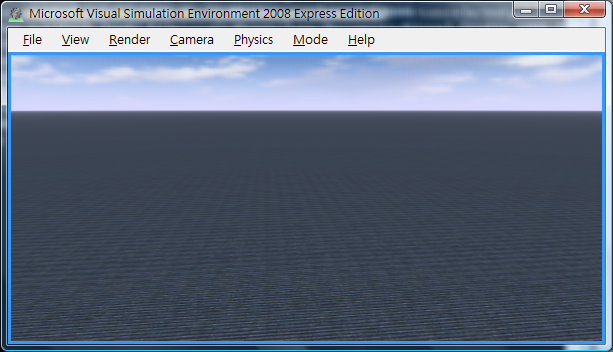
現在你可以執行它, 或是建置它, 然後在 VPL 當中拉出來放著, 直接執行.
執行結果就是, 會跑出 Visual Simulation Environment , 但是畫面都是...嘿嘿...ㄜ...黑黑的...
這是因為 Simulation Engine 只是啟動虛擬環境, 比照之前, 我們還少了光源, 還少了地板, 還少了天空, 還少了其他等等等.
為了要加上這些東西, 我們要加入一些等一下會用到的參考 DLL , 在方案的參考上按右鍵點選加入參考, 選擇瀏覽, 然後選擇你的 Robotics Developer Studio 安裝目錄下的 bin , 你會看到一堆 DLL , 我們要加入兩個, 分別是 PhysicsEngine.dll (負責物理引擎) , RoboticsCommon.dll , SimulationCommon.dll, SimulationEngine.dll 這幾個.
接著在 VSE_Example.cs 的 using 新增 (你也可以等一下寫 code 的時候再按右鍵點選 "解析" , VS 2008 會去幫你搜尋參考 DLL , 加上正確的 using (如果有複選題也會讓你自己挑選))
using Microsoft.Robotics.Simulation.Engine;
using Microsoft.Robotics.PhysicalModel;
using Microsoft.Robotics.Simulation.Physics;
ok, 我們在 VSE_ExampleService 這個 class 內部加上如下的 code, 註解我就直接寫在 code 當中:
/// <summary>
/// 設定一個鏡頭觀景窗 CameraView
/// </summary>
private void SetupCamera()
{
    CameraView view = new CameraView();
    view.EyePosition = new Vector3(-1.65f, 1.63f, -0.29f);
    view.LookAtPoint = new Vector3(-0.68f, 1.38f, -0.18f);

    SimulationEngine.GlobalInstancePort.Update(view);
}

/// <summary>
/// 加上天空 , 太陽
/// </summary>
void AddSky()
{
    //加上天空
    SkyDomeEntity sky = new SkyDomeEntity("skydome.dds", "sky_diff.dds");
    SimulationEngine.GlobalInstancePort.Insert(sky);

    //用平行光源 (無限遠處的光源) 來模擬太陽
    LightSourceEntity sun = new LightSourceEntity();
    sun.State.Name = "Sun";
    sun.Type = LightSourceEntityType.Directional;
    sun.Color = new Vector4(0.8f, 0.8f, 0.8f, 1);
    sun.Direction = new Vector3(0.5f, -.75f, 0.5f);
    SimulationEngine.GlobalInstancePort.Insert(sun);
}

/// <summary>
/// 加上地面
/// </summary>
void AddGround()
{
    // 產生一個寬廣的地面
    HeightFieldEntity ground = new HeightFieldEntity(
        "simple ground", // name
        "03RamieSc.dds", // texture image
        new MaterialProperties("ground",
            0.2f, // restitution
            0.5f, // dynamic friction
            0.5f) // static friction
        );
    SimulationEngine.GlobalInstancePort.Insert(ground);
}
現在我們要在啟動時呼叫這些函式, 所以 VSE_ExampleService.Start() 的程式碼改為如下:
/// <summary>
/// Service start
/// </summary>
protected override void Start()
{

    //
    // Add service specific initialization here
    //

    base.Start();

    //加入一些必要的物體.
    SetupCamera();
    AddSky();
    AddGround();
}
恩, 這次執行以後, 就會看到一些東西了...
明天再來為它加點東西, 而且來跟 VPL 整合.