[Java] 10分鐘快速上手Spring Framework - Part1 (IoC容器篇)
此系列其實是最近良葛格的書籍「Spring 2.0技術手冊」的讀書心得之精華整理
最近稍微摸索Spring IoC容器的玩法,簡單來講,根本就是用.xml組態檔對物件給值
感覺就像用.xml 寫程式一樣…
以下用 JDK1.6 + NetBeans IDE 7.0 + Spring 2.0 Framework 開發環境介紹Spring IoC容器的玩法
1. 先去官網下載JAR檔


with-dependencies版,額外包含了如Struts、hibernate等等的Framework JAR檔,所以下載with-dependencies版就可以不用再到其他網站找JAR檔。
接著把.zip解壓縮先放著
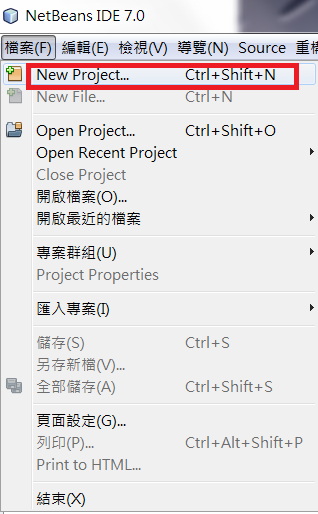
2. 開NetBeans IDE 新增Web專案


Web 伺服器用GlassFish應該也沒差,因為我是用JDK1.6開發,所以選Java EE 6 Web
(NetBeans IDE加入Tomcat伺服器方法,請參考:[J2EE] 安裝Tomcat 伺服器到NetBeans開發工具)

3. 接著把剛剛解壓縮的資料夾,底下
spring-framework-2.0\dist\spring.jar和spring-framework-2.0\lib\jakarta-commons\commons-logging.jar
兩個檔案丟到專案資料夾底下的lib目錄下
NetBeans IDE加入該兩個JAR檔的參考


4. 完成專案參考後,開始寫一支簡單的類別


由於書上的範例可能有誤人子弟的感覺,所以程式碼我故意設計以下這樣,待會的.xml檔才看得出到底是對誰做設定值的動作
package com;

public class HelloWorld {
    private String myMsg;
    private String myMsg2;

    public void setMsg(String m)
    {
     this.myMsg = m;
    }

    public String getMsg()
    {
     return this.myMsg;
    }

    public void setMSG2(String m2)
    {
      this.myMsg2 = m2;
    }

    public String getMSG2()
    {
      return this.myMsg2;
    }


}
5. 藉助NetBeans IDE 新增一個Spring的.xml檔


預設.xml檔會建在ClassPath下

命名空間,全部勾選、全部引用,省得以後打字
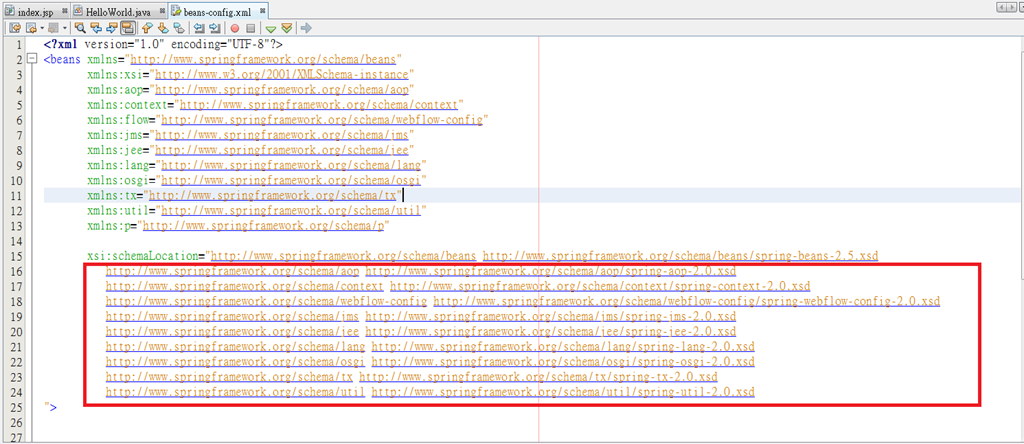
完成後請注意.xml的命名空間,NetBeans IDE 7 幾乎只提供2.0的命名空間,所以若有用到Spring 2.5以上版本的話,命名空間的版本也要修改
6. 開始寫.xml檔,對HelloWorld物件塞值
<?xml version="1.0" encoding="UTF-8"?>
<beans xmlns="http://www.springframework.org/schema/beans"
       xmlns:xsi="http://www.w3.org/2001/XMLSchema-instance"
       xmlns:aop="http://www.springframework.org/schema/aop"
       xmlns:context="http://www.springframework.org/schema/context"
       xmlns:flow="http://www.springframework.org/schema/webflow-config"
       xmlns:jms="http://www.springframework.org/schema/jms"
       xmlns:jee="http://www.springframework.org/schema/jee"
       xmlns:lang="http://www.springframework.org/schema/lang"
       xmlns:osgi="http://www.springframework.org/schema/osgi"
       xmlns:tx="http://www.springframework.org/schema/tx"
       xmlns:util="http://www.springframework.org/schema/util"
       xmlns:p="http://www.springframework.org/schema/p"

       xsi:schemaLocation="http://www.springframework.org/schema/beans http://www.springframework.org/schema/beans/spring-beans-2.5.xsd
          http://www.springframework.org/schema/aop http://www.springframework.org/schema/aop/spring-aop-2.0.xsd
          http://www.springframework.org/schema/context http://www.springframework.org/schema/context/spring-context-2.0.xsd
          http://www.springframework.org/schema/webflow-config http://www.springframework.org/schema/webflow-config/spring-webflow-config-2.0.xsd
          http://www.springframework.org/schema/jms http://www.springframework.org/schema/jms/spring-jms-2.0.xsd
          http://www.springframework.org/schema/jee http://www.springframework.org/schema/jee/spring-jee-2.0.xsd
          http://www.springframework.org/schema/lang http://www.springframework.org/schema/lang/spring-lang-2.0.xsd
          http://www.springframework.org/schema/osgi http://www.springframework.org/schema/osgi/spring-osgi-2.0.xsd
          http://www.springframework.org/schema/tx http://www.springframework.org/schema/tx/spring-tx-2.0.xsd
          http://www.springframework.org/schema/util http://www.springframework.org/schema/util/spring-util-2.0.xsd
">


    <!--id為實例化後的物件名稱,必須明確指定class全名-->
    <bean id="myBean" class="com.HelloWorld">
     <!--name為setter方法名稱,首字一定小寫外其他大小寫跟名稱一樣,value為要注入的字串-->
     <property name="msg" value="Hi!Shadow" />
     <!--一般name都是首字小寫,但setXXX方法的XXX名稱剛好都是大寫的話,則這邊就要全給大寫,後面的value,一樣為要注入的字串-->
     <property name="MSG2" value="Hi!Shadow Two" />
    </bean>


</beans>
7. .xml檔設定完畢後,寫JSP,把該物件的值撈出來
<%@page import="org.springframework.context.support.ClassPathXmlApplicationContext"%>
<%@page import="org.springframework.context.ApplicationContext"%>
<%@page contentType="text/html" pageEncoding="UTF-8"%>
<!DOCTYPE html>
<html>
    <head>
        <meta http-equiv="Content-Type" content="text/html; charset=UTF-8">
    </head>
    <body>
        <%


        //取得.xml檔
        ApplicationContext context = new ClassPathXmlApplicationContext("beans-config.xml");
        //取得Bean
        com.HelloWorld obj = (com.HelloWorld)context.getBean("myBean");

        //顯示訊息
        out.print("訊息1:" + obj.getMsg() + "<br/>");
        out.print("訊息2:" + obj.getMSG2() + "<br/>");


        %>
    </body>
</html>
8. 執行結果:

9. 注入字串介紹完畢,接著介紹注入物件、集合的.xml設定方法
先從集合開始吧
把剛剛的HelloWorld.java檔修改成以下
package com;

import java.util.ArrayList;

public class HelloWorld {
    private String myMsg;
    private ArrayList list;

    public void setMsg(String m)
    {
     this.myMsg = m;
    }

    public String getMsg()
    {
     return this.myMsg;
    }

    public ArrayList getList() {
        return list;
    }


    public void setList(ArrayList list) {
        this.list = list;
    }


}
10. .xml檔
    <!--先在.xml檔定義要注入的集合物件-->
    <util:list id="myList" list-class="java.util.ArrayList"><!--因為要注入ArrayList集合,所以用util:list標籤-->
        <value>Apple</value>
        <value>Banana</value>
    </util:list>

    <!--id為實例化後的物件名稱,必須明確指定class全名-->
    <bean id="myBean" class="com.HelloWorld">
     <!--name為setter方法名稱,首字一定小寫外其他大小寫跟名稱一樣,value為要注入的字串-->
     <property name="msg" value="Hi!Shadow" />
     <!--注入物件要用ref-->
     <property name="list" ref="myList" />
    </bean>
11. JSP程式
<%@page import="org.springframework.context.support.ClassPathXmlApplicationContext"%>
<%@page import="org.springframework.context.ApplicationContext"%>
<%@page contentType="text/html" pageEncoding="UTF-8"%>
<!DOCTYPE html>
<html>
    <head>
        <meta http-equiv="Content-Type" content="text/html; charset=UTF-8">
    </head>
    <body>
        <%


        //取得.xml檔
        ApplicationContext context = new ClassPathXmlApplicationContext("beans-config.xml");
        //取得Bean
        com.HelloWorld obj = (com.HelloWorld)context.getBean("myBean");

        //從集合撈資料
        for(Object o:obj.getList())
        {
         String list_str = (String)o;
         out.print(list_str + "<br/>");
        }


        %>
    </body>
</html>
執行結果:

12. 介紹如何注入物件
得先定義一個類別
package com;


public class Blog {
    private String blogOwner;

    public String getBlogOwner() {
        return this.blogOwner;
    }

    public void setBlogOwner(String blogOwner) {
        this.blogOwner = blogOwner;
    }

}
13. HelloWorld.java也修改一下
package com;


public class HelloWorld {
    private String myMsg;
    private Blog myBlog;

    public void setMsg(String m)
    {
     this.myMsg = m;
    }

    public String getMsg()
    {
     return this.myMsg;
    }

    public Blog getMyBlog() {
        return this.myBlog;
    }

    public void setMyBlog(Blog myBlog) {
        this.myBlog = myBlog;
    }


}
14. .xml設定:
    <!--先把該物件定義完畢-->
    <bean id="myBlogObj" class="com.Blog">
     <property name="blogOwner" value="Shadow"/>
    </bean>

    <!--id為實例化後的物件名稱,必須明確指定class全名-->
    <bean id="myBean" class="com.HelloWorld">
     <!--以下寫法就可以給setMsg() NULL值-->
     <property name="msg" ><null /></property>
     <!--注入物件要用ref-->
     <property name="myBlog" ref="myBlogObj" />
    </bean>
15. JSP程式碼:
<%@page import="com.Blog"%>
<%@page import="org.springframework.context.support.ClassPathXmlApplicationContext"%>
<%@page import="org.springframework.context.ApplicationContext"%>
<%@page contentType="text/html" pageEncoding="UTF-8"%>
<!DOCTYPE html>
<html>
    <head>
        <meta http-equiv="Content-Type" content="text/html; charset=UTF-8">
    </head>
    <body>
        <%


        //取得.xml檔
        ApplicationContext context = new ClassPathXmlApplicationContext("beans-config.xml");
        //取得Bean
        com.HelloWorld obj = (com.HelloWorld)context.getBean("myBean");

        out.print(obj.getMsg());//這裡其實是NULL值

        Blog blog = (Blog)obj.getMyBlog();
        out.print("<br/ >" + blog.getBlogOwner());


        %>
    </body>
</html>
16.執行結果:

看到這邊,Spring IoC其實也玩得差不多了,其他更冷門的語法請參考林信良老師的書籍「Spring 2.0技術手冊」
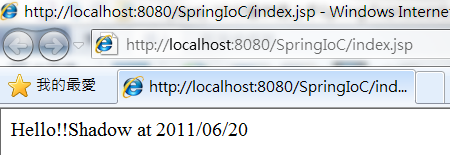
2011.6.20 追記constructor的注入
把HelloWorld.java修改如下:
package com;


public class HelloWorld {
    private String myMsg1;
    private String myMsg2;

    //最好有無參數的建構子
    public HelloWorld()
    {

    }

    public HelloWorld(String msg1,String msg2)
    {
     this.myMsg1 = msg1;
     this.myMsg2 = msg2;

    }

    public String getMsg()
    {
     return this.myMsg1 + this.myMsg2;
    }


}
然後.xml組態設定
    <!--id為實例化後的物件名稱,必須明確指定class全名-->
    <bean id="myBean" class="com.HelloWorld">
      <!--有字串參數的建構子有兩個參數,index='0'為第一個參數,index='1'為第二個參數-->
      <constructor-arg index="0" value="Hello!!" />
      <constructor-arg index="1" value="Shadow at 2011/06/20" />
      <!--這樣就完成有參數建構子的注入-->
    </bean>
JSP檔
<%@page import="com.Blog"%>
<%@page import="org.springframework.context.support.ClassPathXmlApplicationContext"%>
<%@page import="org.springframework.context.ApplicationContext"%>
<%@page contentType="text/html" pageEncoding="UTF-8"%>
<!DOCTYPE html>
<html>
    <head>
        <meta http-equiv="Content-Type" content="text/html; charset=UTF-8">
    </head>
    <body>
        <%


        //取得.xml檔
        ApplicationContext context = new ClassPathXmlApplicationContext("beans-config.xml");
        //取得Bean
        com.HelloWorld obj = (com.HelloWorld)context.getBean("myBean");

        out.print(obj.getMsg());


        %>
    </body>
</html>
執行結果:
Constructor注入的用途:想要讓欄位成員變為私有唯讀時
缺點:要注入的參數很多的話,得設定一堆index=”0”、index=”1”、index=”2”等等,和setter方法注入相比,Constructor比較不容易知道注入的參數意義
另外補上石頭閒語Java Spring framework 開發人員面試題
autowrite自動綁定,個人認為程式難以閱讀維護,我是覺得少用吧