{Oracle VM VirtualBox}如何讓Guest OS、Host OS的網路彼此互通
最近在Windows 7上安裝VMWare Server架設Lab遇到虛擬硬碟切太小的問題,導致要測試SQL Server 2012(Denali)時,磁碟空間不足無法安裝,找了半天找不到類似Hyper-V有提供編輯虛擬硬碟精靈這種懶人工具。
如果是單一虛擬磁碟Partition切太小,可以利用類似Gnome Partition Editor的工具或磁碟管理員來調整磁區,但如果要擴充原本單一虛擬磁碟的容量,就必須利用VMWare Virtual Disk Manager這個命列工具,以Windows 7 Professaionl Edition (x86)為例,預設路徑是在C:\Program Files\VMware\VMware Server,檔案名稱為vmware-vdiskmanager.exe。
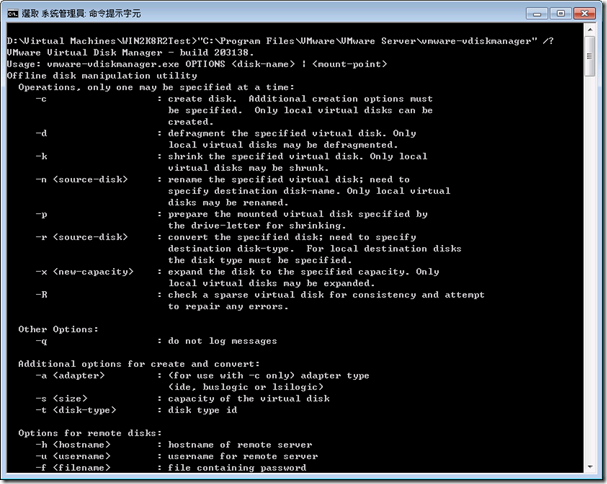
若要查詢VMWare Virtual Disk Manager可用參數,請於命令提示字元中輸入C:\Program Files\VMware\VMware Server\vmware-vdiskmanager /?,常見參數整理如下:
| 項次 | 參數 | 用途 |
| 1 | -c |
建立虛擬硬碟。 create disk. Additional creation options must be specified. Only local virtual disks can be created. |
| 2 | -d |
虛擬硬碟磁碟重組。 defragment the specified virtual disk. Only local virtual disks may be defragmented. |
| 3 | -k |
壓縮虛擬硬碟。 shrink the specified virtual disk. Only local virtual disks may be shrunk. |
| 4 | -n |
重新命名虛擬硬碟。 rename the specified virtual disk; need to specify destination disk-name. Only local virtual disks may be renamed. |
| 5 | -p |
掛載虛擬硬碟。 prepare the mounted virtual disk specified by the drive-letter for shrinking. |
| 6 | -r |
轉換虛擬硬碟。 convert the specified disk; need to specify destination disk-type. For local destination disks the disk type must be specified. |
| 7 | -x |
擴大虛擬硬碟SIZE。 expand the disk to the specified capacity. Only local virtual disks may be expanded. |
| 8 | -R |
檢查分割的虛擬硬碟檔案。 check a sparse virtual disk for consistency and attempt to repair any errors. |
【特別提醒,參數有區分大小寫。】
下圖為筆者LAB原本的組態,虛擬硬碟為預設值24G。
依照下列步驟將虛擬硬碟擴充至80G:
- 以【Win + R】開啟執行視窗後輸入cmd。
- 切換至虛擬硬碟所在的目錄。
-
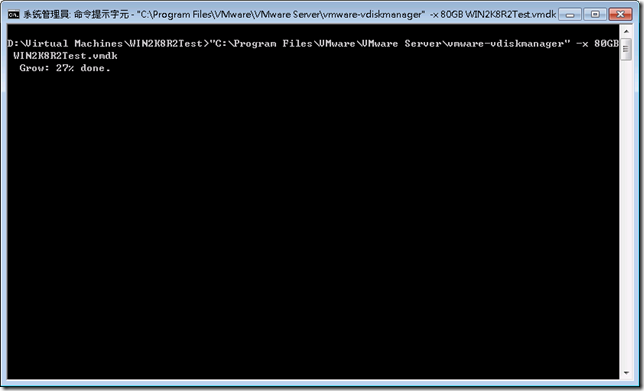
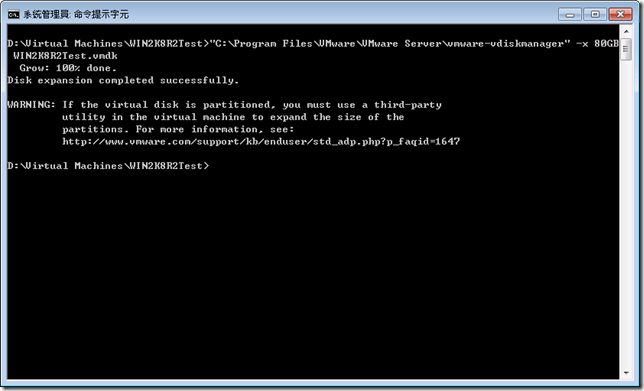
輸入"C:\Program Files\VMware\VMware Server\vmware-vdiskmanager" -x 新虛擬硬碟SIZE 原VMSD檔,本文以"C:\Program Files\VMware\VMware Server\vmware-vdiskmanager" -x 80GB WIN2K8R2Test.vmdk為例。
-
虛擬硬碟擴大成功。
重新回到VMware Server Home Page查看,怎麼虛擬硬碟還是24GB(如下圖螢光筆處),此時點選要擴大SIZE的虛擬硬碟後選擇Edit。
在Capacity後面多了Increase Capacity,在使用VMWare Virtual Disk Manager加大虛擬硬碟前是沒有這個選項。
有點弔詭的是你可以增加超過利用VMWare Virtual Disk Manager擴大的容量。
不知道是筆者哪邊有弄錯,不過經過實驗確實可以增加虛擬硬碟的SIZE。
開啟Guest OS後進到Windows,確實剛剛所擴充的硬碟正確被建立成未配置的磁區。
接下來筆者介紹兩種方法來合併磁區,說明如下:
【使用Gnome Partion Editor合併磁區】
將Guest OS的光碟機Mount到Gnome Partion Editor的ISO檔,並設定開機後啟動BIOS。
開機之後於下圖畫面中按ENTER選擇GParted Live (Default settings)。
啟動Gnome Partition Editor畫面如下:
直接按Enter選擇Don’t touch keymap。
預設為US English,可以輸入30後按Enter選擇繁體中文。
直接按Enter以自動組態執行X視窗。
選擇要擴大SIZE的磁區接著點選調整大小/移動。
點選下圖紅色框框處的箭頭向右拖曳到底。
結果應該如下圖的樣子,接著按調整大小/移動按鈕開始擴大虛擬硬碟的SIZE。
點選Apply開始擴大SIZE。
再次確認是否套用。
擴大過程截圖如下:
依下圖步驟離開GParted。
重新開機進到Windows檢查擴大的磁區無誤。
【使用磁碟管理員合併磁區】
於伺服器管理員視窗中點選伺服器管理員>存放>磁碟管理,在要擴大的磁區上按右鍵選擇延伸磁碟區。
按下一步繼續。
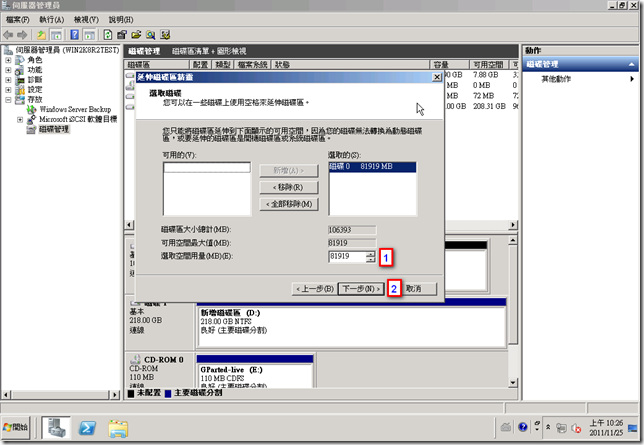
於下圖1處輸入要擴大的SIZE,筆者打算把所有空間配置給C槽,因此保留預設值後按下一步。
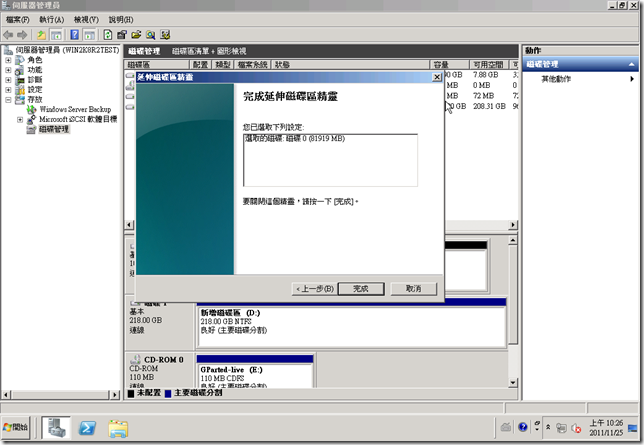
按完成以開始擴大磁區。
如此一來終於完成虛擬磁碟擴大SIZE,步驟真是繁瑣,不曉得有沒有更簡單的方法,但這次就先這樣撐過去好了。
【參考資料】
- http://ithelp.ithome.com.tw/question/10004265
- Gnome Partition Editor
- VMWare Server Online Library
- http://www.vmware.com/support/ws45/doc/disks_vdiskmanager_eg_ws.html#1057652
特別感謝ychsiao所提供有關Gnome Partition Editor的資訊。

