這篇記錄小喵透過Angular-CLI撰寫針對單一資料表的CRUD,從WebAPI,到Angular 2。文章有點長,如果您對於WebAPI的部分已經很熟悉,建議您可以從Angular 2的部分開始看。
緣起
小喵這一篇,紀錄著如何透過Angular-CLI,開發撰寫 Angular 2 透過 WebAPI 針對單一資料表的CRUD,主要重點會放在 Angular 2 的相關部分。提供小喵自己外來參考,也提供網友們參考。
本來預計著介紹完Angular 2的,不過剛好同事正準備第一次用 Angular 2 要開發CRUD的功能,所以小喵這一篇先發,過程會盡量讓看的人可以依照步驟逐一完成,中間用到的,有些觀念後續小喵再補充在其他篇中。
文章有點長,如果您對於WebAPI的部分已經很熟悉,那麼,建議您可以從Angular 2的部分開始看~
開發順序
小喵這篇會依照以下這樣的順序開發:
首先,是WebAPI的部分
- 建立WebAPI專案
- Nuget取得Dapper, CORS套件
- 資料存取Model撰寫
- Controller撰寫
接著,是 Angular 2 的部分:
- 建立NG2專案
- 撰寫資料存取的Service
- 撰寫Component
- 多筆顯示
- 分頁
- 單筆維護表單
- 新增資料
- 維護資料
- 刪除資料
- 新增按鈕
整體上就以上述的順序來進行囉。
資料庫的部分,則選擇北風資料庫裡面的Products這個資料表來當作範例。
WebAPI的部分
建立WebAPI的專案
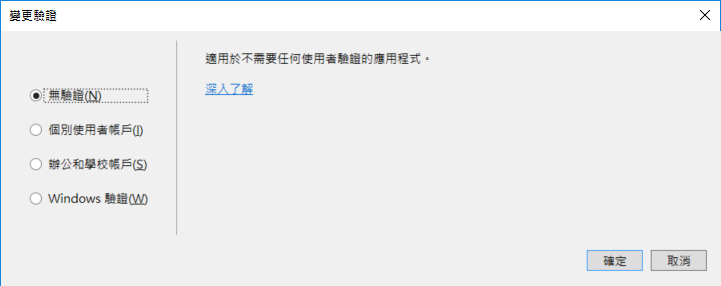
我們新增一個名稱為SBLG的方案,在方案中,新增方案資料夾WebAPI,在方案資料夾的WebAPI上右鍵,加入,新專案「PBLGAPI」
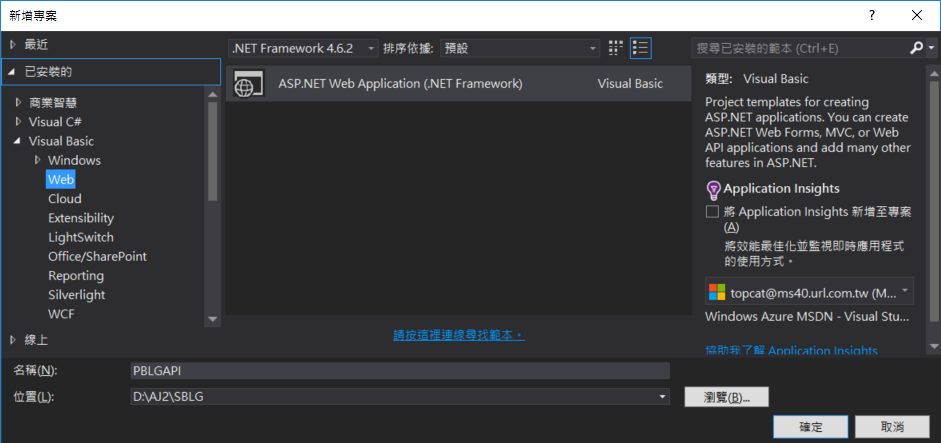
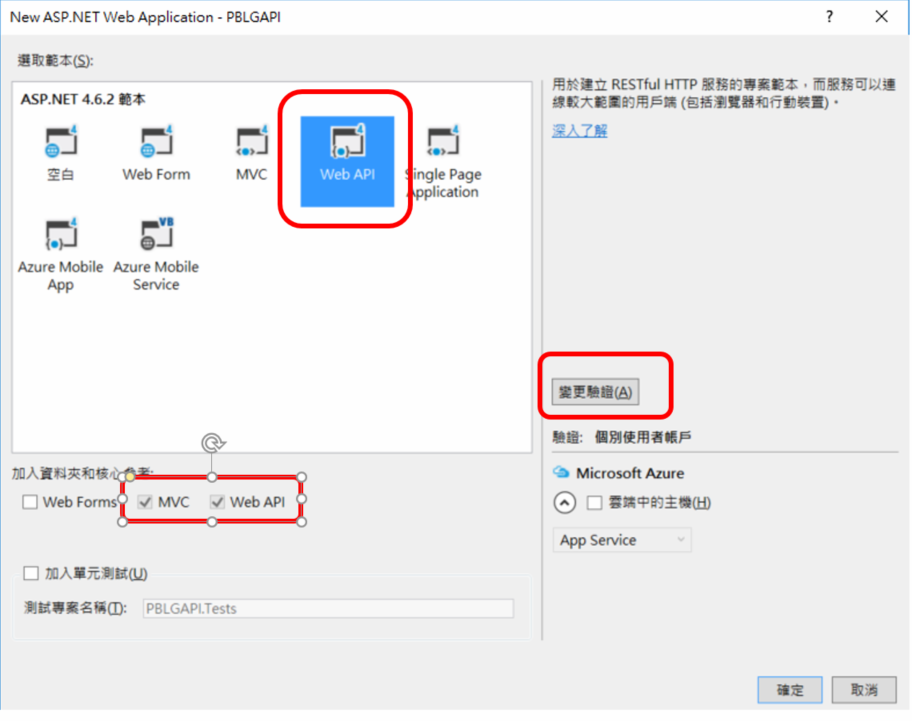
由於這一篇主要是要練習為主,驗證的部分就暫時先選擇無驗證
按下確定專案就建立起來
Nuget套件:Dapper, CORS
Dapper套件,主要是在資料存取時,可以透過Dapper的幫忙,將的屬性自動對應到相關的欄位,這樣的開發可以讓程式碼更為簡潔,詳細想進一步瞭解Dapper,請參考小喵的『[筆記]好用輕量型ORM神器--Dapper』這一篇。
CORS套件,由於在瀏覽器中,跨專案使用WebAPI,一定會有CORS的問題,因此我們在撰寫WebAPI的同時,就把這部分的問題先處理掉。
資料存取的Model
接著,我們開始撰寫資料存取的部分,首先,我們的資料來源是北風資料庫,裡面的『Products』資料表,因此,我們先依據 Products 的 Data Schema來撰寫資料存取類別『ProductInfo』。我們先在資料夾『Models』中,新增一個『Infos』的資料夾,未來相關資料類別,我們放在這裡面。之後,在Infors資料夾中,新增類別如下:
Public Class ProductInfo
    Public Property ProductID() As Integer = 0
    Public Property ProductName() As String = ""
    Public Property SupplierID() As Integer = 0
    Public Property CategoryID() As Integer = 0
    Public Property QuantityPerUnit() As String = ""
    Public Property UnitPrice() As Integer = 0
    Public Property UnitsInStock() As Int16 = 0
    Public Property UnitsOnOrder() As Int16 = 0
    Public Property ReorderLevel() As Int16 = 0
    Public Property Discontinued() As Boolean = False
End Class
屬性名稱與資料表的欄位名稱一致,這樣後續,就可以讓Dapper發揮大功用,自動對應相關欄位。
接著,在Models再新增一個資料夾,名為『DAOs』未來所有資料存取的程式,放此資料夾。接著,新增一個『ProductDAO』的類別,來放資料群取的相關程式碼。相關程式碼內容如下:
Imports System.Data
Imports System.Data.SqlClient
Imports Dapper

Public Class ProductDAO
    ''' <summary>
    ''' 依據傳入的第幾頁(PageNum)、頁面筆數(PageSize),傳回該分頁的相關資料物件集合
    ''' </summary>
    ''' <param name="PageNum">第幾頁</param>
    ''' <param name="PageSize">頁面筆數</param>
    ''' <returns>
    ''' 成功回傳資料物件集合oProds
    ''' </returns>
    Public Function GetProdsByPage(ByVal PageNum As Integer, ByVal PageSize As Integer) As List(Of ProductInfo)
        'Throw New NotImplementedException()
        Dim oProds As New List(Of ProductInfo)
        Try
            Dim ConnStr As String = GetConnStr()
            Using Conn As New SqlConnection(ConnStr)
                Dim SqlTxt As String = ""
                SqlTxt &= " SELECT *  "
                SqlTxt &= " FROM  "
                SqlTxt &= " ( "
                SqlTxt &= "     SELECT rank() OVER ( ORDER BY ProductID ) AS RankNumber, *  "
                SqlTxt &= " 	FROM Products (NOLOCK) "
                SqlTxt &= " ) AS P "
                SqlTxt &= " WHERE RankNumber BETWEEN @PageSize*(@PageNum-1)+1 AND @PageSize*@PageNum "
                SqlTxt &= "  "

                oProds = Conn.Query(Of ProductInfo)(SqlTxt, New With {.PageSize = PageSize, .PageNum = PageNum})
            End Using
        Catch ex As Exception
            Throw New Exception(ex.Message)
        End Try
        Return oProds
    End Function

    ''' <summary>
    ''' 依據傳入的頁面筆數(PageSize),傳回該資料總共有幾頁
    ''' </summary>
    ''' <param name="PageSize">頁面筆數</param>
    ''' <returns>
    ''' 成功傳回總頁數TotalPage
    ''' </returns>
    Public Function GetProdsTotalPageByPageSize(ByVal PageSize As Integer) As Integer
        Dim TotalPage As Integer = 0
        Try
            Dim ConnStr As String = GetConnStr()
            Using Conn As New SqlConnection(ConnStr)
                Dim SqlTxt As String = ""
                SqlTxt &= " SELECT CASE	 "
                SqlTxt &= " 		WHEN Cnt % @PageSize = 0 THEN Cnt / @PageSize "
                SqlTxt &= " 		ELSE (Cnt / @PageSize) + 1 "
                SqlTxt &= " 	END AS TotalPage "
                SqlTxt &= " FROM "
                SqlTxt &= " ( "
                SqlTxt &= " 	SELECT COUNT(*) Cnt "
                SqlTxt &= " 	FROM Products (NOLOCK) "
                SqlTxt &= " ) V "
                SqlTxt &= "  "

                Conn.Open()

                Using Cmmd As New SqlCommand(SqlTxt, Conn)
                    Cmmd.Parameters.AddWithValue("@PageSize", PageSize)

                    Dim Dr As SqlDataReader = Cmmd.ExecuteReader()
                    If Dr.HasRows Then
                        Dr.Read()
                        TotalPage = Dr.Item("TotalPage")
                    End If
                    Dr.Close()
                End Using
            End Using
            Return TotalPage

        Catch ex As Exception
            Throw New Exception(ex.Message)
        End Try
    End Function

    ''' <summary>
    ''' 依據傳入的資料物件,維護該筆資料
    ''' </summary>
    ''' <param name="oProd">產品資料物件</param>
    ''' <returns>
    ''' 成功回傳Success
    ''' </returns>
    Public Function ChgProd(oProd As ProductInfo) As String
        Try
            Dim ConnStr As String = GetConnStr()
            Using Conn As New SqlConnection(ConnStr)
                Conn.Open()
                Dim SqlTxt As String = ""
                SqlTxt = ""
                SqlTxt &= " UPDATE [dbo].[Products] "
                SqlTxt &= " SET "
                SqlTxt &= " ProductName=@ProductName"
                SqlTxt &= ", SupplierID=@SupplierID"
                SqlTxt &= ", CategoryID=@CategoryID"
                SqlTxt &= ", QuantityPerUnit=@QuantityPerUnit"
                SqlTxt &= ", UnitPrice=@UnitPrice"
                SqlTxt &= ", UnitsInStock=@UnitsInStock"
                SqlTxt &= ", UnitsOnOrder=@UnitsOnOrder"
                SqlTxt &= ", ReorderLevel=@ReorderLevel"
                SqlTxt &= ", Discontinued=@Discontinued"
                SqlTxt &= ", PGUID=@PGUID"
                SqlTxt &= " WHERE ProductID = @ProductID "

                Conn.Execute(SqlTxt, oProd)
            End Using

            Return "Success"
        Catch ex As Exception
            Throw New Exception(ex.Message)
        End Try
    End Function

    ''' <summary>
    ''' 依據傳入的產品代號(ProductID),刪除該商品資料
    ''' </summary>
    ''' <param name="ProductID">產品代號</param>
    ''' <returns>
    ''' 成功傳回Success
    ''' </returns>
    Public Function DelProd(ProductID As Integer) As String
        Try
            Dim ConnStr As String = GetConnStr()
            Using Conn As New SqlConnection(ConnStr)
                Conn.Open()
                Dim SqlTxt As String = ""
                SqlTxt = ""
                SqlTxt &= " DELETE Products "
                SqlTxt &= " WHERE ProductID = @ProductID "
                SqlTxt &= "  "

                Conn.Execute(SqlTxt, New With {.ProductID = ProductID})

            End Using
            Return "Success"
        Catch ex As Exception
            Throw New Exception(ex.Message)
        End Try
    End Function

    ''' <summary>
    ''' 依據傳入的商品物件,新增一筆資料
    ''' </summary>
    ''' <param name="oProd">商品物件</param>
    ''' <returns>
    ''' 成功傳回Success
    ''' </returns>
    Public Function InsertProd(oProd As ProductInfo) As String
        Try
            Dim ConnStr As String = GetConnStr()
            Using Conn As New SqlConnection(ConnStr)
                Conn.Open()
                Dim SqlTxt As String = ""
                SqlTxt = ""
                SqlTxt &= " INSERT INTO [dbo].[Products] "
                SqlTxt &= " 	(ProductName, SupplierID, CategoryID, QuantityPerUnit, UnitPrice, UnitsInStock, UnitsOnOrder, ReorderLevel, Discontinued) "
                SqlTxt &= " VALUES (@ProductName, @SupplierID, @CategoryID, @QuantityPerUnit, @UnitPrice, @UnitsInStock, @UnitsOnOrder, @ReorderLevel, @Discontinued) "
                SqlTxt &= "  "

                Conn.Execute(SqlTxt, oProd)

            End Using
            Return "Success"
        Catch ex As Exception
            Throw New Exception(ex.Message)
        End Try
    End Function

    Private Function GetConnStr() As String
        Return "Data Source=.\SQLExpress;Initial Catalog=NorthwindChinese;Integrated Security=True"
    End Function
End Class
另外,Controller會用到的錯誤處理,小喵也寫成一個類別來幫忙。還有,分頁查詢時,最後傳回的時候,會同時傳回總頁數與該分頁資料,因此也會撰寫一個類別來傳回。相關程式碼如下:
錯誤處理的類別:(ErrMsgInfo)
Imports System.Net.Http
Imports System.Net

Public Class ErrMsgInfo
    Private m_ErrCode As String = ""
    Private m_ErrMsg As String = ""
    Private m_ErrTime As String = ""
    Private m_ErrJSON As String = ""

    Private m_Ex As Exception = Nothing
    Private m_RepMsg As HttpResponseMessage

    Public WriteOnly Property Ex As Exception
        Set(value As Exception)
            m_Ex = value
            If m_Ex IsNot Nothing Then
                m_ErrCode = m_Ex.HResult
                m_ErrMsg = m_Ex.Message
                GenErrJSON()
            End If
        End Set
    End Property

    Public ReadOnly Property RepMsg As HttpResponseMessage
        Get
            Return m_RepMsg
        End Get
    End Property


    Private Sub GenErrJSON()
        If m_ErrCode <> "" And m_ErrMsg <> "" Then
            '產生錯誤回傳的JSON
            m_ErrJSON = "{" & Chr(34) & "ErrCode" & Chr(34) & ":" & Chr(34) & m_ErrCode & Chr(34) & "," & Chr(34) & "ErrMsg" & Chr(34) & ":" & Chr(34) & m_ErrMsg & Chr(34) & "}"
            '產生迴船的HttpResponseMessage
            m_RepMsg = New HttpResponseMessage(HttpStatusCode.ExpectationFailed)
            m_RepMsg.Content = New StringContent(m_ErrJSON)
            m_RepMsg.Content.Headers.ContentType = New Headers.MediaTypeHeaderValue("application/json")
        End If
    End Sub
End Class
傳回一頁商品資料的類別:
Public Class ProductPageInfo
    Public Property TotalPage As Integer = 0
    Public Property oPages As List(Of ProductInfo)
End Class
醬子,WebAPI的模組部分準備好了,下一步撰寫Controller的部分
Controller的部分
CORS的設定
要使用CORS,必須先在App_Start裡面的『WebApiConfig.vb』做個簡單的設定,需加上『config.EnableCors()』這一句
Imports System
Imports System.Collections.Generic
Imports System.Linq
Imports System.Web.Http

Public Module WebApiConfig
    Public Sub Register(ByVal config As HttpConfiguration)
        ' Web API 設定和服務

        ' CORS請加上這一行
        config.EnableCors()

        ' Web API 路由
        config.MapHttpAttributeRoutes()

        config.Routes.MapHttpRoute(
            name:="DefaultApi",
            routeTemplate:="api/{controller}/{id}",
            defaults:=New With {.id = RouteParameter.Optional}
        )
    End Sub
End Module
Controller中,需要加上CORS的設定,Angular 2 那邊才不會被擋住,整體內容如下:
Imports System.Net
Imports System.Web.Http
Imports System.Net.Http
Imports System.Web.Http.Cors

Namespace Controllers
    <EnableCors("*", "*", "*", "*")>
    Public Class ProductController
        Inherits ApiController


        <Route("api/Prod/{PageNum}/{PageSize}")>
        <HttpGet>
        Public Function GetProdsByPage(ByVal PageNum As Integer, ByVal PageSize As Integer) As ProductPageInfo
            Try
                Dim dao As New ProductDAO
                Dim oProdPage As New ProductPageInfo
                Dim TotalPage As Integer = dao.GetProdsTotalPageByPageSize(PageSize)
                Dim oProds As List(Of ProductInfo) = dao.GetProdsByPage(PageNum, PageSize)
                oProdPage.TotalPage = TotalPage
                oProdPage.oPages = oProds
                Return oProdPage

            Catch ex As Exception
                'Throw New Exception(ex.Message)
                Dim oErr As New ErrMsgInfo
                oErr.Ex = ex

                Dim RepMsg As HttpResponseMessage = oErr.RepMsg
                Throw New HttpResponseException(RepMsg)

            End Try
        End Function

        ' POST: api/Prod
        <Route("api/Prod")>
        <HttpPost>
        Public Sub PostValue(<FromBody()> ByVal oProd As ProductInfo)
            Try
                Dim dao As New ProductDAO
                Dim Rc As String = dao.InsertProd(oProd)

            Catch ex As Exception
                'Throw New Exception(ex.Message)
                Dim oErr As New ErrMsgInfo
                oErr.Ex = ex

                Dim RepMsg As HttpResponseMessage = oErr.RepMsg
                Throw New HttpResponseException(RepMsg)

            End Try
        End Sub

        ' PUT: api/Prod/5
        <Route("api/Prod")>
        <HttpPut>
        Public Sub PutValue(<FromBody()> ByVal oProd As ProductInfo)
            Try
                Dim dao As New ProductDAO
                Dim Rc As String = dao.ChgProd(oProd)

            Catch ex As Exception
                'Throw New Exception(ex.Message)
                Dim oErr As New ErrMsgInfo
                oErr.Ex = ex

                Dim RepMsg As HttpResponseMessage = oErr.RepMsg
                Throw New HttpResponseException(RepMsg)

            End Try

        End Sub

        ' DELETE: api/Prod/5
        <Route("api/Prod/Delete/{ProductID}")>
        <HttpDelete>
        Public Sub DeleteValue(ByVal ProductID As Integer)
            Try
                Dim dao As New ProductDAO
                Dim Rc As String = dao.DelProd(ProductID)

            Catch ex As Exception
                'Throw New Exception(ex.Message)
                Dim oErr As New ErrMsgInfo
                oErr.Ex = ex

                Dim RepMsg As HttpResponseMessage = oErr.RepMsg
                Throw New HttpResponseException(RepMsg)

            End Try
        End Sub
    End Class

End Namespace
稍微用Chrome的DHC測試一下:OK,沒問題。

Angular 2 的部分
我們希望將相關的程式碼放在一起,因此,開啟檔案總管,進入剛剛Solution的資料夾,新增一個Ag2的資料夾,並進入該資料夾。然後如下處理:
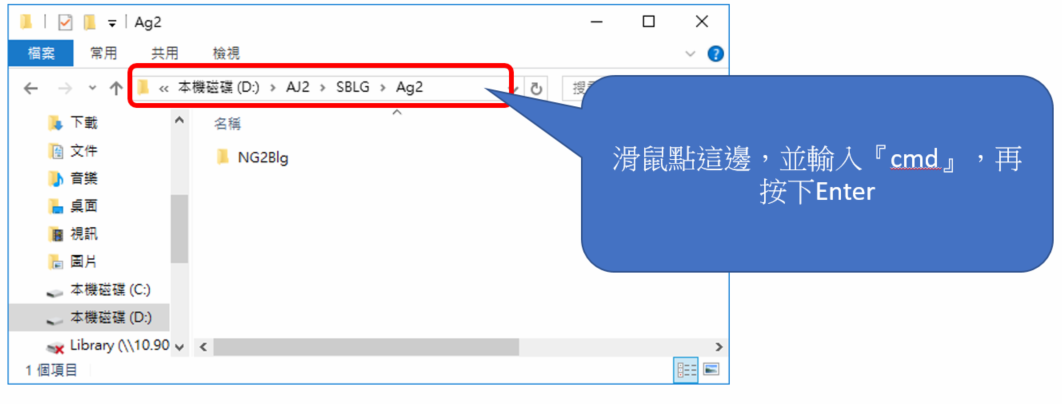 就會開啟一個命令視窗,且位置是在這邊,此時輸入指令:『ng new NG2Blg』,建立新的 Angular 2 專案,這裡要稍等一下~
當您看到如下的訊息,專案就建立完成囉
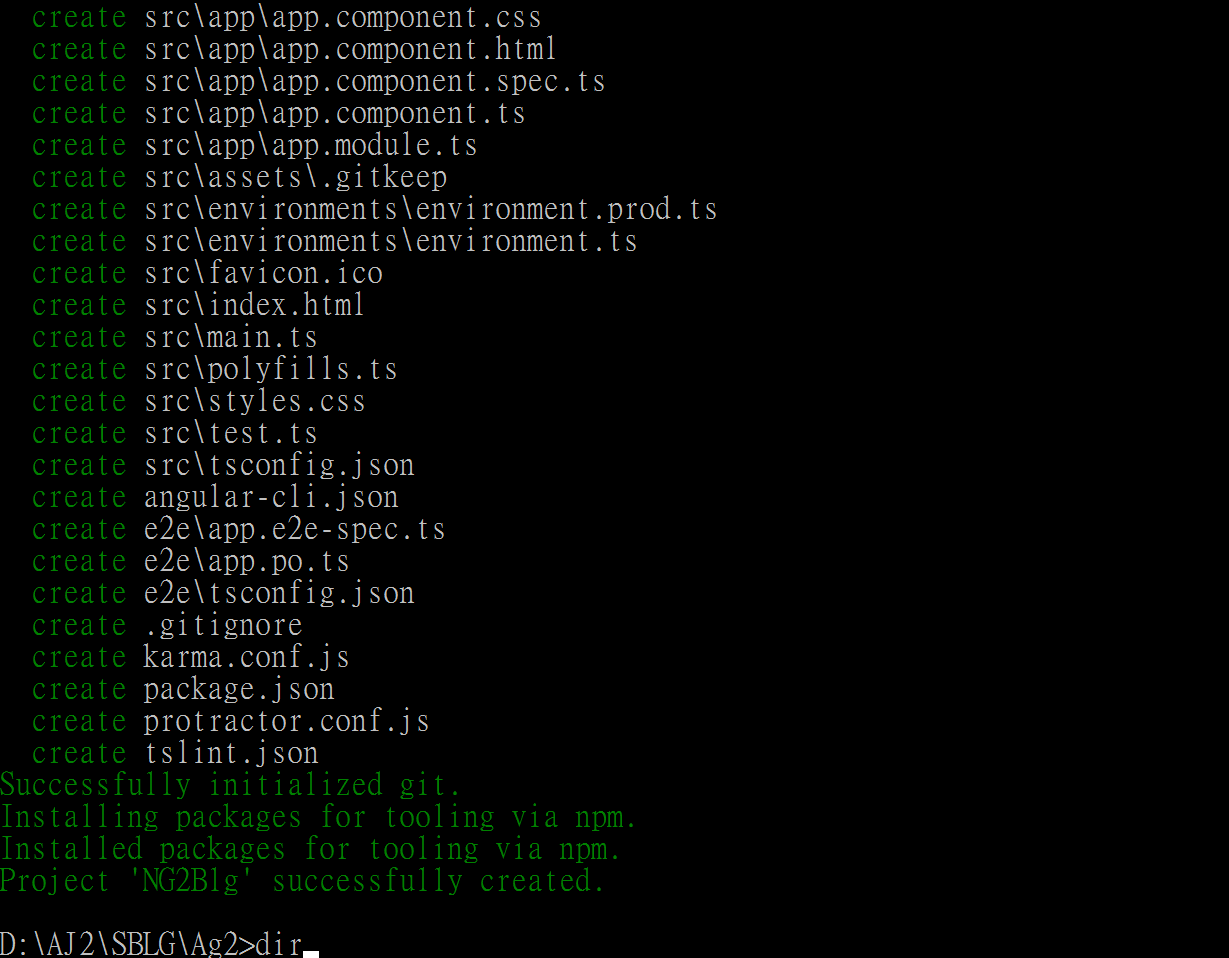
補充:ng new 專案名稱,這中間會透過「npm」安裝一些套件,剖費時間。如果想加快一些,可以先忽略npm的套件安裝,之後再用『yarn』安裝套件,加快時間。
- ng new 專案名稱 --skip-npm
- cd 專案名稱
- yarn
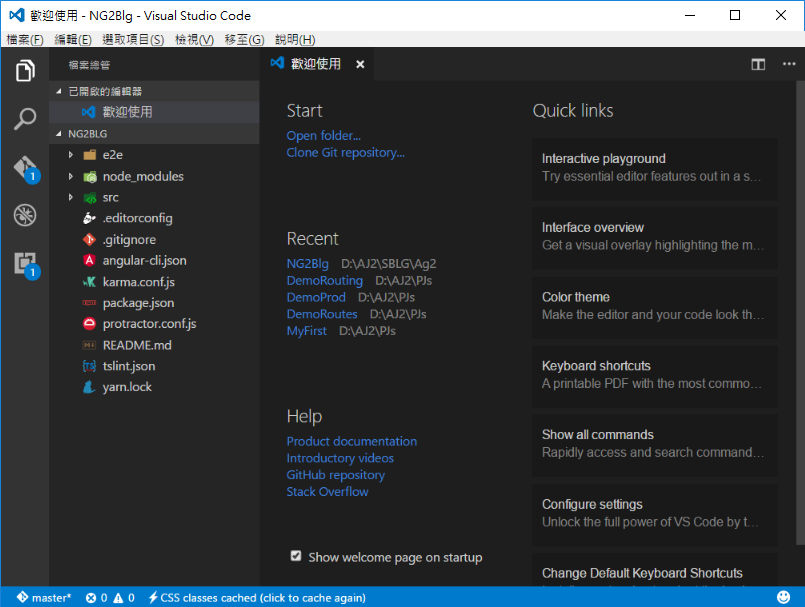
接著,輸入『Code NG2Blg』,就可以開啟Visual Studio Code並且開好這個專案。
撰寫Service
接著,我們先透過命令產生Data Service的檔案。在Visual Studio Code中,可以透過『Ctrl + `』在VS Code中開啟命令視窗,未來輸入指令直接在此即可。我們輸入產生Prod服務的指令如下:
ng g s Prod
會在「src/app」產生「prod.service.ts」的檔案,我們雙擊這個檔案,開始撰寫service,我們會先初步撰寫取得分頁內容的部分。大致步驟如下:
- 屬性宣告:宣告datas屬性,型別先設定為any,預設為空的陣列,用以承接從API取得的JSON物件集合。
- 注入http:在「constractor」中,宣告「private http:Http」,同時記得加上Import Http的宣告在最上方『import { Http } from '@angular/http';』
- 函數撰寫:撰寫「GetDatasByPage」的函數,傳入PageNum,透過this.http.get取得資料。
- 回頭在「constructor」中,呼叫function,讀取第一頁的資料。
相關程式碼如下:
import { Http, Headers, RequestOptions, Response } from '@angular/http';
import { Injectable } from '@angular/core';

@Injectable()
export class ProdService {

  //API來源名稱
  serverName:string='http://localhost:54514/';

  //取回的內容
  datas:any=[];
  error:any;

  //分頁相關屬性
  currentPageNum:number=1;
  pageSize:number=10;
  totalPage:number=0;

  constructor(private http:Http) {
    this.GetDatasByPage(1);
  }

  GetDatasByPage(pageNum:number){
    this.currentPageNum = pageNum;
    let url:string=this.serverName + 'api/prod/' + this.currentPageNum.toString() + '/' + this.pageSize.toString();
    let headers = new Headers({'Content-Type':'application/json'});
    let options = new RequestOptions({headers:headers});

    this.http.get(url, options)
    .subscribe(
      (value:Response)=>{
        let jData:any;
        jData = value.json();
        this.datas = jData.oPages;
        this.totalPage = jData.TotalPage;
      },
      (error)=>{
        this.error = error;
      }
    );
  }

}
app.module的providers
不要忘記,在 app.module.ts 的 providers中,把ProdService加進去。
providers: [ProdService],
Prod Component
DataService好了後,我們接著就來將資料顯示出來。我們先透過命令視窗下「ng g c Prod」產生一個Prod的Component,然後讓資料顯示在這個Prod的Component中。
首先開啟『prod.component.ts』,將寫好的prod data service注入:在constructro中加入 dataSvc,如下:
import { ProdService } from './../prod.service';
import { Component, OnInit } from '@angular/core';

@Component({
  selector: 'app-prod',
  templateUrl: './prod.component.html',
  styleUrls: ['./prod.component.css']
})
export class ProdComponent implements OnInit {

  constructor(public dataSvc:ProdService) { }

  ngOnInit() {
  }

}
接著,開啟Templete檔案「prod.component.html」,撰寫一個table來展現資料,相關內容如下:
<table border="1">
  <thead>
    <tr>
      <th>功能</th>
      <th>ProductID</th>
      <th>ProductName</th>
      <th>SupplierID</th>
      <th>CategoryID</th>
      <th>QuantityPerUnit</th>
      <th>UnitPrice</th>
      <th>UnitsInStock</th>
      <th>UnitsOnOrder</th>
      <th>ReorderLevel</th>
      <th>Discontinued</th>
    </tr>
  </thead>
  <tbody>
    <tr *ngFor="let oItem of dataSvc.datas">
      <td></td>
      <td>{{oItem.ProductID}}</td>
      <td>{{oItem.ProductName}}</td>
      <td>{{oItem.SupplierID}}</td>
      <td>{{oItem.CategoryID}}</td>
      <td>{{oItem.QuantityPerUnit}}</td>
      <td>{{oItem.UnitPrice}}</td>
      <td>{{oItem.UnitsInStock}}</td>
      <td>{{oItem.UnitsOnOrder}}</td>
      <td>{{oItem.ReorderLevel}}</td>
      <td>{{oItem.Discontinued}}</td>
    </tr>
  </tbody>
</table>
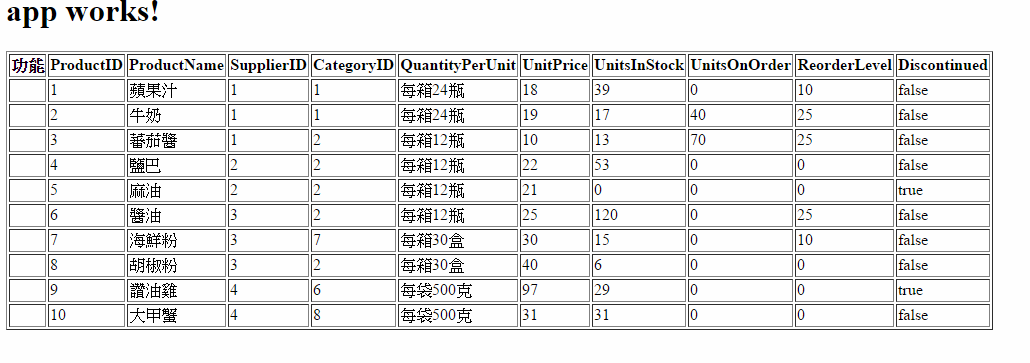
醬子,prod component大致顯示多筆已經ok囉,再來,把prod component放到 app component中,開啟「app.component.html」,加上『<app-prod></app-prod>』
<h1>
  {{title}}
</h1>
<app-prod></app-prod>
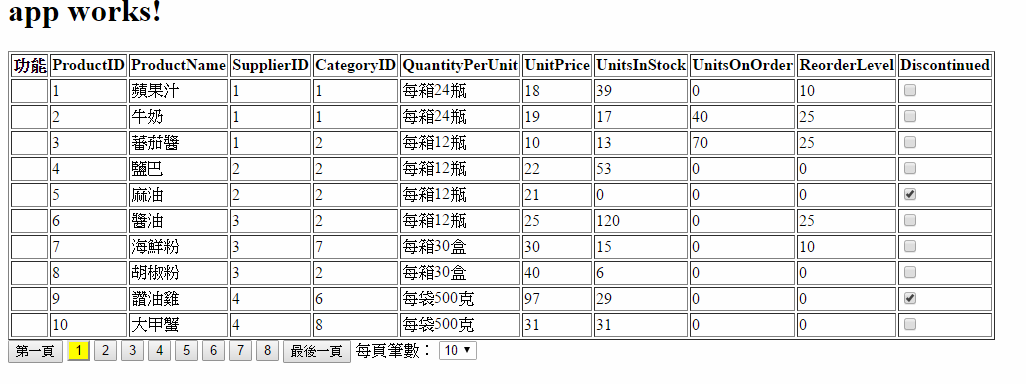
就醬子,可以執行看看囉,執行結果如下:
分頁控制
接著,我們加上分頁的控制,讓他可以切換分頁、並且可以調整每頁的筆數。
首先,開啟「prod.service.ts」,增加分頁所需要的屬性
  pageNumArray:number[]=[];   //用以存放所有分頁的數字(3頁就會是1,2,3)
  pageNumArrayMax:number=0;   //分頁數的陣列最大數
  startPg:number=0;     //分頁陣列,開始的頁數
撰寫計算分頁控制項陣列的function
  //分頁相關開始
  //  設定分頁控制項的陣列
  set_pageNumArray(){
      //初始劃分頁陣列
        this.pageNumArray=[];
        let i:number=0;

        //計算起始頁
        this.startPg = Math.floor((this.currentPageNum-1)/10)*10+1;

        if(this.startPg+10>this.totalPage){
          this.pageNumArrayMax = this.totalPage;
        }
        else{
          this.pageNumArrayMax = this.startPg+10-1;
        }
        for(i=this.startPg;i<=this.pageNumArrayMax;i++){
            this.pageNumArray.push(i);
        }
  }
  //分頁相關結束
撰寫分頁功能的畫面,在「prod.component.html」中,加上控制分頁的功能如下:
  <!--分頁開始-->
  <span><button (click)="dataSvc.GetDatasByPage(1)">第一頁</button></span>
  <span *ngIf="(dataSvc.startPg-10)>=1">
    <button (click)="dataSvc.GetDatasByPage(dataSvc.startPg-1)">...{{dataSvc.startPg-1}}</button>
  </span>
  <span *ngFor="let pn of dataSvc.pageNumArray">
    <button (click)="dataSvc.GetDatasByPage(pn)" [ngClass]="{currentPage: pn==dataSvc.currentPageNum}">{{pn}}</button>
  </span>
  <span *ngIf="dataSvc.pageNumArrayMax < dataSvc.totalPage">
    <button (click)="dataSvc.GetDatasByPage(dataSvc.pageNumArrayMax+1)">{{dataSvc.pageNumArrayMax+1}}...</button>
  </span>
  <span><button (click)="dataSvc.GetDatasByPage(dataSvc.totalPage)">最後一頁</button></span>
  每頁筆數:
  <select name="sltPageSize" id="sltPageSize" [(ngModel)]="dataSvc.pageSize" (change)="dataSvc.GetDatasByPage(dataSvc.currentPageNum)">
    <option value="5">5</option>
    <option value="10">10</option>
    <option value="15">15</option>
    <option value="20">20</option>
  </select>
  <!--分頁結束-->
其中,目前的分頁,要加上一個顏色來區別,這部分的設定,就設定在「prod.component.css」中
.currentPage{background-color:yellow;}
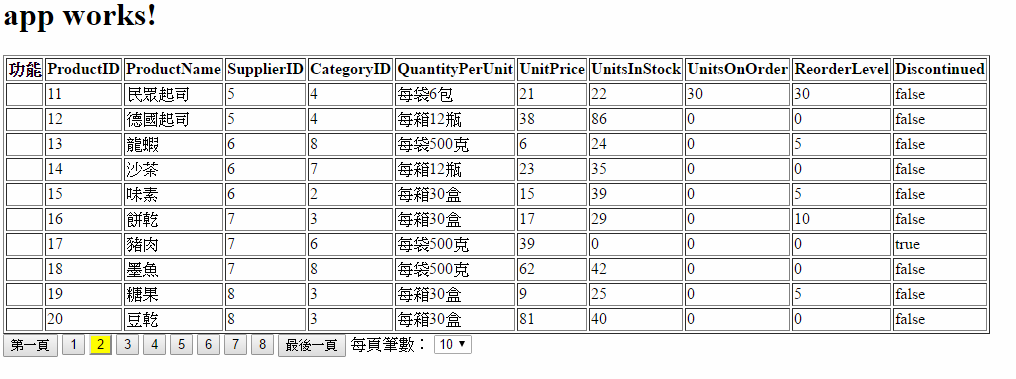
就醬子,目前的執行結果如下:
其中,Discontinued的型態是Boolen,這部分採用Checkbox比較合適,所以在稍微改寫一下html~
{{oItem.Discontinued}}改為『<input type="checkbox" [(ngModel)]="oItem.Discontinued">』,透過ngModel將input綁定oItem.Discontinued。畫面結果如下:
加上選取的按鈕
接著,我們想在每一筆的前面,增加一個『編』的按鈕,按下後,可以編輯該資料。
我們首先在『Prod.Service』中,新增一個屬性「currentData」,用來記錄被選取的那一筆資料內容。另外,用一個屬性「editMode」來記錄目前編輯區的狀況,期望按下「編」的按鈕,將currentData設定為目前該筆資料,並且設定「editMode」為『Edit』
所以我們新增兩個屬性
  currentData:any={};   //被選取作用中的單筆資料
  editMode:string='';   //記錄編輯模式為何?Edit:編輯中, AddNew:新增中,空字串為非作用中,初始值為''非作用中。
增加一個function
  doSetcurrentData(oData:any){
    this.currentData=oData;
    this.editMode='Edit';
  }
接著,在畫面中,每一筆前面增加一個按鈕,設定如下:
      <td>
        <button type="button" (click)="dataSvc.doSetcurrentData(oItem)">編</button>
      </td>
我們在畫面的下方,暫時把editMode與currentData顯示出來,因此畫面html改如下:
  <tbody>
    <tr *ngFor="let oItem of dataSvc.datas">
      <td>
        <button type="button" (click)="dataSvc.doSetcurrentData(oItem)">編</button>
      </td>
      <td>{{oItem.ProductID}}</td>
      <td>{{oItem.ProductName}}</td>
      <td>{{oItem.SupplierID}}</td>
      <td>{{oItem.CategoryID}}</td>
      <td>{{oItem.QuantityPerUnit}}</td>
      <td>{{oItem.UnitPrice}}</td>
      <td>{{oItem.UnitsInStock}}</td>
      <td>{{oItem.UnitsOnOrder}}</td>
      <td>{{oItem.ReorderLevel}}</td>
      <td>
          <input type="checkbox" [(ngModel)]="oItem.Discontinued">
      </td>
    </tr>
  </tbody>
</table>
{{dataSvc.editMode}}<br>
{{dataSvc.currentData|json}}
<hr>
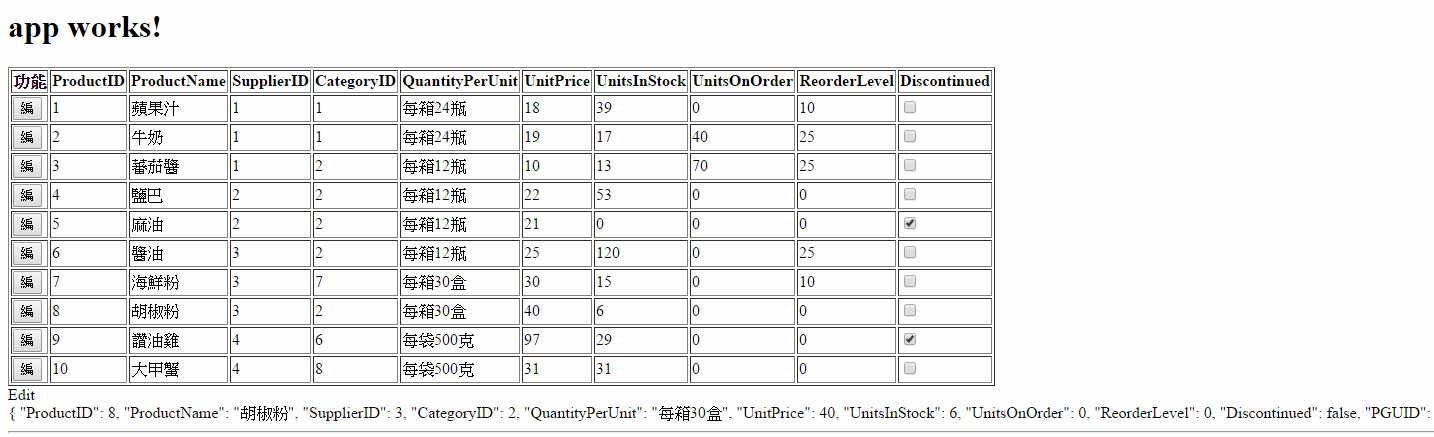
執行結果如下:
單筆維護介面
接著,我們處理單筆維護的介面。在editMode==Edit的時候,我們希望多筆顯示的區塊不顯示,另外一個區塊(單筆維護)改已顯示這個
這部分可以透過ngif來處理
我們先將目前的多筆查詢+分頁,用一個div包起來,並且再另一個div用來作編輯區,多筆查詢區,當editMode==''時,顯示,另外,編輯區則是ngif editMode!='' 的時候
另外,在編輯區,新增一個按鈕「取消」,click的時候呼叫prod service中的doCancel,將editMode的屬性內容重設為'',這樣就可以恢復瀏覽模式。
prod.service:
  doSetcurrentData(oData:any){
    this.currentData=oData;
    this.editMode='Edit';
  }

  doCancel(){
    this.editMode = '';
  }
prod.component.html:
<div *ngIf="dataSvc.editMode==''">
  <table border="1">
    <thead>
      <tr>
        <th>功能</th>
        <th>ProductID</th>
        <th>ProductName</th>
        <th>SupplierID</th>
        <th>CategoryID</th>
        <th>QuantityPerUnit</th>
        <th>UnitPrice</th>
        <th>UnitsInStock</th>
        <th>UnitsOnOrder</th>
        <th>ReorderLevel</th>
        <th>Discontinued</th>
      </tr>
    </thead>
    <tbody>
      <tr *ngFor="let oItem of dataSvc.datas">
        <td>
          <button type="button" (click)="dataSvc.doSetcurrentData(oItem)">編</button>
        </td>
        <td>{{oItem.ProductID}}</td>
        <td>{{oItem.ProductName}}</td>
        <td>{{oItem.SupplierID}}</td>
        <td>{{oItem.CategoryID}}</td>
        <td>{{oItem.QuantityPerUnit}}</td>
        <td>{{oItem.UnitPrice}}</td>
        <td>{{oItem.UnitsInStock}}</td>
        <td>{{oItem.UnitsOnOrder}}</td>
        <td>{{oItem.ReorderLevel}}</td>
        <td>
            <input type="checkbox" [(ngModel)]="oItem.Discontinued">
        </td>
      </tr>
    </tbody>
  </table>
    <!--分頁開始-->
    <span><button (click)="dataSvc.GetDatasByPage(1)">第一頁</button></span>
    <span *ngIf="(dataSvc.startPg-10)>=1">
      <button (click)="dataSvc.GetDatasByPage(dataSvc.startPg-1)">...{{dataSvc.startPg-1}}</button>
    </span>
    <span *ngFor="let pn of dataSvc.pageNumArray">
      <button (click)="dataSvc.GetDatasByPage(pn)" [ngClass]="{currentPage: pn==dataSvc.currentPageNum}">{{pn}}</button>
    </span>
    <span *ngIf="dataSvc.pageNumArrayMax < dataSvc.totalPage">
      <button (click)="dataSvc.GetDatasByPage(dataSvc.pageNumArrayMax+1)">{{dataSvc.pageNumArrayMax+1}}...</button>
    </span>
    <span><button (click)="dataSvc.GetDatasByPage(dataSvc.totalPage)">最後一頁</button></span>
    每頁筆數:
    <select name="sltPageSize" id="sltPageSize" [(ngModel)]="dataSvc.pageSize" (change)="dataSvc.GetDatasByPage(dataSvc.currentPageNum)">
      <option value="5">5</option>
      <option value="10">10</option>
      <option value="15">15</option>
      <option value="20">20</option>
    </select>
    <!--分頁結束-->
</div>
  {{dataSvc.editMode}}<br>
  {{dataSvc.currentData|json}}
  <hr>
<div *ngIf="dataSvc.editMode!=''">
  編輯區
  <br>
  <button (click)="dataSvc.doCancel()">取消</button>
</div>
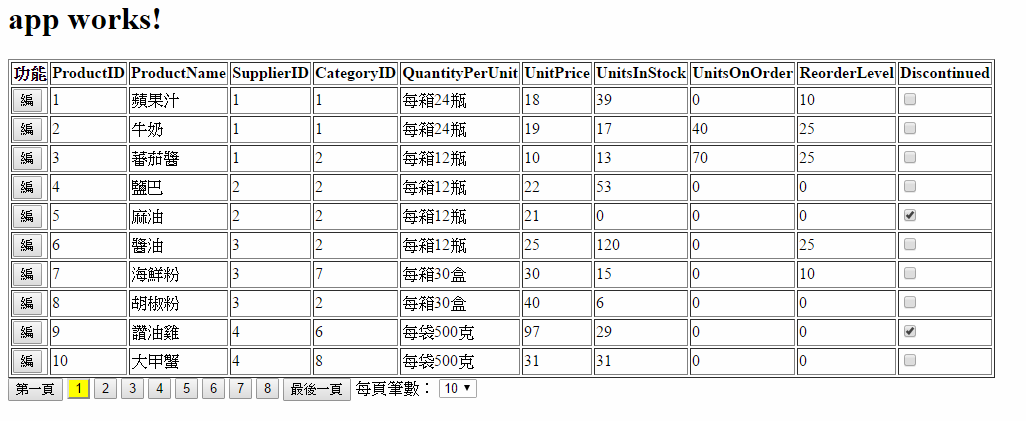
執行查詢模式時:
按下『編』按鈕後

此時再按下『取消』,則會恢復為多筆查詢模式。
套用Bootstrap
我們為了畫面的美觀,並可以響應式,將專案安裝上ng2-bootstrap,安裝的方式請參考以下
https://github.com/valor-software/ng2-bootstrap/blob/development/docs/getting-started/ng-cli.md
套用後,畫面稍微修改如下:
<div *ngIf="dataSvc.editMode==''">
  <table class="table table-hover table-striped table-bordered">
    <thead>
      <tr class="info">
        <th>功能</th>
        <th>ProductID</th>
        <th>ProductName</th>
        <th>SupplierID</th>
        <th>CategoryID</th>
        <th>QuantityPerUnit</th>
        <th>UnitPrice</th>
        <th>UnitsInStock</th>
        <th>UnitsOnOrder</th>
        <th>ReorderLevel</th>
        <th>Discontinued</th>
      </tr>
    </thead>
    <tbody>
      <tr *ngFor="let oItem of dataSvc.datas">
        <td>
          <button type="button" (click)="dataSvc.doSetcurrentData(oItem)" class="btn">編</button>
        </td>
        <td>{{oItem.ProductID}}</td>
        <td>{{oItem.ProductName}}</td>
        <td>{{oItem.SupplierID}}</td>
        <td>{{oItem.CategoryID}}</td>
        <td>{{oItem.QuantityPerUnit}}</td>
        <td>{{oItem.UnitPrice}}</td>
        <td>{{oItem.UnitsInStock}}</td>
        <td>{{oItem.UnitsOnOrder}}</td>
        <td>{{oItem.ReorderLevel}}</td>
        <td>
            <input type="checkbox" [(ngModel)]="oItem.Discontinued">
        </td>
      </tr>
    </tbody>
  </table>
    <!--分頁開始-->
    <span><button (click)="dataSvc.GetDatasByPage(1)">第一頁</button></span>
    <span *ngIf="(dataSvc.startPg-10)>=1">
      <button (click)="dataSvc.GetDatasByPage(dataSvc.startPg-1)">...{{dataSvc.startPg-1}}</button>
    </span>
    <span *ngFor="let pn of dataSvc.pageNumArray">
      <button (click)="dataSvc.GetDatasByPage(pn)" [ngClass]="{currentPage: pn==dataSvc.currentPageNum}">{{pn}}</button>
    </span>
    <span *ngIf="dataSvc.pageNumArrayMax < dataSvc.totalPage">
      <button (click)="dataSvc.GetDatasByPage(dataSvc.pageNumArrayMax+1)">{{dataSvc.pageNumArrayMax+1}}...</button>
    </span>
    <span><button (click)="dataSvc.GetDatasByPage(dataSvc.totalPage)">最後一頁</button></span>
    每頁筆數:
    <select name="sltPageSize" id="sltPageSize" [(ngModel)]="dataSvc.pageSize" (change)="dataSvc.GetDatasByPage(dataSvc.currentPageNum)">
      <option value="5">5</option>
      <option value="10">10</option>
      <option value="15">15</option>
      <option value="20">20</option>
    </select>
    <!--分頁結束-->
</div>
  {{dataSvc.editMode}}<br>
  {{dataSvc.currentData|json}}
  <hr>
<div *ngIf="dataSvc.editMode!=''">
  編輯區
  <br>
  <button (click)="dataSvc.doCancel()" class="btn">取消</button>
</div>
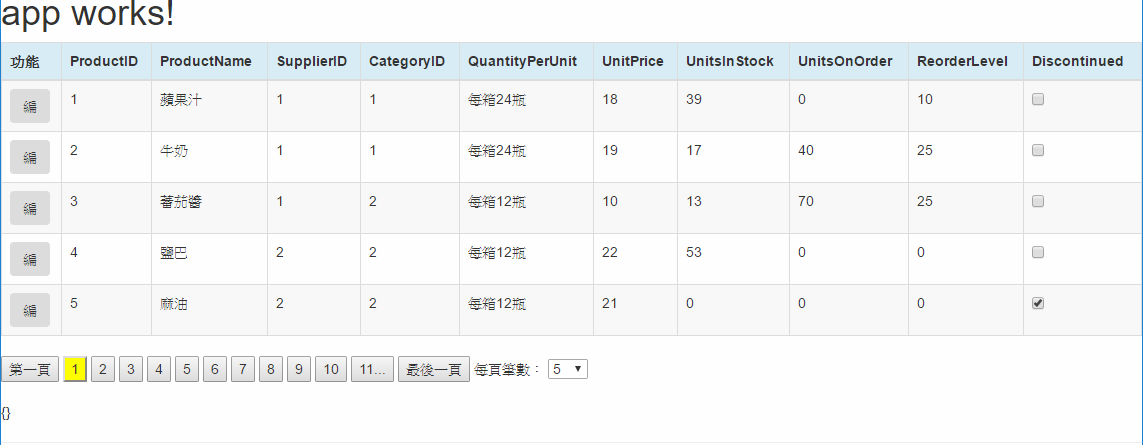
執行後,畫面UI就變成
 我們編輯區,修改單筆維護Form的相關如下:
<div class="container" *ngIf="(dataSvc.editMode!='')">
  <div class="row">
    <form class="form-horizontal">
      <fieldset>
        <legend>Product</legend>
        <div class="form-group" *ngIf="dataSvc.editMode=='Edit'">
          <label for="inputProductID" class="col-lg-2 control-label">ProductID</label>
          <div class="col-lg-10">
            <input type="text" class="form-control" id="inputProductID" name="ProductID" placeholder="ProductID" [(ngModel)]="dataSvc.currentData.ProductID">
          </div>
        </div>
        <div class="form-group">
          <label for="inputCategoryID" class="col-lg-2 control-label">CategoryID</label>
          <div class="col-lg-10">
            <input type="text" class="form-control" id="inputCategoryID" name="CategoryID" placeholder="CategoryID" [(ngModel)]="dataSvc.currentData.CategoryID">
          </div>
        </div>
        <div class="form-group">
          <label for="inputPGUID" class="col-lg-2 control-label">PGUID</label>
          <div class="col-lg-10">
            <input type="text" class="form-control" id="inputPGUID" name="PGUID" placeholder="PGUID" [(ngModel)]="dataSvc.currentData.PGUID">
          </div>
        </div>
        <div class="form-group">
          <label for="inputProductName" class="col-lg-2 control-label">ProductName</label>
          <div class="col-lg-10">
            <input type="text" class="form-control" id="inputProductName" name="ProductName" placeholder="ProductName" [(ngModel)]="dataSvc.currentData.ProductName">
          </div>
        </div>
        <div class="form-group">
          <label for="inputQuantityPerUnit" class="col-lg-2 control-label">QuantityPerUnit</label>
          <div class="col-lg-10">
            <input type="text" class="form-control" id="inputQuantityPerUnit" name="QuantityPerUnit" placeholder="QuantityPerUnit" [(ngModel)]="dataSvc.currentData.QuantityPerUnit">
          </div>
        </div>
        <div class="form-group">
          <label for="inputReorderLevel" class="col-lg-2 control-label">ReorderLevel</label>
          <div class="col-lg-10">
            <input type="text" class="form-control" id="inputReorderLevel" name="ReorderLevel" placeholder="ReorderLevel" [(ngModel)]="dataSvc.currentData.ReorderLevel">
          </div>
        </div>
        <div class="form-group">
          <label for="inputSupplierID" class="col-lg-2 control-label">SupplierID</label>
          <div class="col-lg-10">
            <input type="text" class="form-control" id="inputSupplierID" name="SupplierID" placeholder="SupplierID" [(ngModel)]="dataSvc.currentData.SupplierID">
          </div>
        </div>
        <div class="form-group">
          <label for="inputUnitPrice" class="col-lg-2 control-label">UnitPrice</label>
          <div class="col-lg-10">
            <input type="text" class="form-control" id="inputUnitPrice" name="UnitPrice" placeholder="UnitPrice" [(ngModel)]="dataSvc.currentData.UnitPrice">
          </div>
        </div>
        <div class="form-group">
          <label for="inputUnitsInStock" class="col-lg-2 control-label">UnitsInStock</label>
          <div class="col-lg-10">
            <input type="text" class="form-control" id="inputUnitsInStock" name="UnitsInStock" placeholder="UnitsInStock" [(ngModel)]="dataSvc.currentData.UnitsInStock">
          </div>
        </div>
        <div class="form-group">
          <label for="inputUnitsOnOrder" class="col-lg-2 control-label">UnitsOnOrder</label>
          <div class="col-lg-10">
            <input type="text" class="form-control" id="inputUnitsOnOrder" name="CategoryID" placeholder="UnitsOnOrder" [(ngModel)]="dataSvc.currentData.UnitsOnOrder">
          </div>
        </div>
        <div class="form-group">
          <label for="chkDiscontinued" class="col-lg-2 control-label">Discontinued</label>
          <div class="col-lg-10">
            <div class="checkbox">
              <label>
                <input type="checkbox" id="chkDiscontinued" name="Discontinued" [(ngModel)]="dataSvc.currentData.Discontinued"> Discontinued
              </label>
            </div>
          </div>
        </div>
        <div class="form-group">
          <div class="col-lg-10 col-lg-offset-2">
            <button type="button" class="btn btn-default"
              (click)="dataSvc.editMode=''"
            >取消</button>
          </div>
        </div>
      </fieldset>
    </form>
  </div>
</div>
在表單中,直接將Prod Service中的currentData與各控制項做雙向綁定,因此,在點選資料後,可以立即的看到資料,而且修改資料後,可以立即反映到Prod Service中的currentData。
接著在Prod Service中,我們加上新增、修改、刪除的相關function,去存取對應的API如下:
  //新增
  doInsert(){
    let url=this.serverName +'/api/Prod';
    let headers = new Headers({'Content-Type':'application/json'});
    let options = new RequestOptions({headers:headers});
    this.http.post(url,this.currentData, options)
    .subscribe(
      (value:Response)=>{
        this.GetDatasByPage(this.currentPageNum);
        this.editMode = '';
      },
      (error)=>{
        this.error = error;
      }
    );
  }

  //修改
  doUpdate(){
    let url=this.serverName +'/api/Prod';
    let headers = new Headers({'Content-Type':'application/json'});
    let options = new RequestOptions({headers:headers});

    this.http.put(url,this.currentData,options)
    .subscribe(
      (value:Response)=>{
        this.GetDatasByPage(this.currentPageNum);
        this.currentData = {};
        this.editMode='';
      },
      (error)=>{
        this.error = error;
      }
    );
  }

  //刪除
  doDelete(){
    let ProductID:number = this.currentData.ProductID;
    let url=this.serverName +'/api/Prod/Delete/' + ProductID.toString();
    let headers = new Headers({'Content-Type':'application/json'});
    let options = new RequestOptions({headers:headers});

    this.http.delete(url,options)
    .subscribe(
      (value:Response)=>{
        this.GetDatasByPage(this.currentPageNum);
        this.editMode='';
      },
      (error)=>{
        this.error = error;
      }
    );
  }
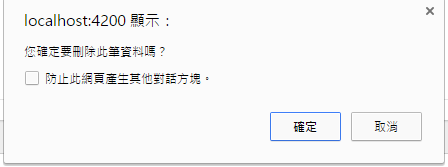
另外,我們希望按下刪除時,可以多一個confirm來確認是否真的要刪除,所以在prod.component.ts中,新增一個doDelete的function
  doDelete(){
    if(confirm('您確定要刪除此筆資料嗎?')){
      this.dataSvc.doDelete();
    }
  }
最後,prod.component中,我們在單筆維護介面中,加上維護新增、修改、刪除的按鈕,如下:
            <button class="btn btn-primary" *ngIf="dataSvc.editMode=='AddNew'"
              (click)="dataSvc.doInsert()"
            >維護新增</button>
            <button type="button" class="btn btn-primary" *ngIf="dataSvc.editMode=='Edit'"
             (click)="dataSvc.doUpdate()"
             >更新</button>
             <button type="button" class="btn" *ngIf="dataSvc.editMode=='Edit'"
              (click)="doDelete()"
             >刪除</button>
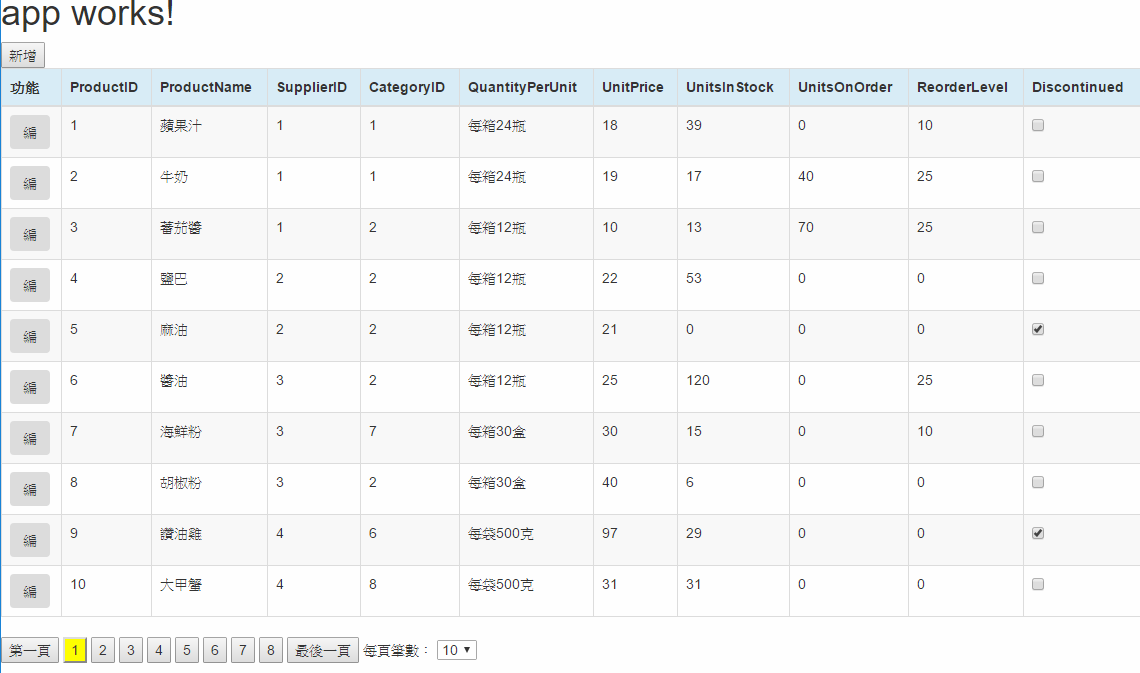
如此單筆維護的介面差不多囉,還差一個新增單筆的按鈕。我們在畫面table的上方新增一個按鈕,讓editMode切換為AddNew,醬子就大功告成囉。
完成後畫面如下:
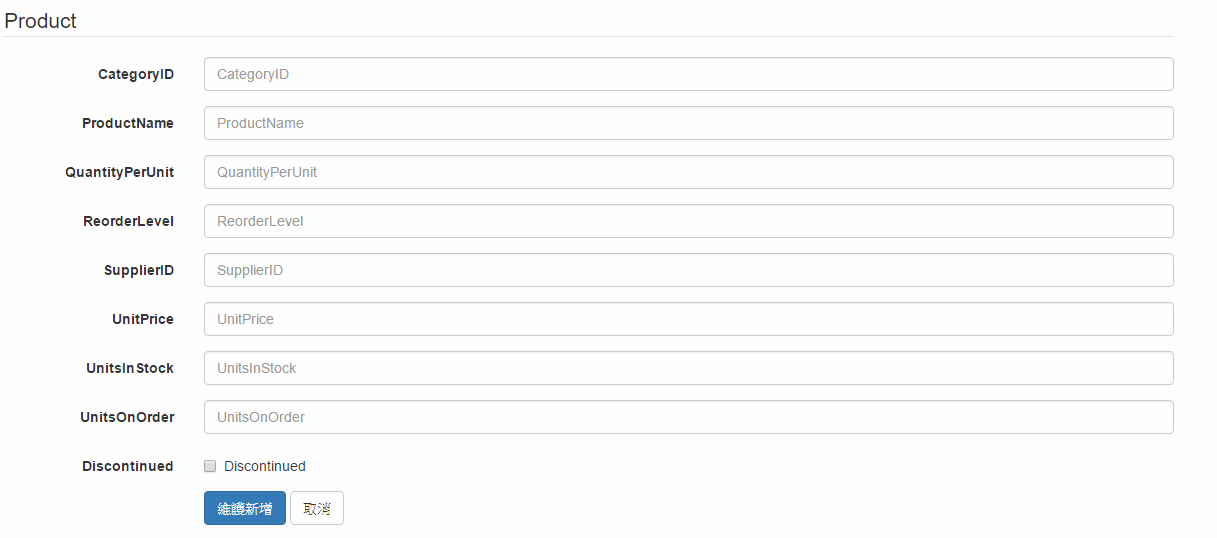
按下新增:
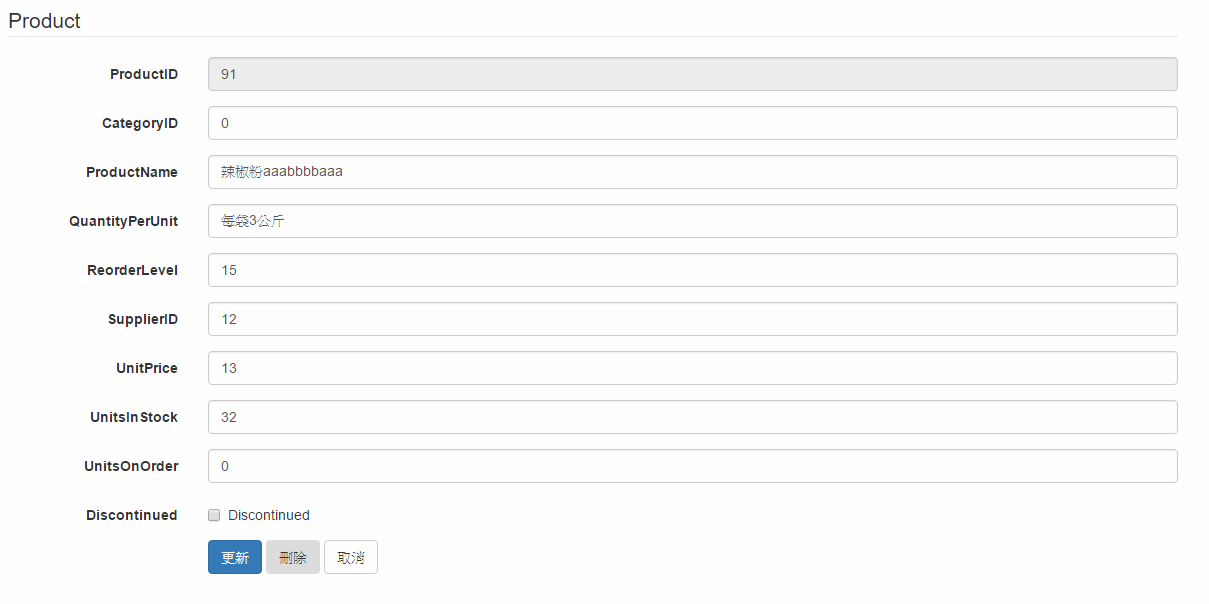
點選單一筆資料:
按下刪除,出現確認對話視窗
就醬子,多筆查詢+分頁+單筆維護的CRUD完成。
整理最終程式碼如下:
Data Service : Prod.Service.ts
import { Http, Headers, RequestOptions, Response } from '@angular/http';
import { Injectable } from '@angular/core';

@Injectable()
export class ProdService {

  //API來源名稱
  serverName:string='http://localhost:54514/'

  //取回的內容
  datas:any=[];
  error:any;
  currentData:any={};   //被選取作用中的單筆資料
  editMode:string='';   //記錄編輯模式為何?Edit:編輯中, AddNew:新增中,空字串為非作用中,初始值為''非作用中。

  //分頁相關屬性開始
  currentPageNum:number=1;
  pageSize:number=10;
  totalPage:number=0;

  pageNumArray:number[]=[];   //用以存放所有分頁的數字(3頁就會是1,2,3)
  pageNumArrayMax:number=0;   //分頁數的陣列最大數
  startPg:number=0;     //分頁陣列,開始的頁數
  //分頁相關屬性結束


  constructor(private http:Http) {
    this.GetDatasByPage(1);
  }


  //分頁相關開始
  //  設定分頁控制項的陣列
  set_pageNumArray(){
      //初始劃分頁陣列
        this.pageNumArray=[];
        let i:number=0;

        //計算起始頁
        this.startPg = Math.floor((this.currentPageNum-1)/10)*10+1;

        if(this.startPg+10>this.totalPage){
          this.pageNumArrayMax = this.totalPage;
        }
        else{
          this.pageNumArrayMax = this.startPg+10-1;
        }
        for(i=this.startPg;i<=this.pageNumArrayMax;i++){
            this.pageNumArray.push(i);
        }
  }
  //分頁相關結束


  GetDatasByPage(pageNum:number){
    this.currentPageNum = pageNum;
    let url:string=this.serverName + 'api/prod/' + this.currentPageNum.toString() + '/' + this.pageSize.toString();
    let headers = new Headers({'Content-Type':'application/json'});
    let options = new RequestOptions({headers:headers});

    this.http.get(url, options)
    .subscribe(
      (value:Response)=>{
        let jData:any;
        jData = value.json();
        this.datas = jData.oPages;
        this.totalPage = jData.TotalPage;
        this.set_pageNumArray();
      },
      (error)=>{
        this.error = error;
      }
    );
  }

  doSetcurrentData(oData:any){
    this.currentData=oData;
    this.editMode='Edit';
  }

  doCancel(){
    this.editMode = '';
  }

  //新增
  doInsert(){
    let url=this.serverName +'/api/Prod';
    let headers = new Headers({'Content-Type':'application/json'});
    let options = new RequestOptions({headers:headers});
    this.http.post(url,this.currentData, options)
    .subscribe(
      (value:Response)=>{
        this.GetDatasByPage(this.currentPageNum);
        this.editMode = '';
      },
      (error)=>{
        this.error = error;
      }
    );
  }

  //修改
  doUpdate(){
    let url=this.serverName +'/api/Prod';
    let headers = new Headers({'Content-Type':'application/json'});
    let options = new RequestOptions({headers:headers});

    this.http.put(url,this.currentData,options)
    .subscribe(
      (value:Response)=>{
        this.GetDatasByPage(this.currentPageNum);
        this.currentData = {};
        this.editMode='';
      },
      (error)=>{
        this.error = error;
      }
    );
  }

  //刪除
  doDelete(){
    let ProductID:number = this.currentData.ProductID;
    let url=this.serverName +'/api/Prod/Delete/' + ProductID.toString();
    let headers = new Headers({'Content-Type':'application/json'});
    let options = new RequestOptions({headers:headers});

    this.http.delete(url,options)
    .subscribe(
      (value:Response)=>{
        this.GetDatasByPage(this.currentPageNum);
        this.editMode='';
      },
      (error)=>{
        this.error = error;
      }
    );
  }

}
Prod Component :
ts:
import { ProdService } from './../prod.service';
import { Component, OnInit } from '@angular/core';

@Component({
  selector: 'app-prod',
  templateUrl: './prod.component.html',
  styleUrls: ['./prod.component.css']
})
export class ProdComponent implements OnInit {

  constructor(public dataSvc:ProdService) { }

  ngOnInit() {
  }

  doDelete(){
    if(confirm('您確定要刪除此筆資料嗎?')){
      this.dataSvc.doDelete();
    }
  }
}
css:
.currentPage{background-color:yellow;}
html:
<div *ngIf="dataSvc.editMode==''">
  <button (click)="dataSvc.editMode='AddNew'">新增</button>
  <table class="table table-hover table-striped table-bordered">
    <thead>
      <tr class="info">
        <th>功能</th>
        <th>ProductID</th>
        <th>ProductName</th>
        <th>SupplierID</th>
        <th>CategoryID</th>
        <th>QuantityPerUnit</th>
        <th>UnitPrice</th>
        <th>UnitsInStock</th>
        <th>UnitsOnOrder</th>
        <th>ReorderLevel</th>
        <th>Discontinued</th>
      </tr>
    </thead>
    <tbody>
      <tr *ngFor="let oItem of dataSvc.datas">
        <td>
          <button type="button" (click)="dataSvc.doSetcurrentData(oItem)" class="btn">編</button>
        </td>
        <td>{{oItem.ProductID}}</td>
        <td>{{oItem.ProductName}}</td>
        <td>{{oItem.SupplierID}}</td>
        <td>{{oItem.CategoryID}}</td>
        <td>{{oItem.QuantityPerUnit}}</td>
        <td>{{oItem.UnitPrice}}</td>
        <td>{{oItem.UnitsInStock}}</td>
        <td>{{oItem.UnitsOnOrder}}</td>
        <td>{{oItem.ReorderLevel}}</td>
        <td>
            <input type="checkbox" [(ngModel)]="oItem.Discontinued">
        </td>
      </tr>
    </tbody>
  </table>
    <!--分頁開始-->
    <span><button (click)="dataSvc.GetDatasByPage(1)">第一頁</button></span>
    <span *ngIf="(dataSvc.startPg-10)>=1">
      <button (click)="dataSvc.GetDatasByPage(dataSvc.startPg-1)">...{{dataSvc.startPg-1}}</button>
    </span>
    <span *ngFor="let pn of dataSvc.pageNumArray">
      <button (click)="dataSvc.GetDatasByPage(pn)" [ngClass]="{currentPage: pn==dataSvc.currentPageNum}">{{pn}}</button>
    </span>
    <span *ngIf="dataSvc.pageNumArrayMax < dataSvc.totalPage">
      <button (click)="dataSvc.GetDatasByPage(dataSvc.pageNumArrayMax+1)">{{dataSvc.pageNumArrayMax+1}}...</button>
    </span>
    <span><button (click)="dataSvc.GetDatasByPage(dataSvc.totalPage)">最後一頁</button></span>
    每頁筆數:
    <select name="sltPageSize" id="sltPageSize" [(ngModel)]="dataSvc.pageSize" (change)="dataSvc.GetDatasByPage(dataSvc.currentPageNum)">
      <option value="5">5</option>
      <option value="10">10</option>
      <option value="15">15</option>
      <option value="20">20</option>
    </select>
    <!--分頁結束-->
</div>

<div class="container" *ngIf="(dataSvc.editMode!='')">
  <div class="row">
    <form class="form-horizontal">
      <fieldset>
        <legend>Product</legend>
        <div class="form-group" *ngIf="dataSvc.editMode=='Edit'">
          <label for="inputProductID" class="col-lg-2 control-label">ProductID</label>
          <div class="col-lg-10">
            <input type="text" class="form-control" id="inputProductID" name="ProductID" placeholder="ProductID" [(ngModel)]="dataSvc.currentData.ProductID" readonly>
          </div>
        </div>
        <div class="form-group">
          <label for="inputCategoryID" class="col-lg-2 control-label">CategoryID</label>
          <div class="col-lg-10">
            <input type="text" class="form-control" id="inputCategoryID" name="CategoryID" placeholder="CategoryID" [(ngModel)]="dataSvc.currentData.CategoryID">
          </div>
        </div>
        <div class="form-group">
          <label for="inputProductName" class="col-lg-2 control-label">ProductName</label>
          <div class="col-lg-10">
            <input type="text" class="form-control" id="inputProductName" name="ProductName" placeholder="ProductName" [(ngModel)]="dataSvc.currentData.ProductName">
          </div>
        </div>
        <div class="form-group">
          <label for="inputQuantityPerUnit" class="col-lg-2 control-label">QuantityPerUnit</label>
          <div class="col-lg-10">
            <input type="text" class="form-control" id="inputQuantityPerUnit" name="QuantityPerUnit" placeholder="QuantityPerUnit" [(ngModel)]="dataSvc.currentData.QuantityPerUnit">
          </div>
        </div>
        <div class="form-group">
          <label for="inputReorderLevel" class="col-lg-2 control-label">ReorderLevel</label>
          <div class="col-lg-10">
            <input type="text" class="form-control" id="inputReorderLevel" name="ReorderLevel" placeholder="ReorderLevel" [(ngModel)]="dataSvc.currentData.ReorderLevel">
          </div>
        </div>
        <div class="form-group">
          <label for="inputSupplierID" class="col-lg-2 control-label">SupplierID</label>
          <div class="col-lg-10">
            <input type="text" class="form-control" id="inputSupplierID" name="SupplierID" placeholder="SupplierID" [(ngModel)]="dataSvc.currentData.SupplierID">
          </div>
        </div>
        <div class="form-group">
          <label for="inputUnitPrice" class="col-lg-2 control-label">UnitPrice</label>
          <div class="col-lg-10">
            <input type="text" class="form-control" id="inputUnitPrice" name="UnitPrice" placeholder="UnitPrice" [(ngModel)]="dataSvc.currentData.UnitPrice">
          </div>
        </div>
        <div class="form-group">
          <label for="inputUnitsInStock" class="col-lg-2 control-label">UnitsInStock</label>
          <div class="col-lg-10">
            <input type="text" class="form-control" id="inputUnitsInStock" name="UnitsInStock" placeholder="UnitsInStock" [(ngModel)]="dataSvc.currentData.UnitsInStock">
          </div>
        </div>
        <div class="form-group">
          <label for="inputUnitsOnOrder" class="col-lg-2 control-label">UnitsOnOrder</label>
          <div class="col-lg-10">
            <input type="text" class="form-control" id="inputUnitsOnOrder" name="CategoryID" placeholder="UnitsOnOrder" [(ngModel)]="dataSvc.currentData.UnitsOnOrder">
          </div>
        </div>
        <div class="form-group">
          <label for="chkDiscontinued" class="col-lg-2 control-label">Discontinued</label>
          <div class="col-lg-10">
            <div class="checkbox">
              <label>
                <input type="checkbox" id="chkDiscontinued" name="Discontinued" [(ngModel)]="dataSvc.currentData.Discontinued"> Discontinued
              </label>
            </div>
          </div>
        </div>
        <div class="form-group">
          <div class="col-lg-10 col-lg-offset-2">
            <button class="btn btn-primary" *ngIf="dataSvc.editMode=='AddNew'"
              (click)="dataSvc.doInsert()"
            >維護新增</button>
            <button type="button" class="btn btn-primary" *ngIf="dataSvc.editMode=='Edit'"
             (click)="dataSvc.doUpdate()"
             >更新</button>
             <button type="button" class="btn" *ngIf="dataSvc.editMode=='Edit'"
              (click)="doDelete()"
             >刪除</button>
            <button type="button" class="btn btn-default"
              (click)="dataSvc.editMode=''"
            >取消</button>
          </div>
        </div>
      </fieldset>
    </form>
  </div>
</div>
末記:
單一資料表CRUD,其中Component的html與資料提供的Data Service彼此關係還蠻密切的。除了資料外,大部分使用到的變數,都設定在Service中的參數,然後直接取用。這樣的方式撰寫起來,與之前在Angular 1.x時開發的感覺有點點雷同。只是以前1.X會將這些變數寫在Controller,但Angular 2則是寫在Service中。其中,分頁的部分屬性與function,其實可以抽出來放一個類別。沒有必要每個CRUD都寫一遍,分頁抽出類別後,撰寫Service的時候,再import進來使用即可。
小喵將CRUD的相關程式記錄下來,提供自己與網友們參考。
2017/10/2 補充:
這一篇的表格,雖然具有分頁功能,但基本的還是缺了排序的功能,相關『排序』的部分,我們補充了一篇,相關連結如下:
[筆記][angular][排序] angular 2 / 4 查詢畫面增加 排序功能
^_^
以下是簽名:
- 歡迎轉貼本站的文章,不過請在貼文主旨上加上【轉貼】,並在文章中附上本篇的超連結與站名【topcat姍舞之間的極度凝聚】,感恩大家的配合。
- 小喵大部分的文章會以小喵熟悉的語言VB.NET撰寫,如果您需要C#的Code,也許您可以試著用線上的工具進行轉換,這裡提供幾個參考
| Microsoft MVP Visual Studio and Development Technologies (2005~2019/6) | topcat Blog:http://www.dotblogs.com.tw/topcat |