使用 Swashbuckle - Swagger for WebApi 自動建立 Web API 線上說明文件
前言
開發Web API服務給其他系統串接使用時,由於初期的異動性較高,因此常常會有調整個需求,如果還是以傳統的方式使用規格文件(Excel/Word)作為溝通方式,其實時效性是相當差的,而且有可能會發生規格文件與實際程式不符的情況發生。此時就可以使用 Swashbuckle 作為線上API說明文件的產生器,讓文件透過程式註解自動產出,達到文件規格與程式需求完全一致,避免上述問題及困擾發生。以下介紹。

環境
- Visual Studio 2015
- Swashbuckle v5.3.2
環境建立
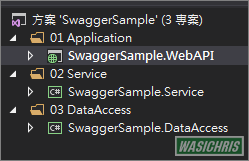
簡單建立一個WebAPI專案,以及相關分層類別庫專案。
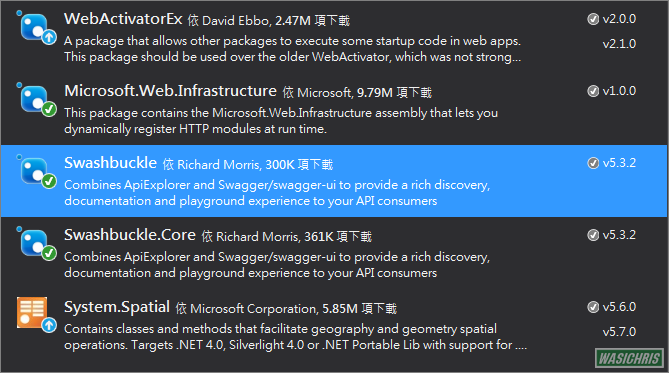
在WebAPI專案中使用Nuget下載安裝Swashbuckle套件,會連同Swashbuckle.Core一併下載。
資訊來源
線上說明文件的資訊來源可想而知一定是從註解來的,因此我們需要將XML文件檔案輸出。由於WebAPI專案(SwaggerSample.WebAPI)中會參考使用到其他專案(SwaggerSample.Service)類別,因此也要一併輸出才會在線上說明文件中顯示。直接右鍵點選專案選擇屬性,切換至建置頁籤後在輸出設定中勾選XML文件檔案即可。
SwaggerSample.WebAPI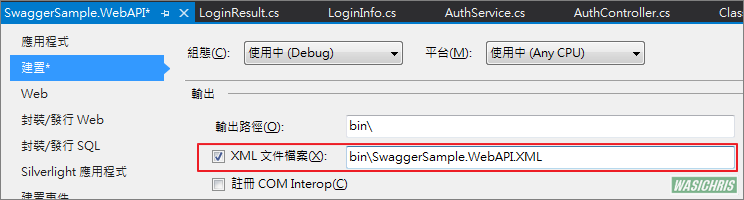
SwaggerSample.Service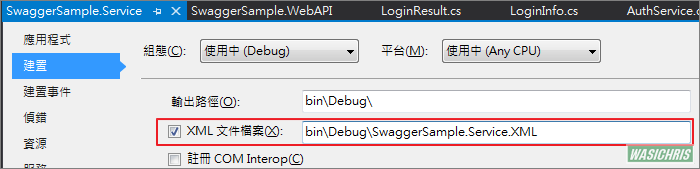
在來由於佈署網站的便利性,透過建置後事件命令集將所有XML檔案集中至App_Data資料夾中。
xcopy /y "$(TargetDir)SwaggerSample.Webapi.xml" "$(ProjectDir)App_Data\"
xcopy /y "$(TargetDir)SwaggerSample.Service.xml" "$(ProjectDir)App_Data\"
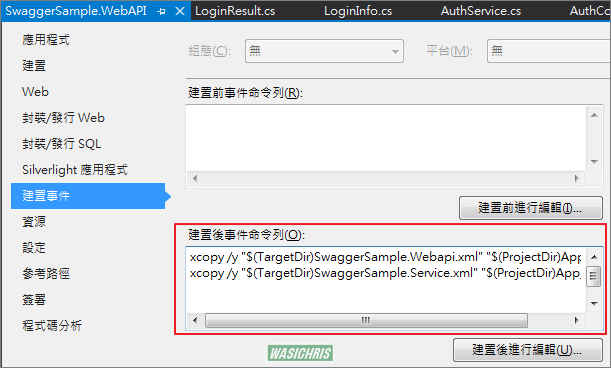
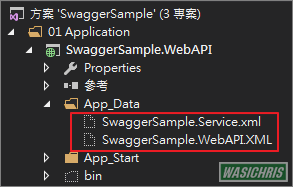
建置後確實將XML都複製到App_Data資料夾中
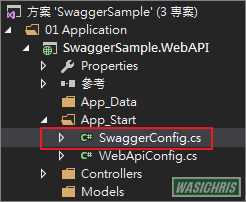
最後只要告訴 Swagger 所需XML檔案放置位置就可以了
先打開 App_Start \ SwaggerConfig 設定檔
加上2個取得XML檔案路徑的方法
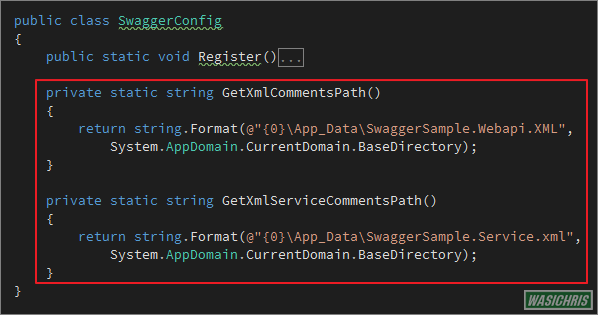
private static string GetXmlCommentsPath()
{
    return string.Format(@"{0}\App_Data\SwaggerSample.Webapi.XML",
        System.AppDomain.CurrentDomain.BaseDirectory);
}

private static string GetXmlServiceCommentsPath()
{
    return string.Format(@"{0}\App_Data\SwaggerSample.Service.xml",
        System.AppDomain.CurrentDomain.BaseDirectory);
}
最後在Register方法中設定XML檔案路徑(可允許多筆),一切就大功告成啦!!
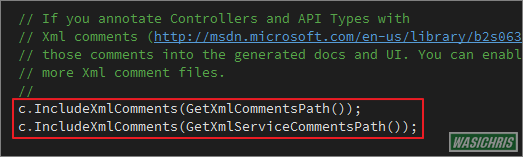
c.IncludeXmlComments(GetXmlCommentsPath());
c.IncludeXmlComments(GetXmlServiceCommentsPath());
火力展示
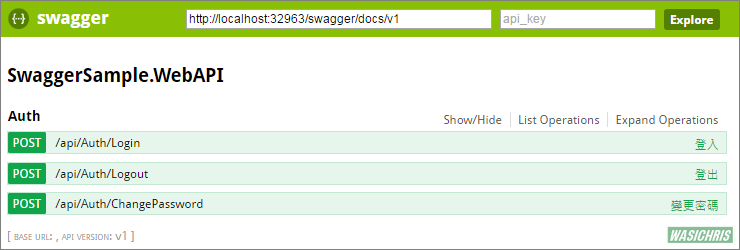
啟動站台後,直接在WebAPI路徑後方加上swagger就可以進入線上說明文件頁面
http://localhost:32963/swagger/
可以清楚了解此站台提供多少種API服務
以登入功能為例,點選後展開文件如下,文件上的資料都是對應到程式碼註解中。
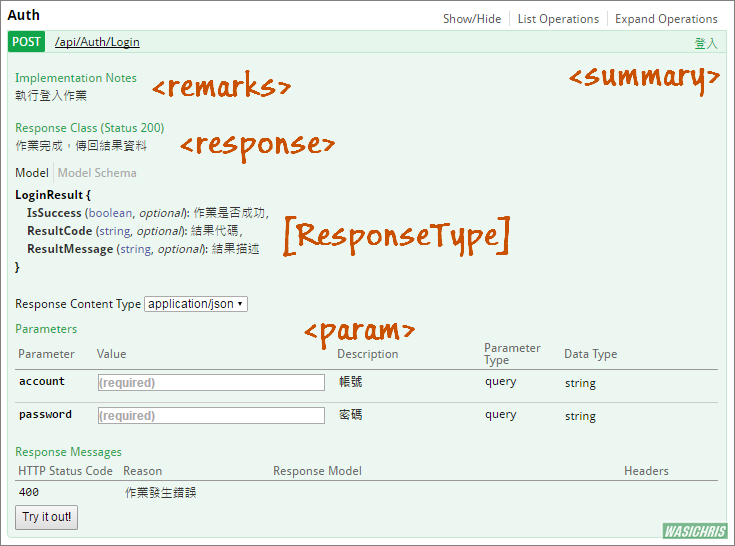
對應代碼如下,稍微比較一下就可以知道註解相對於文件上的位置了
/// <summary>
/// 登入
/// </summary>
/// <param name="account">帳號</param>
/// <param name="password">密碼</param>
/// <remarks>
/// 執行登入作業
/// </remarks>
/// <response code="200">作業完成,傳回結果資料</response>
/// <response code="400">作業發生錯誤</response>
[ResponseType(typeof(LoginResult))]
public IHttpActionResult Login(string account, string password)
{
    try
    {
        var loginResult = new LoginResult();

        if (account == "1" && password == "2")
        {
            loginResult.IsSuccess = true;
            loginResult.ResultCode = "100";
            loginResult.ResultMessage = "登入成功";
        }
        else
        {
            loginResult.IsSuccess = false;
            loginResult.ResultCode = "200";
            loginResult.ResultMessage = "帳號密碼錯誤";
        }

        return Ok(loginResult);
    }
    catch (Exception)
    {
        // log exception here
        return BadRequest("異常");
    }
}
登入回傳結果之類別如下
namespace SwaggerSample.Service.DTO
{
    public class LoginResult
    {
        /// <summary>
        /// 作業是否成功
        /// </summary>
        public bool IsSuccess { get; set; }

        /// <summary>
        /// 結果代碼
        /// </summary>
        public string ResultCode { get; set; }

        /// <summary>
        /// 結果描述
        /// </summary>
        public string ResultMessage { get; set; }
    }
}
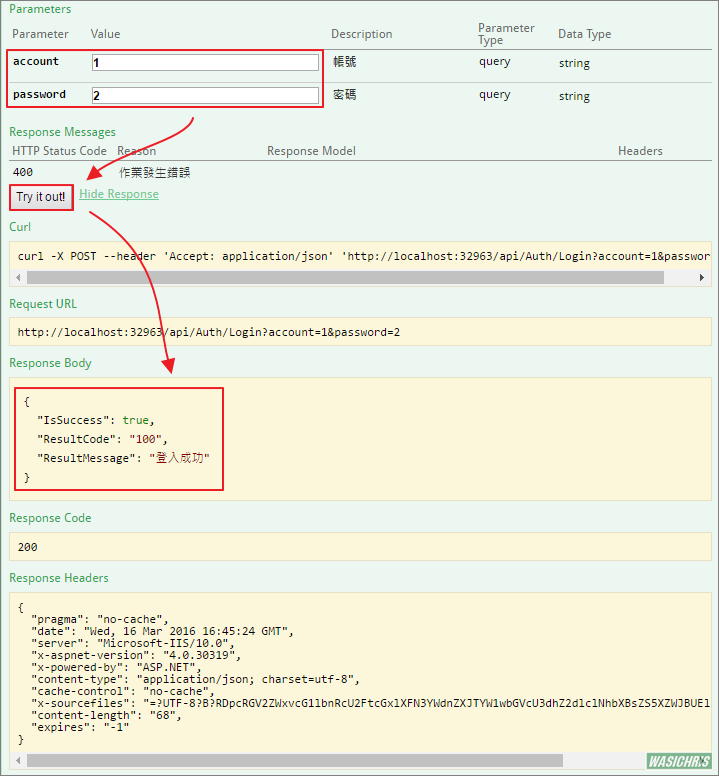
另外還可以直接在頁面上直接點選Try it out測試API功能,真是方便阿
參考資訊
http://kevintsengtw.blogspot.tw/2015/12/swashbuckle-swagger-for-web-api.html
http://www.codeproject.com/Articles/1078249/RESTful-Web-API-Help-Documentation-using-Swagger-U
希望此篇文章可以幫助到需要的人
若內容有誤或有其他建議請不吝留言給筆者喔 !