[C#.NET][WCF] 實作 單向 MSMQ @self-host for NetMsmqBinding
MSMQ 提供一種非連接式的發送方式,也就是離線通訊方式,使得發送者可以在離線狀態下工作,網路上隨便找都一堆,本篇則是要利用 WCF Framework 下實作MSMQ
必要條件,開始前要安裝 Windows 環境,我準備了兩台電腦,安裝了相同的環境
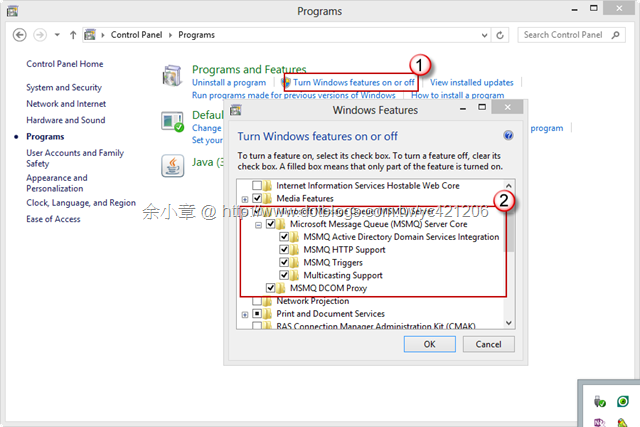
安裝MSMQ at Windows 8
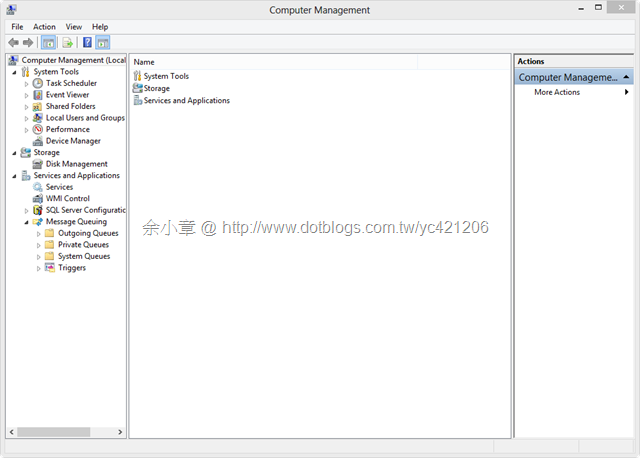
安裝完成後畫面如下:
實作步驟:
@合約專案:Tako.MSMQ.Contract
[ServiceContract]
public interface IService1
{
    [OperationContract(IsOneWay = true)]
    void SendUser(User user);
}


[DataContract]
public class User
{
    [DataMember]
    public string Name { get; set; }

    [DataMember]
    public int Age { get; set; }

    public override string ToString()
    {
        return string.Format("Name:{0},Age:{1}", this.Name, this.Age);
    }
}
Note.若介面方法沒有定義 IsOneWay 或 void 當載體載入服務時就會跳出例外
@載體專案:Host
public class Service1 : IService1
{
    public void SendUser(User user)
    {
        //TODO:接收到訊息要處理的事
        Console.WriteLine("接收 : " + user);
    }
}
@載體專案:Host
使用 MessageQueue 建立佇列
使用 ServiceHost 裝載 WCF 服務
internal class Program
{
    public const String QueueName = @".\private$\takoQueue";

    private static void Main(string[] args)
    {
        if (!MessageQueue.Exists(QueueName))
        {
            MessageQueue.Create(QueueName, true);
            Console.WriteLine("佇列不存在.新增佇列");
        }
        else
        {
            Console.WriteLine("佇列已存在.");
        }

        ServiceHost serviceHost = null;
        try
        {
            serviceHost = new ServiceHost(typeof(Service1));
            serviceHost.Open();
            Console.WriteLine("服務就緒.");
            Console.WriteLine("按任意鍵離開服務.....");
            Console.WriteLine();
            Console.ReadLine();
        }
        finally
        {
            serviceHost.Close();
        }
    }
}
Note.非AD的 Queue 使用必須使用 private$,注意有 $ 符號
@載體專案:Host
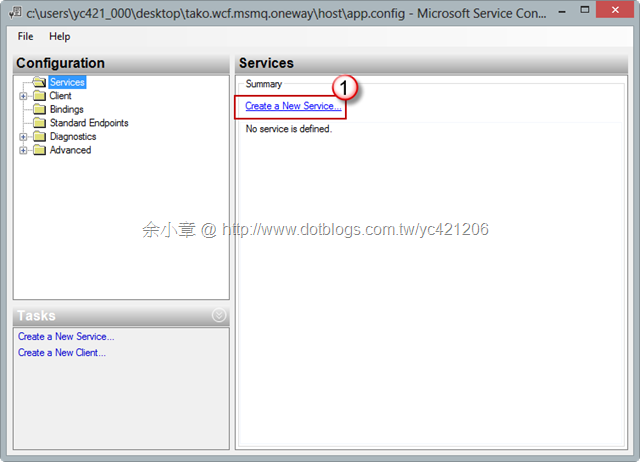
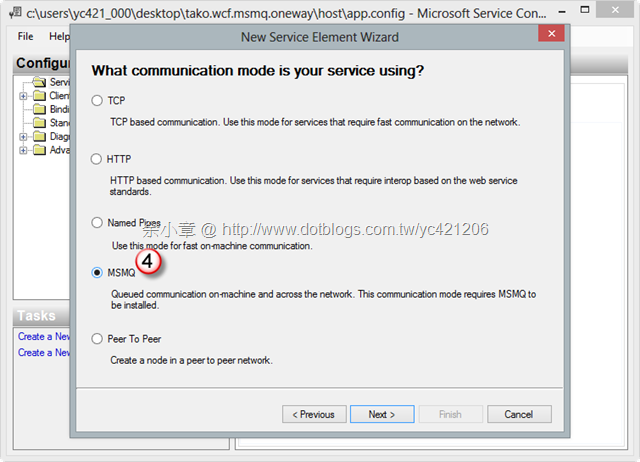
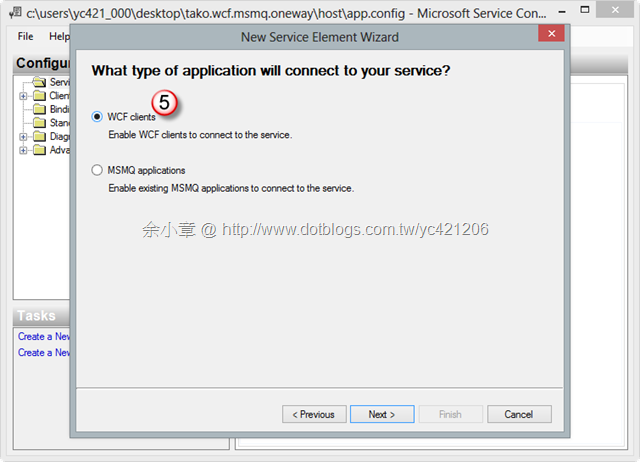
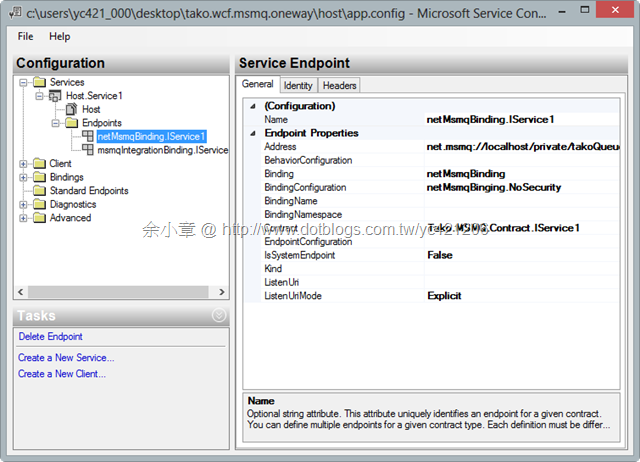
建立一個新的服務
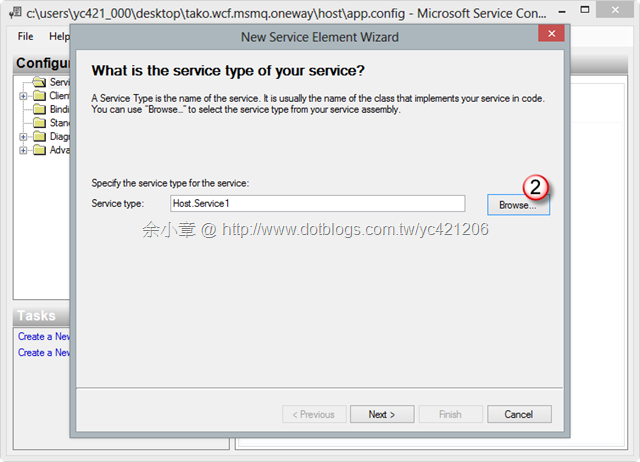
選擇我們剛剛實作的 Service1
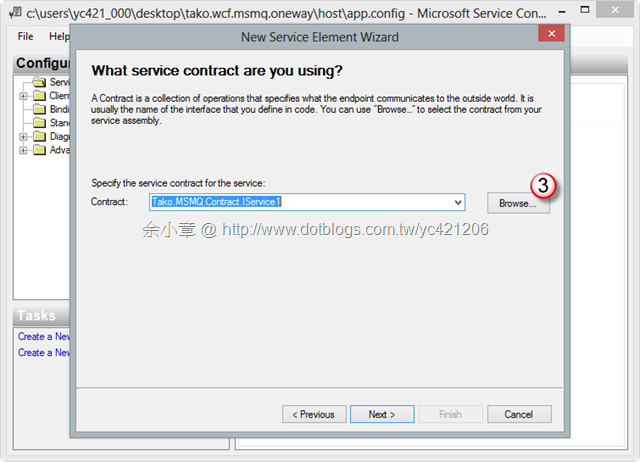
選擇合約
輸入服務名稱
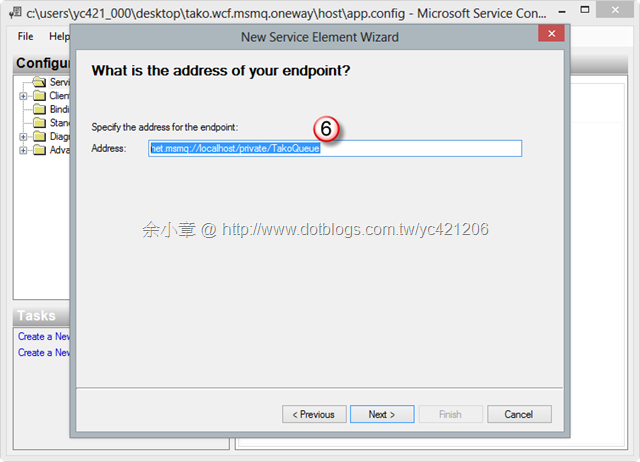
net.msmq://localhost/private/TakoQueue
完成
Note.一個 ServiceHost 只能設定一個Endpoint
若設定多個則會引發例外
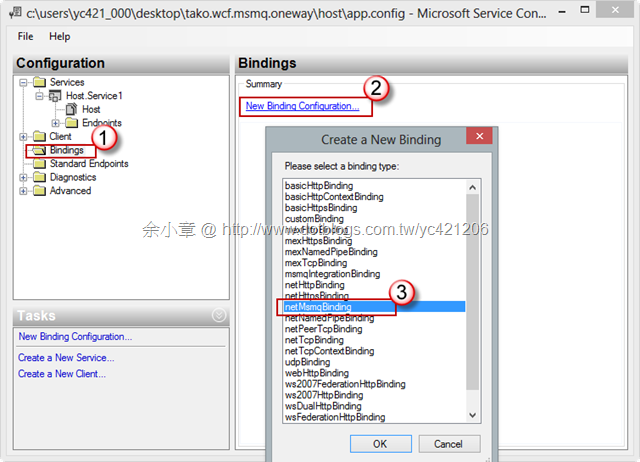
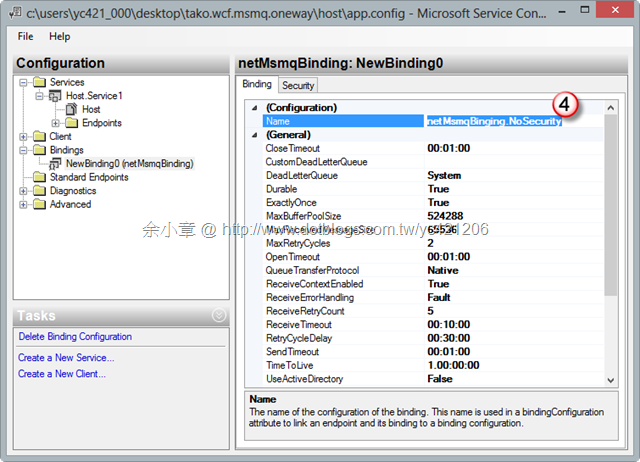
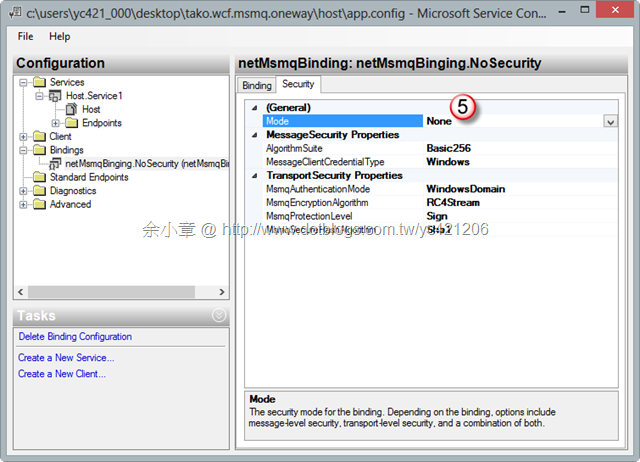
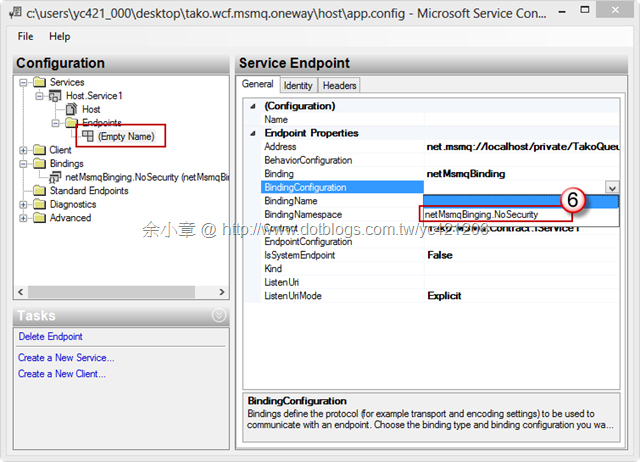
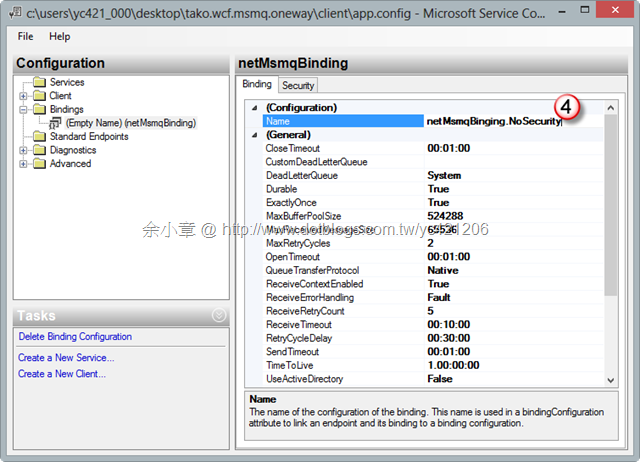
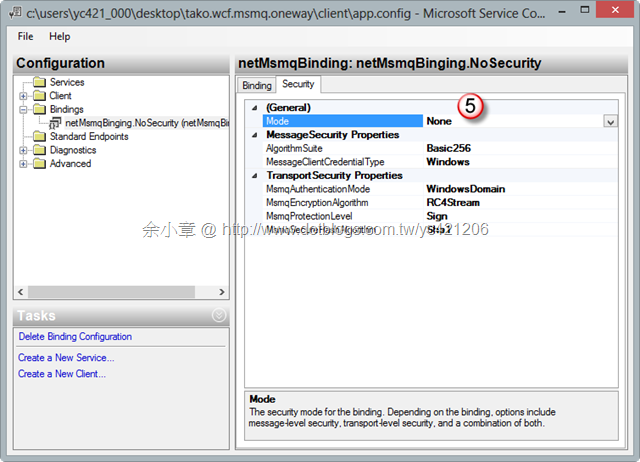
定義Bindings
套用
設定完成後存檔
完整的設定檔
<?xml version="1.0" encoding="utf-8" ?>
<configuration>
  <startup>
    <supportedRuntime version="v4.0" sku=".NETFramework,Version=v4.5" />
  </startup>
  <system.serviceModel>
    <bindings>
      <netMsmqBinding>
        <binding name="netMsmqBinging.NoSecurity">
          <security mode="None" />
        </binding>
      </netMsmqBinding>
    </bindings>
    <services>
      <service name="Host.Service1">
        <endpoint address="net.msmq://localhost/private/TakoQueue" binding="netMsmqBinding"
          bindingConfiguration="netMsmqBinging.NoSecurity" contract="Tako.MSMQ.Contract.IService1" />
      </service>
    </services>
  </system.serviceModel>
</configuration>
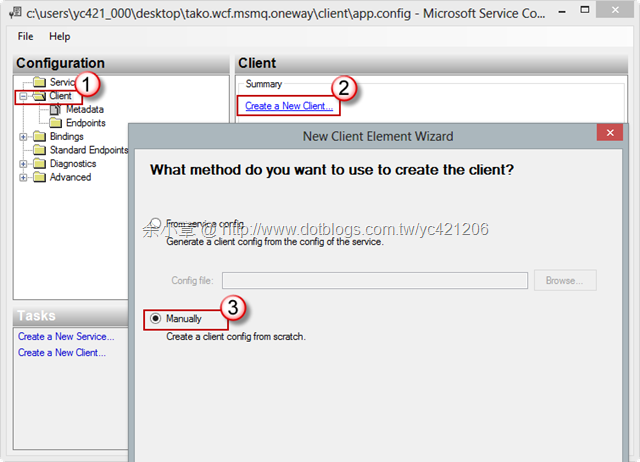
@用戶端專案:Client
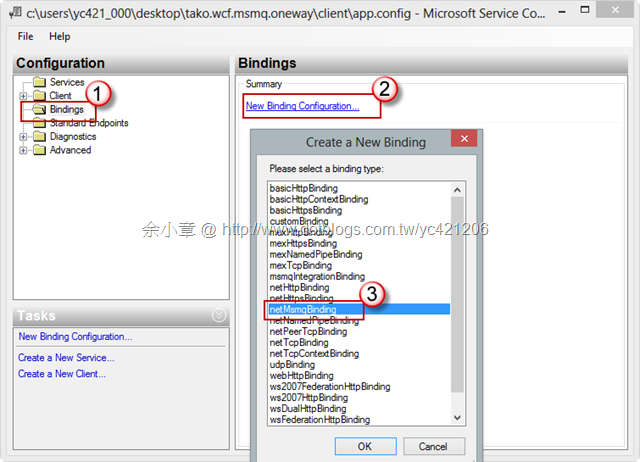
建立Binding
建立Client
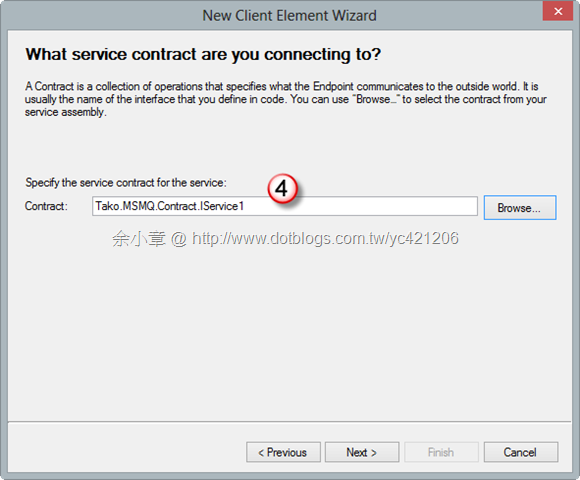
選擇合約
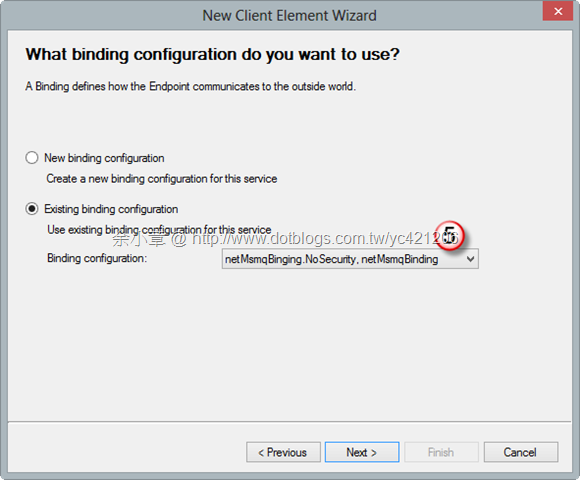
選擇我們剛剛定義的 netMsmqBinging.NoSecurity
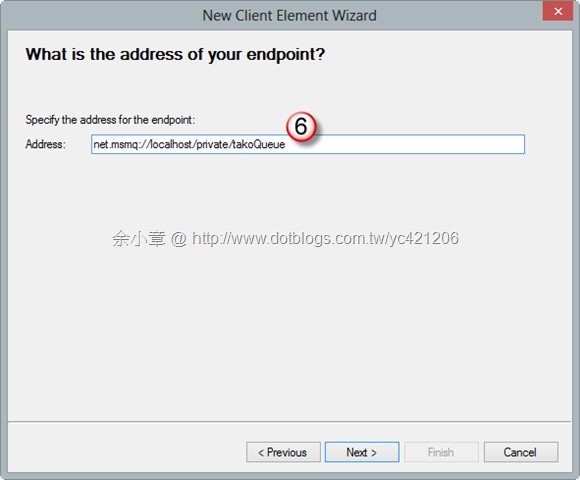
輸入 Queue 的位置。
因為要先在本機測試所以輸入localhost,待發佈到另一台電腦再變更 ip
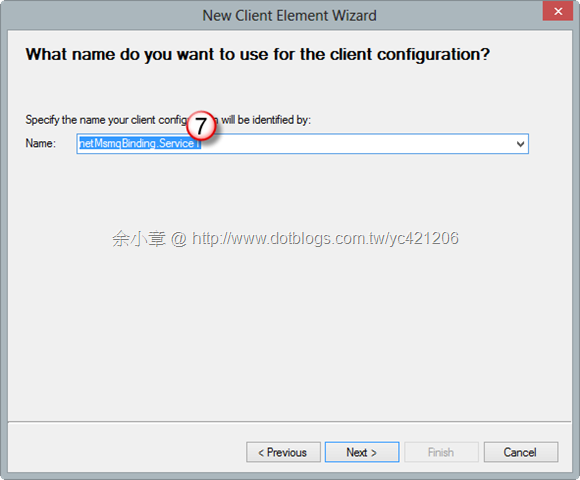
輸入名稱
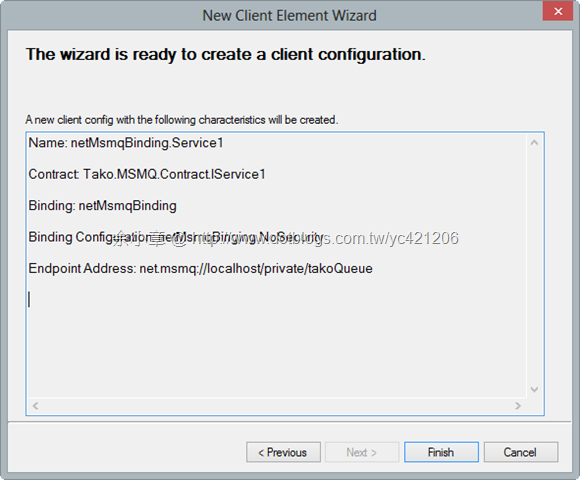
完成
完成後存檔
完整的設定檔如下:
<?xml version="1.0" encoding="utf-8" ?>
<configuration>
    <startup>
        <supportedRuntime version="v4.0" sku=".NETFramework,Version=v4.5" />
    </startup>
    <system.serviceModel>
        <client>
            <endpoint address="net.msmq://localhost/private/takoQueue" binding="netMsmqBinding"
                bindingConfiguration="netMsmqBinging.NoSecurity" contract="Tako.MSMQ.Contract.IService1"
                name="netMsmqBinding.Service1" kind="" endpointConfiguration="" />
        </client>
        <bindings>
            <netMsmqBinding>
                <binding name="netMsmqBinging.NoSecurity">
                    <security mode="None" />
                </binding>
            </netMsmqBinding>
        </bindings>
    </system.serviceModel>
</configuration>
@用戶端專案:Client
主要是使用 ChannelFactory 將服務載入
private static void Main(string[] args)
{
    ChannelFactory<IService1> proxy = new ChannelFactory<IService1>("netMsmqBinding.Service1");
    proxy.Open();
    IService1 channel = proxy.CreateChannel();

label1:

    Console.Write("按任意鍵繼續,按ESC離開");
    var key = Console.ReadKey(true);

    if (key.Key == ConsoleKey.Escape)
    {
        Console.WriteLine("再會~!");
        proxy.Close();
        Console.ReadLine();
        return;
    }

    Console.WriteLine("");
    Console.Write("Name:");
    string name = Console.ReadLine();
    Console.Write("Age:");
    string age = Console.ReadLine();

    var user = new User() { Name = name, Age = int.Parse(age) };
    Console.WriteLine("傳送內容 : " + user);
    channel.SendUser(user);
    Console.WriteLine("傳送完成");
    goto label1;
}
當 Client 輸入資料後,Host 便可收到訊息
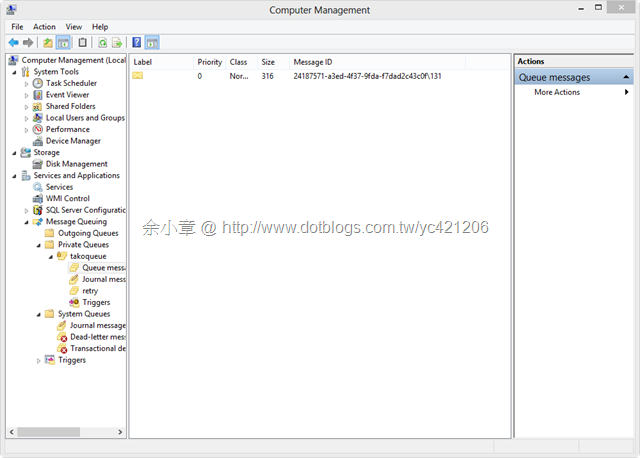
Note.通訊斷線時,Client 會先把資料放在自己的 Queue 裡面,待連線後會再把資料傳給 Host 的 Queue。
若沒有人去 Host 拿 Queue,它就會存在這裡
文章出自:http://www.dotblogs.com.tw/yc421206/archive/2013/10/23/125276.aspx
範例下載:https://dotblogsfile.blob.core.windows.net/user/yc421206/1310/2013102311423330.zip
若有謬誤,煩請告知,新手發帖請多包涵
Microsoft MVP Award 2010~2017 C# 第四季
Microsoft MVP Award 2018~2022 .NET
