VS IDE 有一個 Windows Service 範本,可以讓我們把應用程式變成 Windows Service,安裝、除錯需要額外的工具輔助,相較之下 Topshelf 在這兩點在使用上較為容易...
Windows Service 範本,需要額外的工具把應用程式裝在服務上,我列出我已知的幾種方式
- InstallUtil.exe:編寫安裝服務腳本用。
- Installer:寫自我安裝,琳瑯滿目的 Installer 供你選擇 AssemblyInstaller、TransactedInstaller、ServiceInstaller...etc
服務安裝後還需要,管理他的狀態,可以用 SC.exe 寫服務啟動、停止的腳本,下面列出以往的文章,對它有興趣的可以前往察看
[C#.NET][VB.NET] 如何建立 Windows 服務 Service 專案
[Windows Service] 替 Windows Service 專案加上 Debug 模式
[TFS 2017] 實作 Build vNext 自動部署 Windows Service
當改用 Topshelf 之後呢就不需要了,他本身就內建自我安裝服務、啟動服務、移除服務,接下來看看如何使用
本文連結
開發環境
- VS 2019
- Topshelf 4.2.1
- Topshelf.NLog 4.2.1
- NLog 4.5.11
- NLog.Config 4.5.11
- NLog.Schema 4.5.11
起手式
首先建立一個 Console 專案,安裝以下套件
Install-Package Topshelf -Version 4.2.1
建立一個 DoThing,裡面放一個 Timer ,每秒定期列印時間
public class DoThing
{
    private readonly Timer _timer;

    public DoThing()
    {
        this._timer         =  new Timer(1000) {AutoReset = true};
        this._timer.Elapsed += (sender, eventArgs) => Console.WriteLine($"Now Time:{DateTime.Now}");
    }

    public void Start()
    {
        this._timer.Start();
        Console.WriteLine($"Timer Start");
    }

    public void Stop()
    {
        this._timer.Stop();
        Console.WriteLine($"Timer Stop");
    }
}HostFactory.Run 是用來建立 Windows Service 設定
x.Service<DoThing>:Windows Service 裡面要做的事,這裡放上 DoThing 物件
s.ConstructUsing(name => new DoThing()):建構物件
s.WhenStarted(tc => tc.Start()):啟動,按 F5/Ctrl+F5
s.whenstopped(tc => tc.stop()):停止,按下 Ctrl+C
internal class Program
{
    private static void Main(string[] args)
    {
        HostFactory.Run(x =>
                        {
                            x.Service<DoThing>(s =>
                                                 {
                                                     s.ConstructUsing(name => new DoThing());
                                                     s.WhenStarted(tc => tc.Start());
                                                     s.WhenStopped(tc => tc.Stop());
                                                 });
                            x.RunAsLocalSystem();
                            var assemblyName = Assembly.GetEntryAssembly().GetName().Name;
                            x.SetDescription("Sample Topshelf Host");
                            x.SetDisplayName(assemblyName);
                            x.SetServiceName(assemblyName);
                        });
    }
}服務配置
以下欄位會對應
x.RunAsLocalSystem():使用 LocalSystem 帳號
x.SetDescription("Sample Topshelf Host"):服務說明
x.SetDisplayName(assemblyName):服務顯示名稱
x.SetServiceName(assemblyName):服務名稱
對應到 Windows Service 的配置如下圖
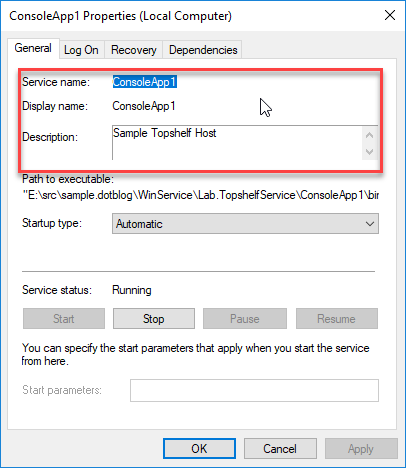
以上,就是一個服務基本的配置,相當的簡單。
更多的配置
https://topshelf.readthedocs.io/en/latest/configuration/index.html
[料理佳餚] Topshelf - 一個完整接合 Windows 服務的套件
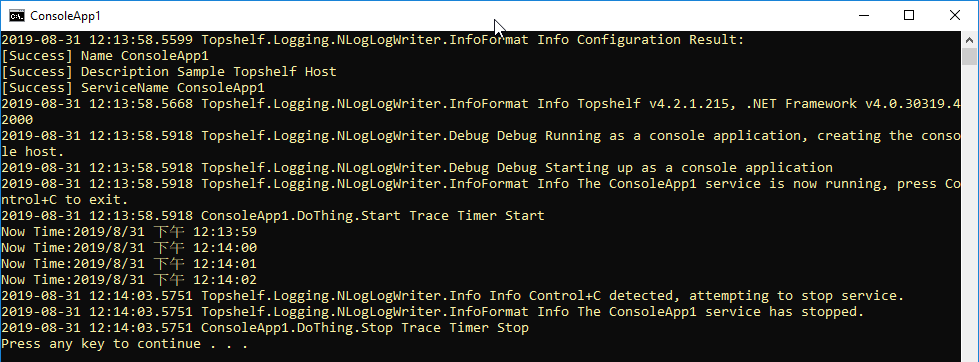
執行效果如下

服務管理
以我的範例,我的組件名稱 ConsoleApp1.exe,別照抄,這要看你的專案設定唷
安裝:ConsoleApp1 install
移除:ConsoleApp1 uninstall
啟動:ConsoleApp1 start
停止:ConsoleApp1 stop
我把它弄成了腳本,然後用系統管理員執行
@echo off set batchFolder=%~dp0 set serviceName=ConsoleApp1.exe set servicePatch=%batchFolder%%serviceName% echo BatchFolder:%batchFolder% echo Service:%servicePatch% echo Installing %serviceName%... echo --------------------------------------------------- %servicePatch% install %servicePatch% start echo --------------------------------------------------- echo Done.
https://github.com/yaochangyu/sample.dotblog/blob/master/WinService/Lab.TopshelfService/ConsoleApp1/install.bat
https://github.com/yaochangyu/sample.dotblog/blob/master/WinService/Lab.TopshelfService/ConsoleApp1/stop.bat
https://github.com/yaochangyu/sample.dotblog/blob/master/WinService/Lab.TopshelfService/ConsoleApp1/uninstall.bat
整合 NLog
Install-Package NLog.Config -Version 4.5.11
Install-Package Topshelf.NLog -Version 4.2.1
添加 x.UseNLog();
HostFactory.Run(x =>
                {
                    x.Service<DoThing>(s =>
                                       {
                                           s.ConstructUsing(name => new DoThing());
                                           s.WhenStarted(tc => tc.Start());
                                           s.WhenStopped(tc => tc.Stop());
                                       });
                    x.UseNLog();
                    x.RunAsLocalSystem();
                    var assemblyName = Assembly.GetEntryAssembly().GetName().Name;
                    x.SetDescription("Sample Topshelf Host");
                    x.SetDisplayName(assemblyName);
                    x.SetServiceName(assemblyName);
                });
設定 NLog Console target
<?xml version="1.0" encoding="utf-8" ?>
<nlog xmlns="http://www.nlog-project.org/schemas/NLog.xsd"
      xmlns:xsi="http://www.w3.org/2001/XMLSchema-instance"
      xsi:schemaLocation="http://www.nlog-project.org/schemas/NLog.xsd NLog.xsd"
      autoReload="true"
      throwExceptions="false"
      internalLogLevel="Off" internalLogFile="c:\temp\nlog-internal.log">
  <variable name="myvar" value="myvalue"/>
  <targets async="true">
    <target xsi:type="Console"
            name="ConsoleTarget"
            layout="${longdate} ${callsite} ${level} ${message}"
            encoding="utf-8"
            error="false"
            detectConsoleAvailable="false" />
  </targets>

  <rules>
    <logger name="*" minlevel="Trace" writeTo="ConsoleTarget"/>
  </rules>
</nlog>
這樣一來就把原本的 Console log,換了成 NLog Console target,執行結果如下圖
啟動多個服務
一個 HostFactory.Run 只能掛載一個 Service
HostFactory.Run(x =>
                {
                    x.Service<DoThing>(s =>
                                              {
                                                  s.ConstructUsing(name => new DoThing());
                                                  s.WhenStarted(tc => tc.Start());
                                                  s.WhenStopped(tc => tc.Stop());
                                              });
                     ...
                });
假如需要多個服務,需要一個物件把服務集中放在集合容器裡面,然後在一起 Start / Stop。
先建立一個抽象物件 IService
public interface IService
{
    void Start();

    void Stop();
}
Service1、Service2 通通實作 IService
public class Service1 : IService
{
    private static readonly ILogger s_logger;
    private readonly        Timer   _timer;

    static Service1()
    {
        if (s_logger == null)
        {
            s_logger = LogManager.GetCurrentClassLogger();
        }
    }

    public Service1()
    {
        this._timer         =  new Timer(1000) {AutoReset = true};
        this._timer.Elapsed += (sender, eventArgs) => Console.WriteLine($"I'm Service1");
    }

    public void Start()
    {
        this._timer.Start();

        s_logger.Trace("Timer Start");
    }

    public void Stop()
    {
        this._timer.Stop();
        s_logger.Trace("Timer Stop");
    }
}
ServiceContainer 紀錄那些 Service 被放進來
public class ServiceContainer
{
    internal readonly Dictionary<Type, IService> _serviceCaches;

    public ServiceContainer()
    {
        if (this._serviceCaches == null)
        {
            this._serviceCaches = new Dictionary<Type, IService>();
        }
    }

    public void Add<T>() where T : IService
    {
        var key     = typeof(T);
        var isExist = this._serviceCaches.TryGetValue(key, out var result);
        var service = Activator.CreateInstance(key) as IService;
        if (!isExist)
        {
            this._serviceCaches.Add(key, service);
        }
    }
}
ServiceManager.Start / Stop 就去 ServiceContainer._serviceCaches 字典集合拿東西,然後呼叫 Service.Start / Stop
public class ServiceManager
{
    private static ServiceContainer s_container;

    public static ServiceContainer Container
    {
        get
        {
            if (s_container == null)
            {
                s_container = new ServiceContainer();
            }

            return s_container;
        }
        set => s_container = value;
    }

    private bool _isStart;

    public void Start()
    {
        if (this._isStart)
        {
            return;
        }

        foreach (var service in Container._serviceCaches)
        {
            service.Value.Start();
        }

        this._isStart = true;
    }

    public void Stop()
    {
        if (!this._isStart)
        {
            return;
        }

        foreach (var service in Container._serviceCaches)
        {
            service.Value.Stop();
        }

        this._isStart = false;
    }
}
調用端代碼,跟上面都很像,改用 ServiceManager 建構服務和 ServiceManager.Container.Add<IService> 增加服務
HostFactory.Run(x =>
                {
                    x.Service<ServiceManager>(s =>
                                              {
                                                  ServiceManager.Container.Add<Service1>();
                                                  ServiceManager.Container.Add<Service2>();

                                                  s.ConstructUsing(name => new ServiceManager());
                                                  s.WhenStarted(tc => tc.Start());
                                                  s.WhenStopped(tc => tc.Stop());
                                              });
                     ...
                });
範例位置
https://github.com/yaochangyu/sample.dotblog/tree/master/WinService/Lab.TopshelfService
若有謬誤,煩請告知,新手發帖請多包涵

Microsoft MVP Award 2010~2017 C# 第四季
Microsoft MVP Award 2018~2025 .NET
