甚麼是 VFS?以下出自 wiki
虛擬檔案系統(英語:Virtual file system,縮寫為VFS),又稱虛擬檔案切換系統(virtual filesystem switch),是作業系統的檔案系統虛擬層,在其下是實體的檔案系統。虛擬檔案系統的主要功用,在於讓上層的軟體,能夠用單一的方式,來跟底層不同的檔案系統溝通。在作業系統與之下的各種檔案系統之間,虛擬檔案系統提供了標準的操作介面,讓作業系統能夠很快的支援新的檔案系統。
Lexical.FileSystem 是 .NET 平台的 VFS,能夠為我帶來甚麼幫助呢??
日前,無意中從 Recca Tsai 身上得知 VFS 的存在,通過 google 搜尋,發現支援 .NET 平台的 VFS Lexical.FileSystem,閱讀了官方文件後,就決定來研究它,試試能不能納入基礎建設的武器當中
簡介
- 從文件 https://avalanche.fi/Articles/intro.html 訊息得知 Lexical.FileSystem 是由 Avalanche IT 這家公司所擁有,github 位置 https://github.com/tagcode
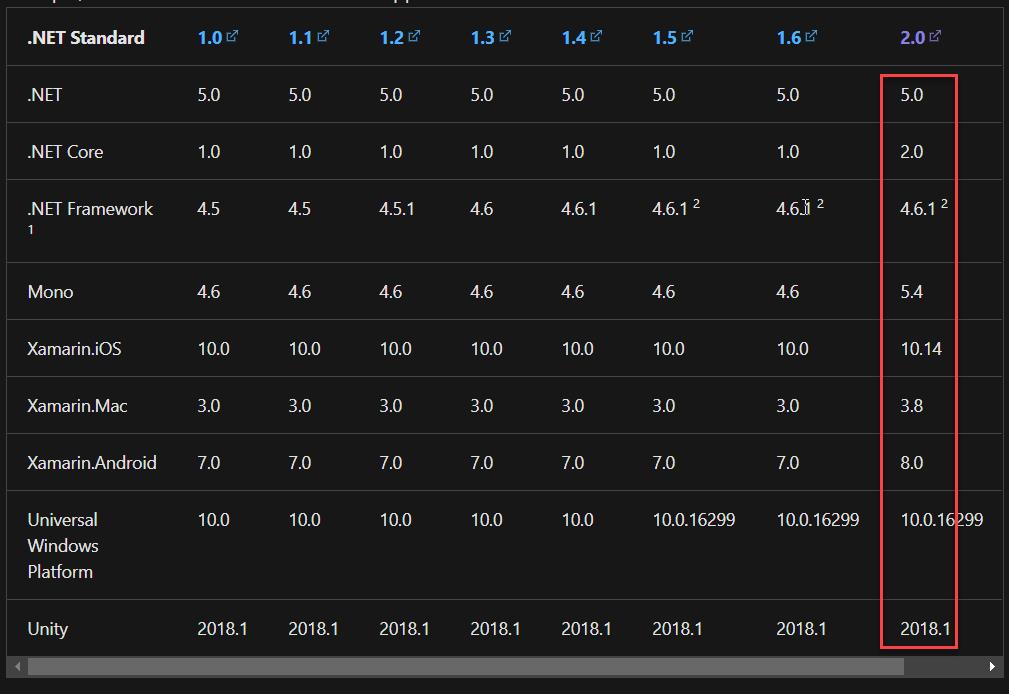
- Lexical.FileSystem 依賴 .NETStandard 2.0
開發環境
- Win10
- Rider 2020.3
- .NET 5
- Lexical.FileSystem 0.21.0
架構
不要讓你的「需求」/ 「產品」直接依賴 System.IO 相關的靜態物件,讓它們依賴一個抽象,比如需求需要的功能叫做「刪除目前目錄 30 天以前的檔案」、「取得目前資料夾的檔案」,我建立一個介面,代碼如下:
public interface IFileAdapter
{
    void DeleteAgo(string folderPath, int day);

    Dictionary<string, string> GetContents(string folderPath);

    ICollection<string> GetFileNames(string folderPath);
}
可以在 FileAdapter 裡面用 System.IO 操作檔案、資料夾
public class FileAdapter : IFileAdapter
{
...
}
這樣一來,會讓我們針對「需求」進行單元測試時,容易許多,我們隨時可以根據情境變出我們想要的測試資料。
在進行「需求」的單元測試之前,我們得先確保 FileAdapter 這個物件本身的正確性,由於 FileAdapter 得去觸碰真實的檔案,為了確保其正確性,必須要針對它去寫測試,這稱為集成測試或是整合測試。
以「刪除目前目錄 30 天以前的檔案」這個需求,我需要以下測試步驟:
- 在目錄 Test 建立 30 天以前的測試假檔案,也稱為測試替身(Test Double)
- 呼叫 DeleteAgo 方法
- 驗證檔案是否已刪除
- 刪除所有測試檔案
以往我會使用 System.IO.File、System.IO.Directory 來完成這些操作;再搭配以下靜態方法,File.SetLastAccessTime、File.SetCreationTime、File.SetLastWriteTime,創建 30 天以前的測試假檔案,感謝好友 Reco 哥告知,我以前都傻傻地改電腦時間,真的好傻(拍腦。
另外,要注意的是,由於 System.IO 是真實的檔案,在不同的測試案例所使用的假檔案,不能衝突,為了要解決這問題:
- 共用相同的檔案,每次案例執行完復原測試檔案,這可能是刪除檔案或是從別的位置覆蓋,一次只跑一個測試案例。
- 不要共用相同的檔案,一個案例一個資料結構,這挺累人的。
現在, VFS 可以讓我更輕易地建立測試檔案,在不同的案例都可以是獨立的檔案結構,彼此不相互影響,接下來,就來看看怎麼使用 MemoryFileSystem
實作 MemoryFileSystem
文件:http://lexical.fi/FileSystem/docs/MemoryFileSystem/index.html
建立 MemoryFileSystem 實例,blockSize 預設值為 1024
IFileSystem filesystem = new MemoryFileSystem(blockSize: 4096);
我非常習慣使用測試專案來調查一個新的 API,沒有寫驗證,不是真正的測試程式;搭配 Console.WriteLine 印出我想要觀察的資訊,所以接下來的範例會採用這樣的方式。
如下圖:
建立資料夾
[TestMethod]
public void 建立資料夾()
{
    using var fileSystem = new MemoryFileSystem();
    Console.WriteLine("建立資料夾");
    fileSystem.CreateDirectory("dir1/dir2/dir3/");
    fileSystem.PrintTo(Console.Out);
}
- "":根目錄
- / 斜線:子結構,目錄或是檔案
- filesystem.PrintTo:輸出 IFileSystem資料結構
執行結果,如下:
建立資料夾
""
└── "dir1"
└── "dir2"
└── "dir3"
在資料夾內建立檔案
[TestMethod]
public void 在資料夾內建立檔案()
{
    using var fileSystem = new MemoryFileSystem();
    Console.WriteLine("建立資料夾");
    fileSystem.CreateDirectory("dir1/dir2/dir3/");
    fileSystem.PrintTo(Console.Out);
    var content      = "This is test string";
    var contentBytes = Encoding.UTF8.GetBytes($"{content}");

    Console.WriteLine("dir1 底下建立檔案");
    using (var outputStream =
        fileSystem.Open("dir1/1.txt", FileMode.OpenOrCreate, FileAccess.ReadWrite, FileShare.ReadWrite))
    {
        var bytes = Encoding.UTF8.GetBytes(content);
        outputStream.Write(bytes, 0, bytes.Length);
    }

    Console.WriteLine("dir2 底下建立檔案");
    fileSystem.CreateFile("dir1/dir2/2.txt", contentBytes);

    fileSystem.PrintTo(Console.Out);
}
- dir1/1.txt:dir1 目錄底下的 1.txt
- 寫檔和讀檔,都是使用 Stream 物件處理,需要更詳細的內容可以自行 google
執行結果,如下:
建立資料夾
""
└── "dir1"
└── "dir2"
└── "dir3"
dir1 底下建立檔案
dir2 底下建立檔案
""
└── "dir1"
├── "1.txt"
└── "dir2"
├── "2.txt"
└── "dir3"
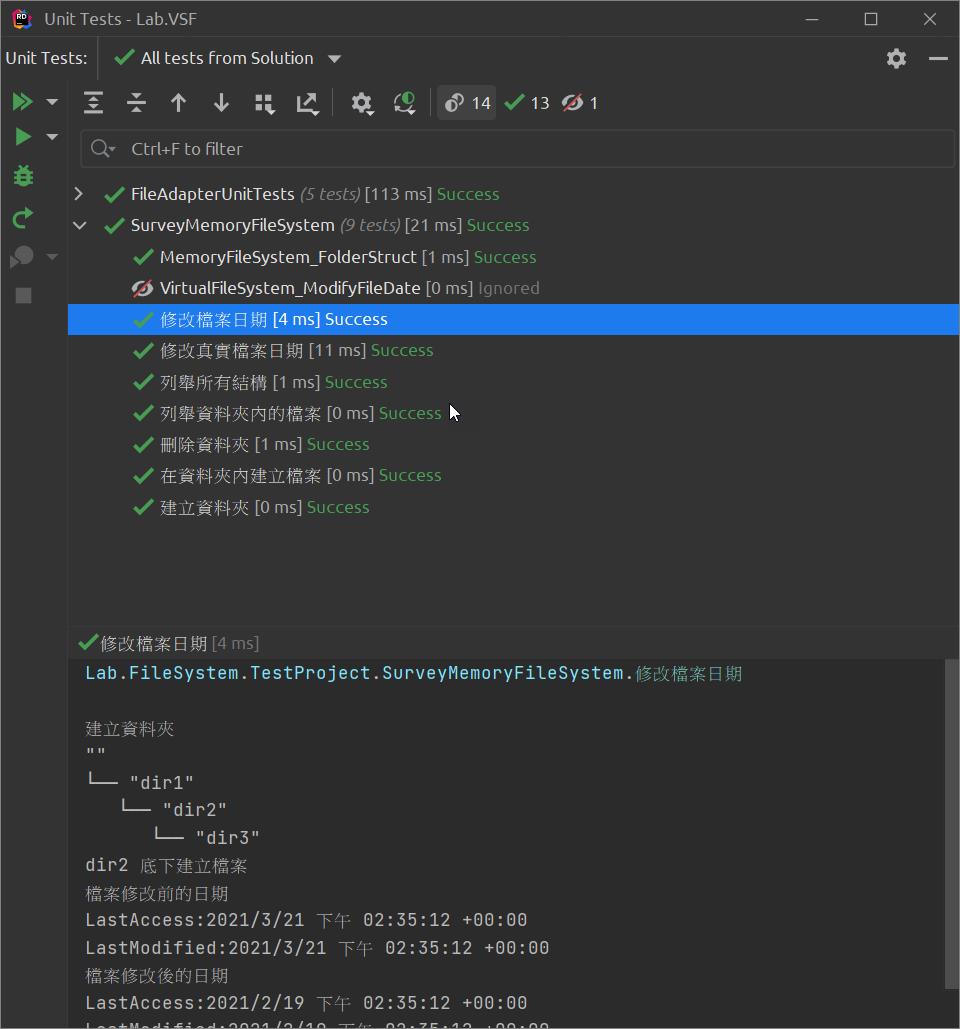
修改檔案日期
[TestMethod]
public void 修改檔案日期()
{
    using var fileSystem = new MemoryFileSystem();
    Console.WriteLine("建立資料夾");
    fileSystem.CreateDirectory("dir1/dir2/dir3/");
    fileSystem.PrintTo(Console.Out);
    var content      = "This is test string";
    var contentBytes = Encoding.UTF8.GetBytes($"{content}");

    Console.WriteLine("dir2 底下建立檔案");
    fileSystem.CreateFile("dir1/dir2/2.txt", contentBytes);

    var entry = fileSystem.GetEntry("dir1/dir2/2.txt");
    Console.WriteLine("檔案修改前的日期");
    Console.WriteLine($"LastAccess:{entry.LastAccess}");
    Console.WriteLine($"LastModified:{entry.LastModified}");

    var type                     = entry.GetType();
    var now                      = new DateTimeOffset(DateTime.UtcNow.AddDays(-30));
    var lastAccessPropertyInfo   = type.GetProperty("LastAccess");
    var lastModifiedPropertyInfo = type.GetProperty("LastModified");
    lastAccessPropertyInfo.SetValue(entry, now);
    lastModifiedPropertyInfo.SetValue(entry, now);

    Console.WriteLine("檔案修改後的日期");
    Console.WriteLine($"LastAccess:{entry.LastAccess}");
    Console.WriteLine($"LastModified:{entry.LastModified}");
}
- filesystem.GetEntry("dir1/dir2/2.txt"):取得特定結構,結構可能是資料夾或是檔案,回傳 IEntry / IEntry 型別。
- 日期沒有公開讓我可以改,由於測試不追求效能,直接採用反射來改變日期,要特別注意,在真實的檔案無法使用這樣的方式,
執行結果,如下:
建立資料夾
""
└── "dir1"
└── "dir2"
└── "dir3"
dir2 底下建立檔案
檔案修改前的日期
LastAccess:2021/3/21 下午 01:39:39 +00:00
LastModified:2021/3/21 下午 01:39:39 +00:00
檔案修改後的日期
LastAccess:2021/2/19 下午 01:39:39 +00:00
LastModified:2021/2/19 下午 01:39:39 +00:00
列舉根路徑內的子資料夾
[TestMethod]
public void 列舉根路徑內的子資料夾()
{
    using var fileSystem = new MemoryFileSystem();
    Console.WriteLine("建立資料夾");
    fileSystem.CreateDirectory("dir1/dir2/dir3/");
    fileSystem.PrintTo(Console.Out);
    var content      = "This is test string";
    var contentBytes = Encoding.UTF8.GetBytes($"{content}");

    Console.WriteLine("dir1 底下建立檔案");
    using (var outputStream =
        fileSystem.Open("dir1/1.txt", FileMode.OpenOrCreate, FileAccess.ReadWrite, FileShare.ReadWrite))
    {
        var bytes = Encoding.UTF8.GetBytes(content);
        outputStream.Write(bytes, 0, bytes.Length);
    }

    Console.WriteLine("dir2 底下建立檔案");
    fileSystem.CreateFile("dir1/dir2/2.txt", contentBytes);

    foreach (var entry in fileSystem.Browse(""))
    {
        var path = entry.Path;
        Console.WriteLine(path);
    }
}
- filesystem.Browse(""):瀏覽根路徑,回傳目前目錄底下的子目錄,型別為 IDirectoryContent
執行結果,如下:
建立資料夾
""
└── "dir1"
└── "dir2"
└── "dir3"
dir1 底下建立檔案
dir2 底下建立檔案
dir1/
列舉根路徑底下所有結構
[TestMethod]
public void 列舉根路徑底下所有結構()
{
    using var fileSystem = new MemoryFileSystem();
    Console.WriteLine("建立資料夾");
    fileSystem.CreateDirectory("dir1/dir2/dir3/");
    fileSystem.PrintTo(Console.Out);
    var content      = "This is test string";
    var contentBytes = Encoding.UTF8.GetBytes($"{content}");

    Console.WriteLine("dir1 底下建立檔案");
    using (var outputStream =
        fileSystem.Open("dir1/1.txt", FileMode.OpenOrCreate, FileAccess.ReadWrite, FileShare.ReadWrite))
    {
        var bytes = Encoding.UTF8.GetBytes(content);
        outputStream.Write(bytes, 0, bytes.Length);
    }

    Console.WriteLine("dir2 底下建立檔案");
    fileSystem.CreateFile("dir1/dir2/2.txt", contentBytes);
    var tree = fileSystem.VisitTree();

    foreach (var line in tree)
    {
        Console.WriteLine($"name:{line.Name},path:{line.Path}");
    }
}
filesystem.VisitTree():取得所有結構,回傳 IEnumerable<TreeVisit.Line>
執行結果,如下:
建立資料夾
""
└── "dir1"
└── "dir2"
└── "dir3"
dir1 底下建立檔案
dir2 底下建立檔案
name:,path:
name:dir1,path:dir1/
name:1.txt,path:dir1/1.txt
name:dir2,path:dir1/dir2/
name:2.txt,path:dir1/dir2/2.txt
name:dir3,path:dir1/dir2/dir3/
刪除資料夾
[TestMethod]
public void 刪除資料夾()
{
    using var fileSystem = new MemoryFileSystem();
    Console.WriteLine("建立資料夾");
    fileSystem.CreateDirectory("dir1/dir2/dir3/");
    fileSystem.PrintTo(Console.Out);

    Console.WriteLine("刪除 dir2 資料夾");
    fileSystem.Delete("dir1/dir2/", true);
    fileSystem.PrintTo(Console.Out);
}
filesystem.Delete("dir1/dir2/", true):刪除 "dir1/dir2/" 以下的結構包含自已
執行結果,如下:
建立資料夾
""
└── "dir1"
└── "dir2"
└── "dir3"
刪除 dir2 資料夾
""
└── "dir1"
映射資料結構2
假如說,需要從真實的結構取得路徑,又不想要破壞真實的結構,可以把真實結構複製到 MemoryFileSystem,如此一來便隔離真實結構,代碼如下:
public void 映射資料結構2()
{
   var executingAssembly = Assembly.GetExecutingAssembly();
   var rootPath          = Path.GetDirectoryName(executingAssembly.Location);
   var subPath           = "TestFolder";
   using var fileSystem       = CreateFolder(rootPath, subPath);
   using var memoryFileSystem = new MemoryFileSystem();
   foreach (var line in fileSystem.VisitTree(subPath))
   {
       if (line.Entry.IsDirectory())
       {
           memoryFileSystem.CreateDirectory(line.Path);
       }
       if (line.Entry.IsFile())
       {
           fileSystem.CopyFile(line.Path, memoryFileSystem, line.Path);
       }
   }
   memoryFileSystem.CreateDirectory("AAA");
   memoryFileSystem.PrintTo(Console.Out);
}
實作 FileSystem
FileSystem 需要傳入一個根路徑,接下來的操作就會以這個根路徑為主,MemoryFileSystem 的根路徑則是 ""
IFileSystem fs = new FileSystem(@"C:\Temp\");其餘的功能就和 MemoryFileSystem 一樣了。
IFileProvider
IFileProvider 來自於 Microsoft.Extensions.FileProviders.Abstractions,這是 .NET Core 的基礎建設之一,這裡提供擴充方法將 PhysicalFileProvider 轉成 IFileSystem
安裝套件
Install-Package Microsoft.Extensions.FileProviders.Physical.PhysicalFileProvider
代碼如下:
IFileSystem fs = new PhysicalFileProvider(@"C:\Users").ToFileSystem();實作 VirtualFileSystem
掛載/卸載
IFileSystem vfs = new VirtualFileSystem();
vfs.Mount("/tmp/", FileSystem.Temp);
vfs.Unmount("/tmp/");
一次掛載兩個不同的 FileSystem 實例
IFileSystem urls = new VirtualFileSystem()
    .Mount("tmp/", FileSystem.Temp)
    .Mount("ram/", MemoryFileSystem.Instance);
要特別注意的是,他的操作會真實寫入到 IO
映射資料結構
再提供另外一種隔離真實結構的作法
[TestMethod]
public void 映射資料結構()
{
   var executingAssembly = Assembly.GetExecutingAssembly();
   var rootPath          = Path.GetDirectoryName(executingAssembly.Location);
   var subPath           = "TestFolder";
   var fileSystem        = CreateFolder(rootPath, subPath);
   var virtualFileSystem = new VirtualFileSystem();
   var memoryFileSystem  = new MemoryFileSystem();
   var appDir = rootPath.Replace('\\', '/');
   virtualFileSystem.Mount("", Lexical.FileSystem.FileSystem.OS, Option.SubPath(appDir));
   virtualFileSystem.CopyTree($"/{subPath}/", memoryFileSystem, "");
   memoryFileSystem.CreateDirectory("AAA");
   Console.WriteLine("memoryFileSystem");
   memoryFileSystem.PrintTo(Console.Out);
}
IFileSystem API 回顧
FileSystem 建構函數傳入根目錄的路徑
IFileSystem fs = new FileSystem(@"C:\Temp\");MemoryFileSystem 建構函數傳入 BlockSize,預設 1024
IFileSystem filesystem = new MemoryFileSystem(blockSize: 4096);- 子結構路徑:用 / 斜線,代表子結構,它可以目錄或是檔案,例如,dir1/1.txt dir1 目錄底下的 1.txt
- filesystem.GetEntry("dir1/dir2/2.txt"):取得特定結構,結構可能是資料夾或是檔案,回傳 IEntry 型別。
- filesystem.Browse(""):瀏覽根路徑,回傳目前目錄底下的子目錄,型別為 IDirectoryContent
- filesystem.VisitTree():取得所有結構,回傳 IEnumerable<TreeVisit.Line>
- filesystem.Delete("dir1/dir2/", true):刪除 "dir1/dir2/" 以下的結構包含自已
- filesystem.PrintTo:輸出 IFileSystem資料結構
FileSystem 靜態成員,支援系統資料夾的說明
以往是透過 Environment.SpecialFolder 和 Environment.GetFolderPath() 才能取到資料夾,要執行才能知道是不是想要的路徑
Environment.GetFolderPath(Environment.SpecialFolder.UserProfile);現在,通過 FileSystem 靜態成員,在開發階段就有說明可以知道路徑

整合測試
為了縮短篇幅我只貼出「刪除目前目錄 30 天以前的檔案」,FileAdapter 開放了建構函數 IFileSystem 注入點,實作內容如下:
public class FileAdapter : IFileAdapter
{
    internal DateTime Now
    {
        get
        {
            if (this._now.HasValue == false)
            {
                return DateTime.UtcNow;
            }

            return this._now.Value;
        }
        set => this._now = value;
    }

    private readonly IFileSystem _fileSystem;
    private          DateTime?   _now;

    public FileAdapter(IFileSystem fileSystem)
    {
        this._fileSystem = fileSystem;
    }


    public void DeleteAgo(string folderPath, int day)
    {
        var fileSystem = this._fileSystem;
        var now = this.Now;

        if (fileSystem.Exists(folderPath) == false)
        {
            return;
        }

        foreach (var entry in fileSystem.Browse(folderPath))
        {
            var diff = now - entry.LastModified.Date;
            if (diff.Days > 2)
            {
                fileSystem.Delete(entry.Path);
            }
        }
    }
}
實例化 FileAdapter 時,注入 FileSystem 物件,測試代碼如下:
[TestMethod]
public void FileSystem_DeleteAgo()
{
    //arrange
    var executingAssembly = Assembly.GetExecutingAssembly();
    var rootFolderPath    = Path.GetDirectoryName(executingAssembly.Location);
    var targetFolderName  = "TestFolder";
    var content           = "This is test string";

    using (var fileSystem = CreateTestFile(rootFolderPath, targetFolderName, content))
    {
        var adapter = new FileAdapter(fileSystem);

        //act
        adapter.DeleteAgo(targetFolderName, 2);

        //assert
        var directoryContent = fileSystem.Browse("targetFolder");
        Assert.AreEqual(true, directoryContent.Any() == false);

        //restore
        fileSystem.Delete(targetFolderName, true);
    }
}
這裡用了 FileSystem 操作真實的檔案,使用方法跟 MemoryFileSystem 大同小異就不另外介紹了;再搭配 File.SetLastAccessTime、File.SetCreationTime、File.SetLastWriteTime 靜態方法修改檔案日期
private static Lexical.FileSystem.FileSystem CreateTestFile(string rootFolder, string subFolder, string content)
{
    var fileSystem = new Lexical.FileSystem.FileSystem(rootFolder);

    if (fileSystem.Exists(subFolder) == false)
    {
        fileSystem.CreateDirectory(subFolder);
    }

    for (var i = 0; i < 5; i++)
    {
        var filePath     = Path.Combine(rootFolder, subFolder, $"{i}.txt");
        var contentBytes = Encoding.UTF8.GetBytes($"{i}.{content}");
        fileSystem.CreateFile(filePath, contentBytes);
    }

    var now = DateTime.UtcNow.AddDays(-30);
    for (var i = 0; i < 5; i++)
    {
        var filePath = Path.Combine(rootFolder, subFolder, $"{i}.txt");
        File.SetLastWriteTime(filePath, now);
        File.SetLastAccessTime(filePath, now);
        File.SetCreationTime(filePath, now);
    }

    return fileSystem;
}
接下來,換成 MemoryFileSystem,實例化 FileAdapter 時,注入 MemoryFileSystem 物件,測試代碼如下:
[TestMethod]
public void MemoryFileSystem_DeleteAgo()
{
    //arrange
    var rootFolderPath = "A:\\TestFolder\\Test";
    var content        = "This is test string";
    using (var fileSystem = CreateTestMemoryFile(rootFolderPath, content))
    {
        var adapter = new FileAdapter(fileSystem);

        //act
        adapter.DeleteAgo(rootFolderPath, 2);

        //assert
        var directoryContent = fileSystem.Browse(rootFolderPath);
        Assert.AreEqual(true, directoryContent.Any() == false);
    }
}
這裡就只是 MemoryFileSystem 物件的操作
private static MemoryFileSystem CreateTestMemoryFile(string folderPath, string content)
{
    var fileSystem = new MemoryFileSystem();

    fileSystem.CreateDirectory(folderPath);

    for (var i = 0; i < 5; i++)
    {
        var filePath = $"{folderPath}/{i}.txt";

        // via stream
        using (var outputStream =
            fileSystem.Open(filePath, FileMode.OpenOrCreate, FileAccess.ReadWrite, FileShare.ReadWrite))
        {
            Write(outputStream, $"{i}.{content}");
        }

        // via IFileSystem.Create
        // var contentBytes = Encoding.UTF8.GetBytes($"{i}.{content}");
        // fileSystem.CreateFile(filePath, contentBytes);
    }

    var type   = typeof(FileEntry);
    var offset = new DateTimeOffset(DateTime.UtcNow.AddDays(-3));
    foreach (var entry in fileSystem.Browse(folderPath))
    {
        var lastAccessPropertyInfo   = type.GetProperty("LastAccess");
        var lastModifiedPropertyInfo = type.GetProperty("LastModified");
        lastAccessPropertyInfo.SetValue(entry, offset);
        lastModifiedPropertyInfo.SetValue(entry, offset);
    }

    return fileSystem;
}
結論
通過 VFS 讓我的測試程式碼
- FileAdapter 依賴 IFileSystem,在 FileAdapter 不動的情況之下,在測試案例注入測試替身 MemoryFileSystem 模擬路徑、檔案屬性,有處理檔案的經驗一定很清楚,路徑是最擾人的。
- 測試程式變得更簡潔,降低準備測試環境的 effort,完全不用擔心路徑會衝突。
- 因為案例彼此之間的環境可以完全獨立,可以使用平行測試 (Run Tests in Parallel),加速測試執行時間。
https://dotblogs.com.tw/yc421206/2019/06/03/specflow_v3_mstest_v2_run_tests_in_parallel
範例位置
https://github.com/yaochangyu/sample.dotblog/tree/master/File/Lab.VSF/Lab.FileSystem.TestProject
相關文章
.NET 的 Virtual File System - Lexical.FileSystem
.NET 的 Virtual File System - Zio FileSystem
若有謬誤,煩請告知,新手發帖請多包涵

Microsoft MVP Award 2010~2017 C# 第四季
Microsoft MVP Award 2018~2025 .NET
