前幾年編寫了 [Swagger] 一些 Swagger 編寫文件的技巧和 Client Code Gen ,不過,已經不適用 ASP.NET Core 6,正好,團隊正在重視 API 文件,正好趁這機會更新 Swashbuckle.AspNetCore 使用
Web API 的文件開發流程我知道得有幾種方式,
- Doc First:先編寫 Swagger Doc,再透過他產生出 Server (只有殼) 和 Client 程式碼
- Servier Code First:先編寫 Server Code 他產生出 Swagger Doc,再透過它產生出 Client 程式碼
這兩種方法都沒有絕對的好壞、優勢,只要團隊運作順暢就可以了。
我自己個人開發的流程是
- 根據需求用 Gherkin 寫出測試案例。
- 用 ASP.NET Core 定義 Web API 的端點,這時候只有殼還沒有實作
- 產生出 Swagger.json。
- 用 Swagger CLI 產生 Client Proxy Code
- 在測試程式裡面把 Web API 掛起來,並使用 Client Proxy 呼叫 Web API
有關 Web API 的整合測試可以參考以下:
[ASP.NET Core 5] 利用 WebApplicationFactory 進行 Web API 整合測試
開發環境
- Windows 11
- .NET 6
- Rider 2021.3.3
- Swashbuckle.AspNetCore 6.2.3
實作
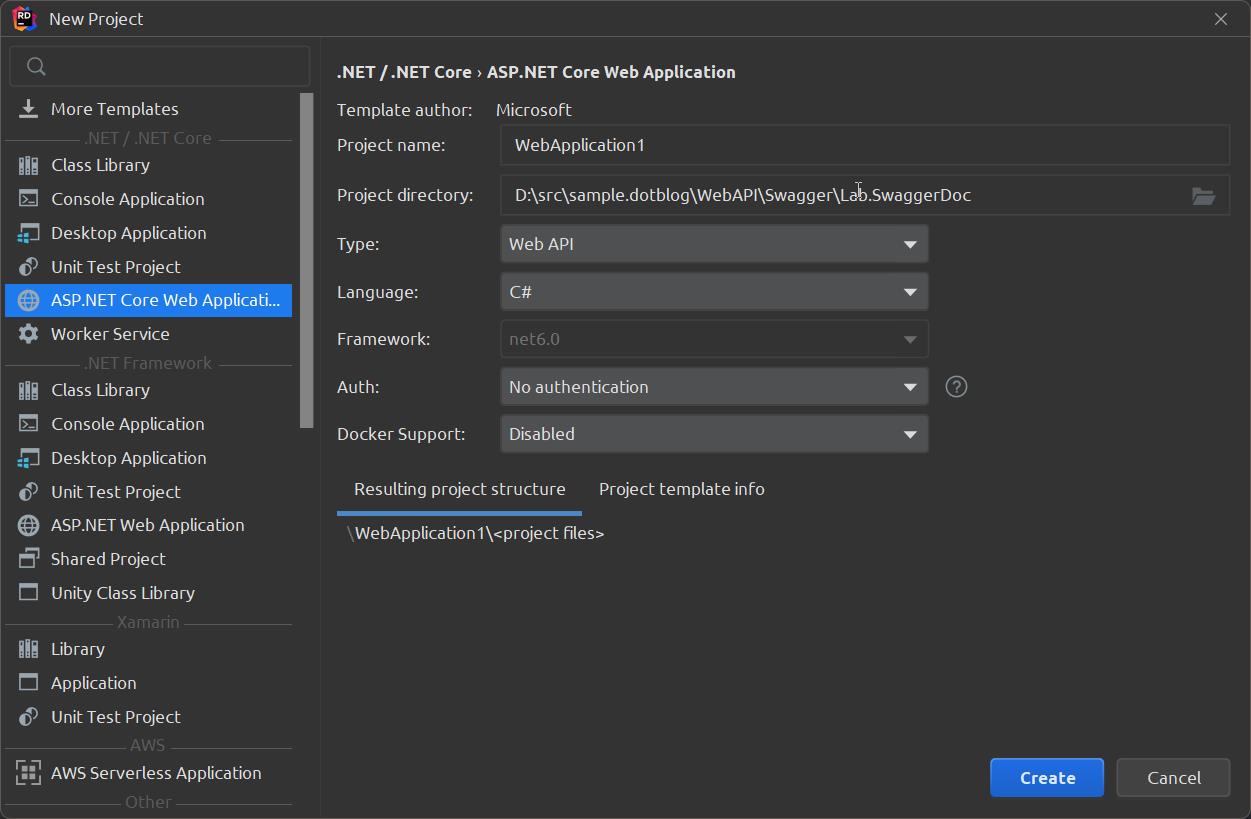
建立新的 Web API 專案,預設就會幫我們裝好 Swashbuckle.AspNetCore
Swagger DI Container
builder.Services.AddSwaggerGen():註冊 Swagger Json 檔產生器
builder.Services.AddControllers();
builder.Services.AddEndpointsApiExplorer();
builder.Services.AddSwaggerGen();
Swagger Middleware
app.UseSwagger():使用 Swagger Json 檔
app.UseSwaggerUI():使用 SwaggerUI
if (app.Environment.IsDevelopment())
{
   app.UseSwagger();
   app.UseSwaggerUI();
}- 當服務啟動時,訪問 https://localhost:<port>/swagger/v1/swagger.json,便能取得 swagger json 檔案
- 訪問 https://localhost:<port>/swagger,就能透過 Swagger UI 探索 Web API
在這個步驟 Swagger UI 就可以正常的運作了,試著跑跑看吧,到目前為止,只有基本的呈現,我們還需要一些設定才能完善它。
Swagger JSON
說明檔位置可以透過以下的設定方式改變
app.UseSwaggerUI(options =>
{
	options.SwaggerEndpoint("/swagger/v1/swagger.json", "v1");
});
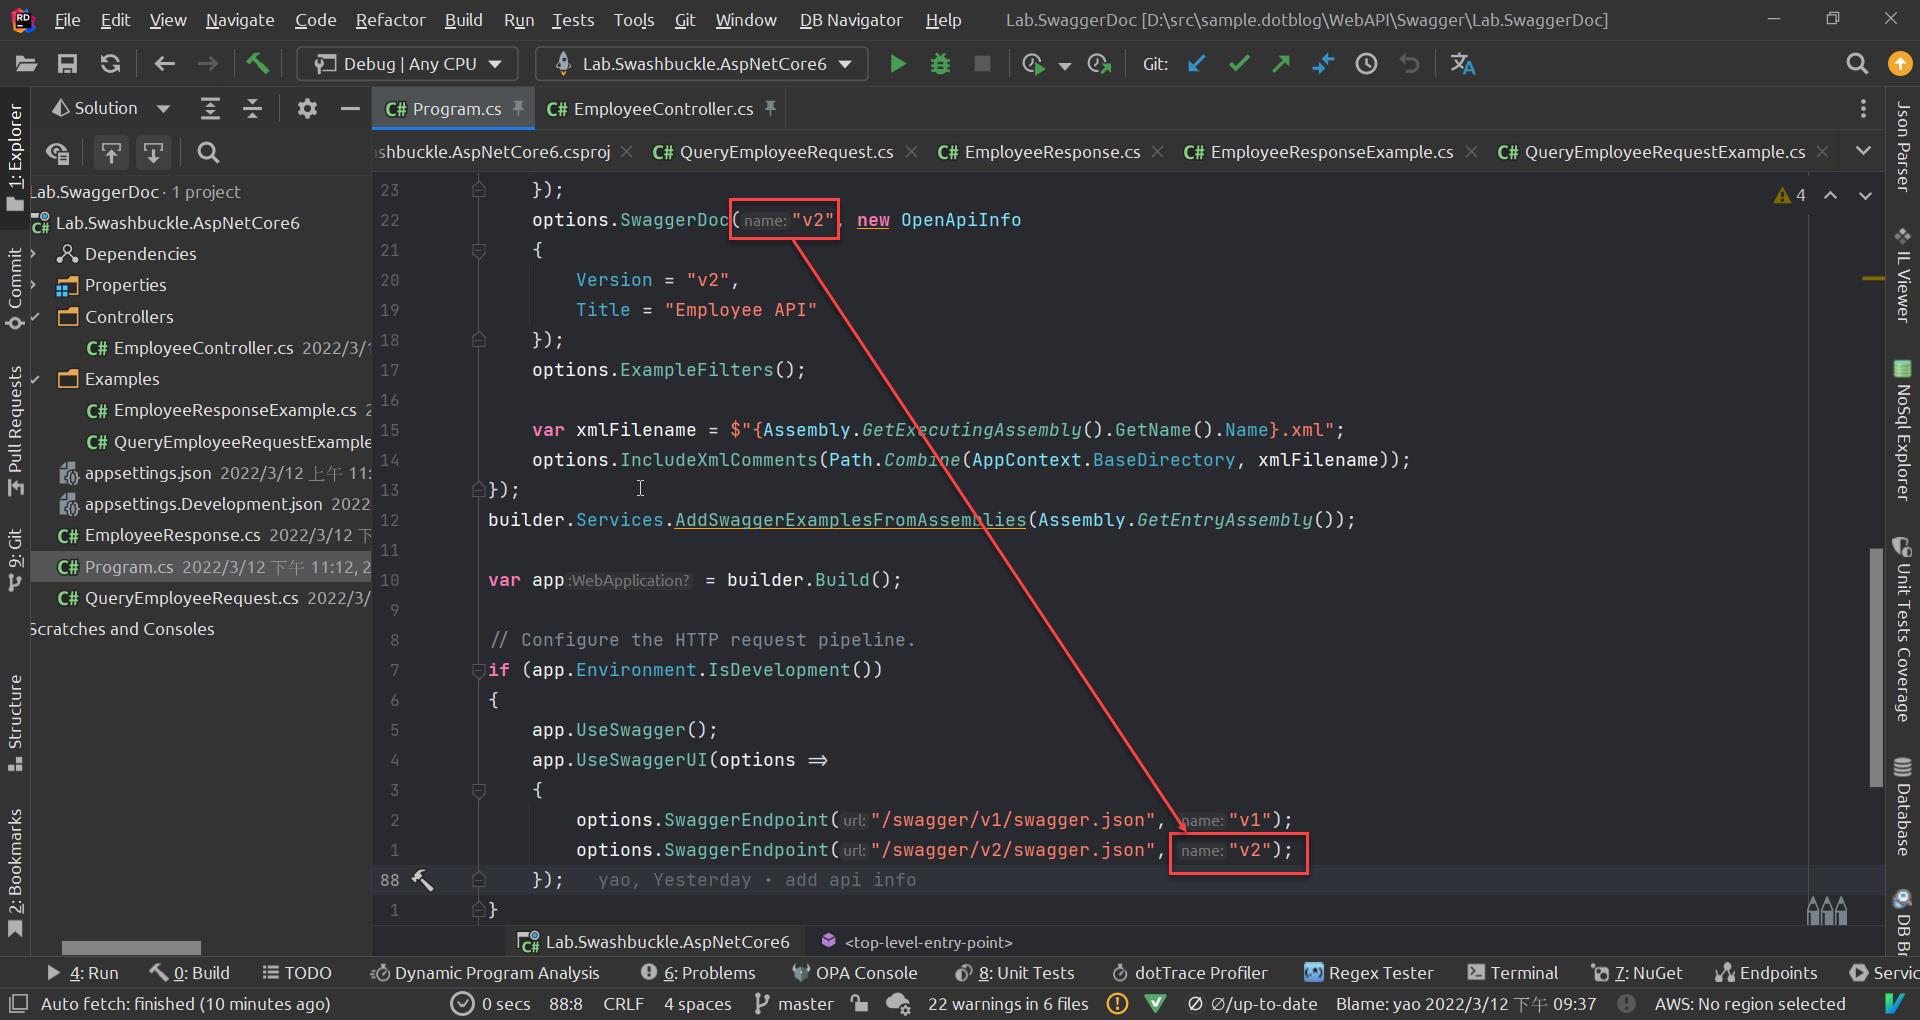
多版本的 Swagger Json
先定義多個版本的 API 資訊
services.AddSwaggerGen(options =>
{
    options.SwaggerDoc("v1", new OpenApiInfo { Title = "Employee API - V1", Version = "v1" });
    options.SwaggerDoc("v2", new OpenApiInfo { Title = "Employee API - V2", Version = "v2" });
})
接下來,設定 Swagger UI 訪問 Json 的位置
app.UseSwaggerUI(options =>
{
	options.SwaggerEndpoint("/swagger/v1/swagger.json", "v1");
	options.SwaggerEndpoint("/swagger/v2/swagger.json", "v2");
});
SwaggerDoc 跟 SwaggerEndpoint 的對應關係如下圖:
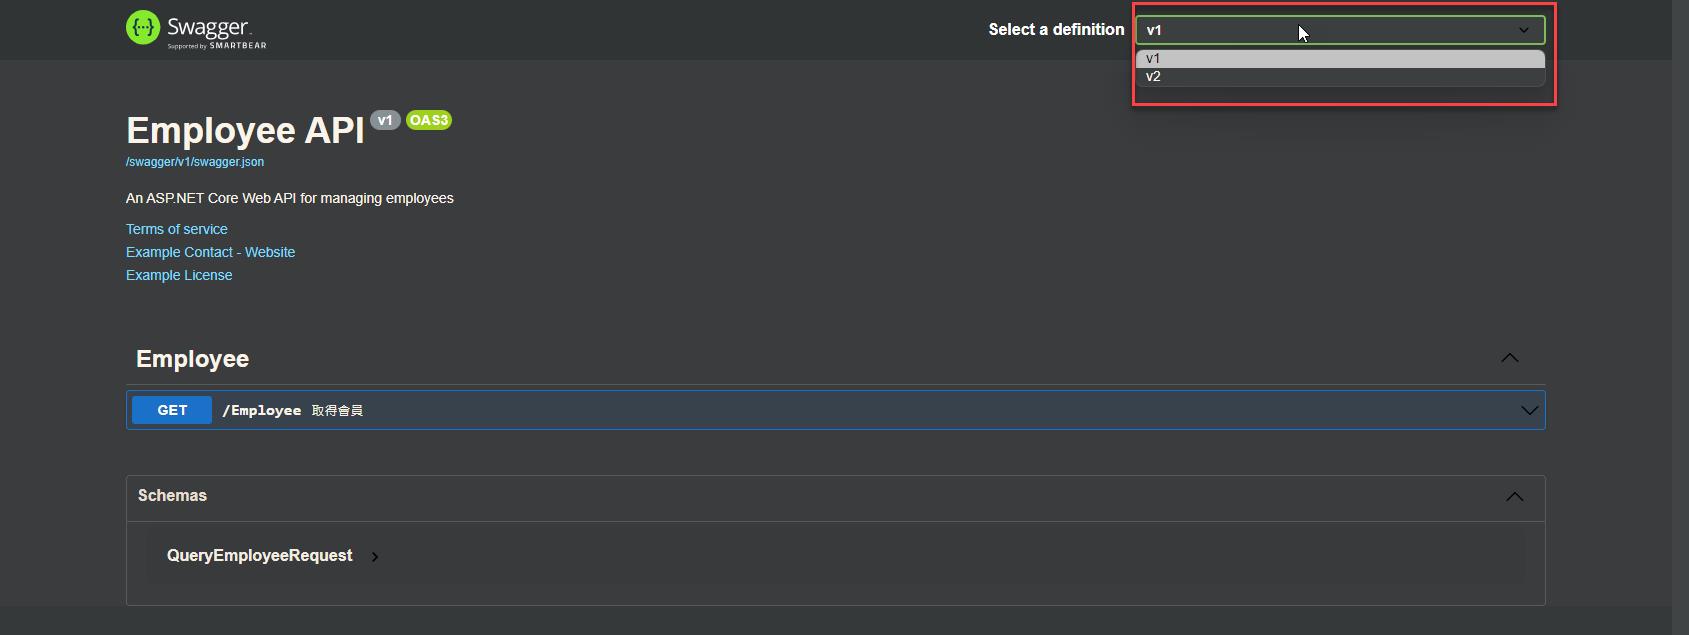
執行效果如下
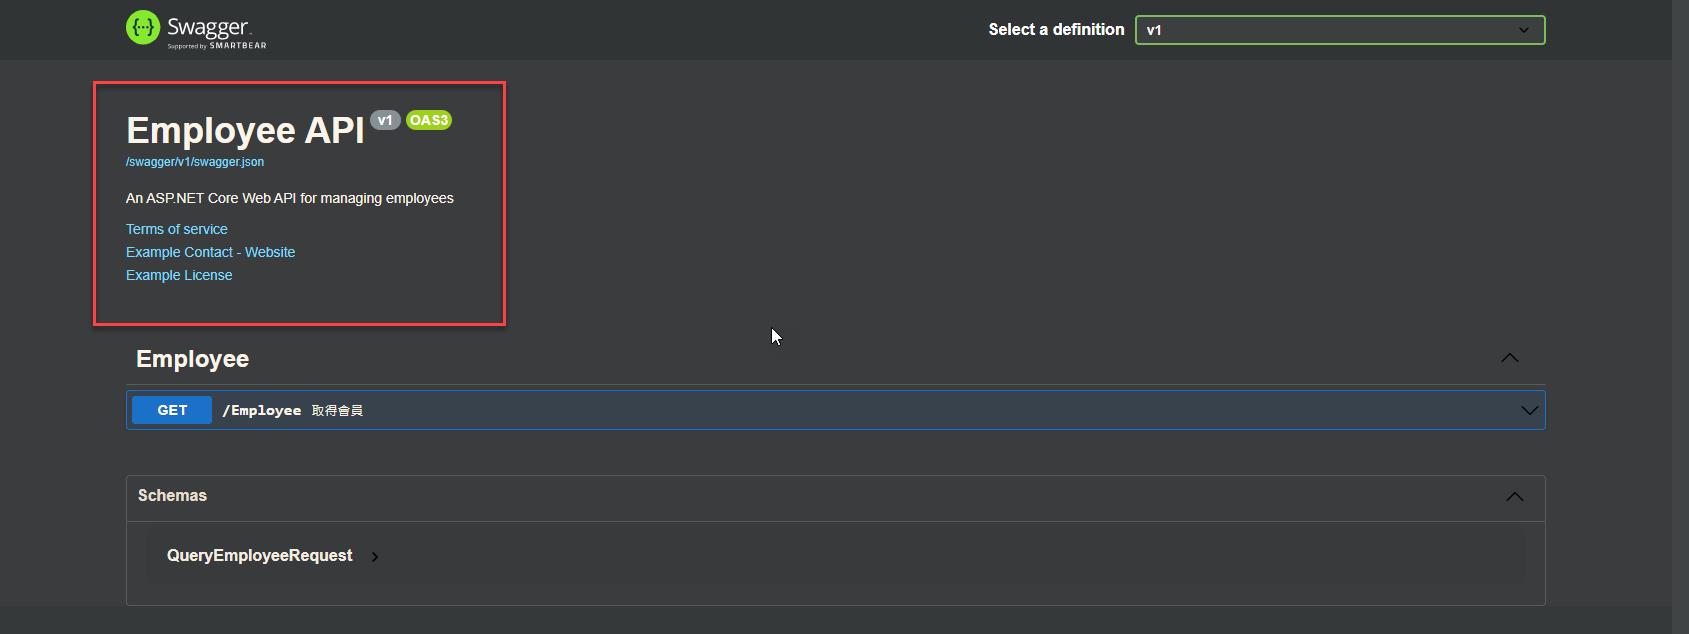
Web API 資訊
OpenApiInfo:API 資訊,這需要匯入 using Microsoft.OpenApi.Models;
builder.Services.AddSwaggerGen(options =>
{
    options.SwaggerDoc("v1", new OpenApiInfo
    {
        Version = "v1",
        Title = "ToDo API",
        Description = "An ASP.NET Core Web API for managing employees",
        TermsOfService = new Uri("https://example.com/terms"),
        Contact = new OpenApiContact
        {
            Name = "Example Contact",
            Url = new Uri("https://example.com/contact")
        },
        License = new OpenApiLicense
        {
            Name = "Example License",
            Url = new Uri("https://example.com/license")
        }
    });
});
執行效果如下
XML 說明檔
在 class 所標記的 Summary 說明檔,編譯變成 xml 檔,可以讓 Swashbuckle.AspNetCore 套用
builder.Services.AddSwaggerGen(options =>
{
    var xmlFilename = $"{Assembly.GetExecutingAssembly().GetName().Name}.xml";
    options.IncludeXmlComments(Path.Combine(AppContext.BaseDirectory, xmlFilename));
});
產生 *.xml 說明檔,我習慣讓 OutputPath 和DocumentationFile不依賴 Debug / Release
<Project Sdk="Microsoft.NET.Sdk.Web">

    <PropertyGroup>
        <TargetFramework>net6.0</TargetFramework>
        <Nullable>enable</Nullable>
        <ImplicitUsings>enable</ImplicitUsings>
        <OutputPath>bin\</OutputPath>
        <DocumentationFile>bin\Lab.Swashbuckle.AspNetCore6.xml</DocumentationFile>
    </PropertyGroup>

    <ItemGroup>
        <PackageReference Include="Swashbuckle.AspNetCore" Version="6.2.3" />
        <PackageReference Include="Swashbuckle.AspNetCore.Filters" Version="7.0.2" />
    </ItemGroup>

</Project>
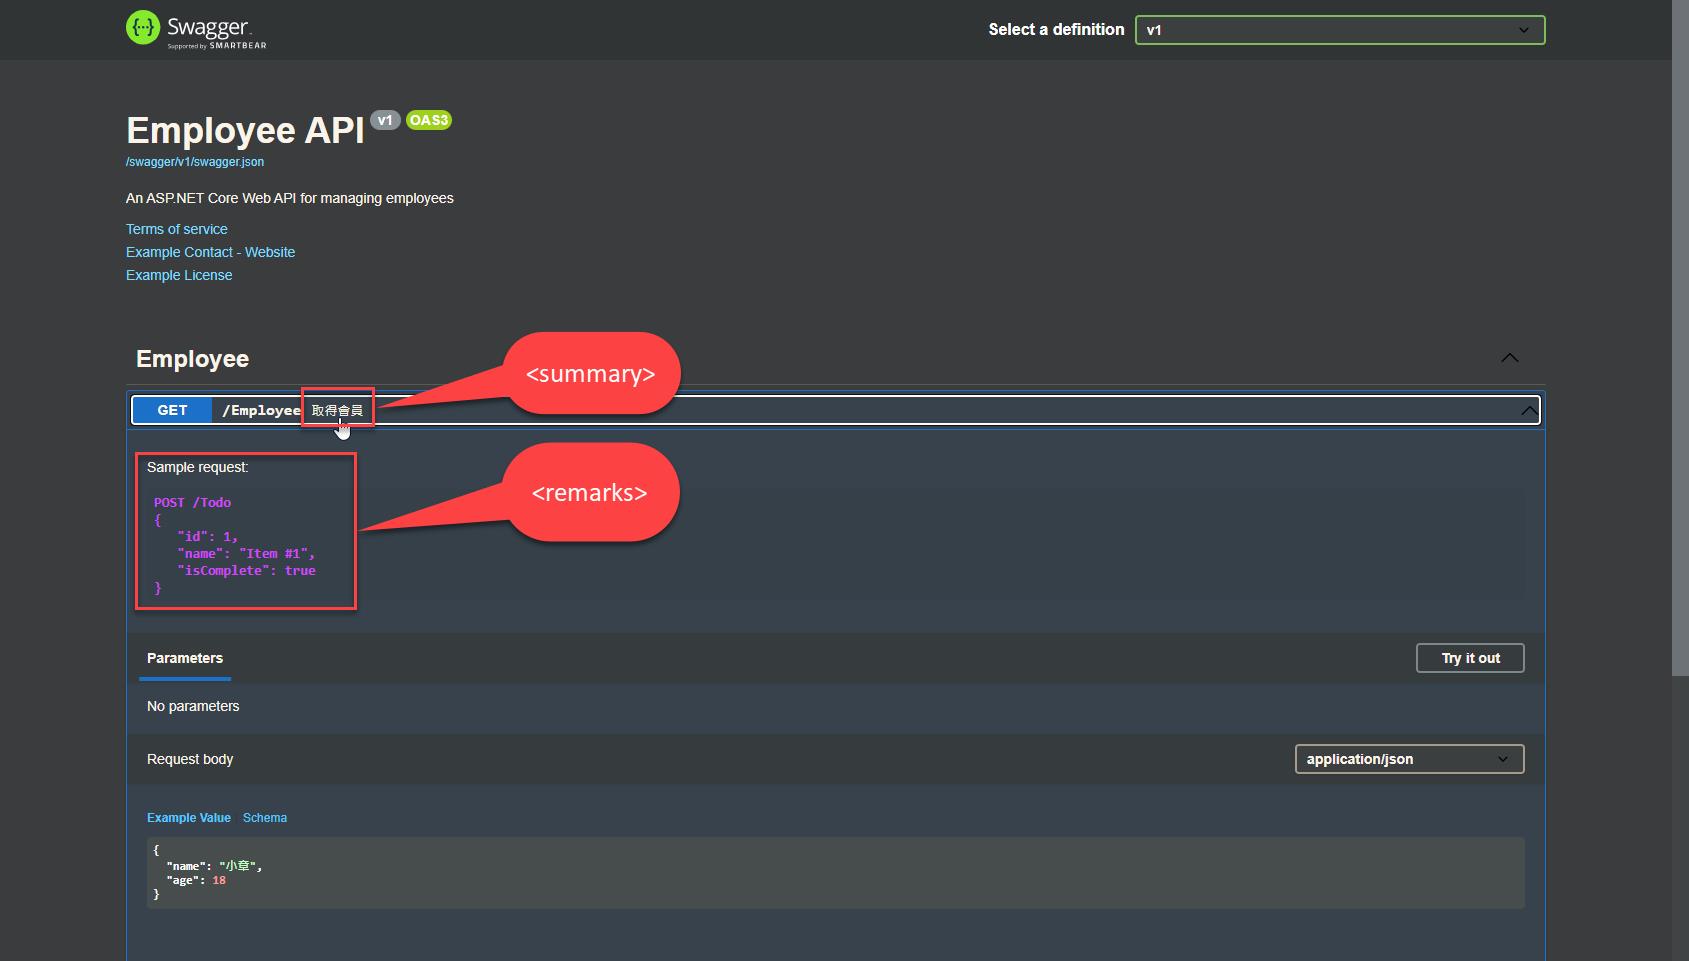
端點說明
/// <summary>
/// 取得會員
/// </summary>
/// <param name="request"></param>
/// <remarks>
/// Sample request:
///
///     POST /Todo
///     {
///        "id": 1,
///        "name": "Item #1",
///        "isComplete": true
///     }
/// </remarks>
[HttpGet]
public async Task<IActionResult> Get(QueryEmployeeRequest request)
{
}
執行結果如下
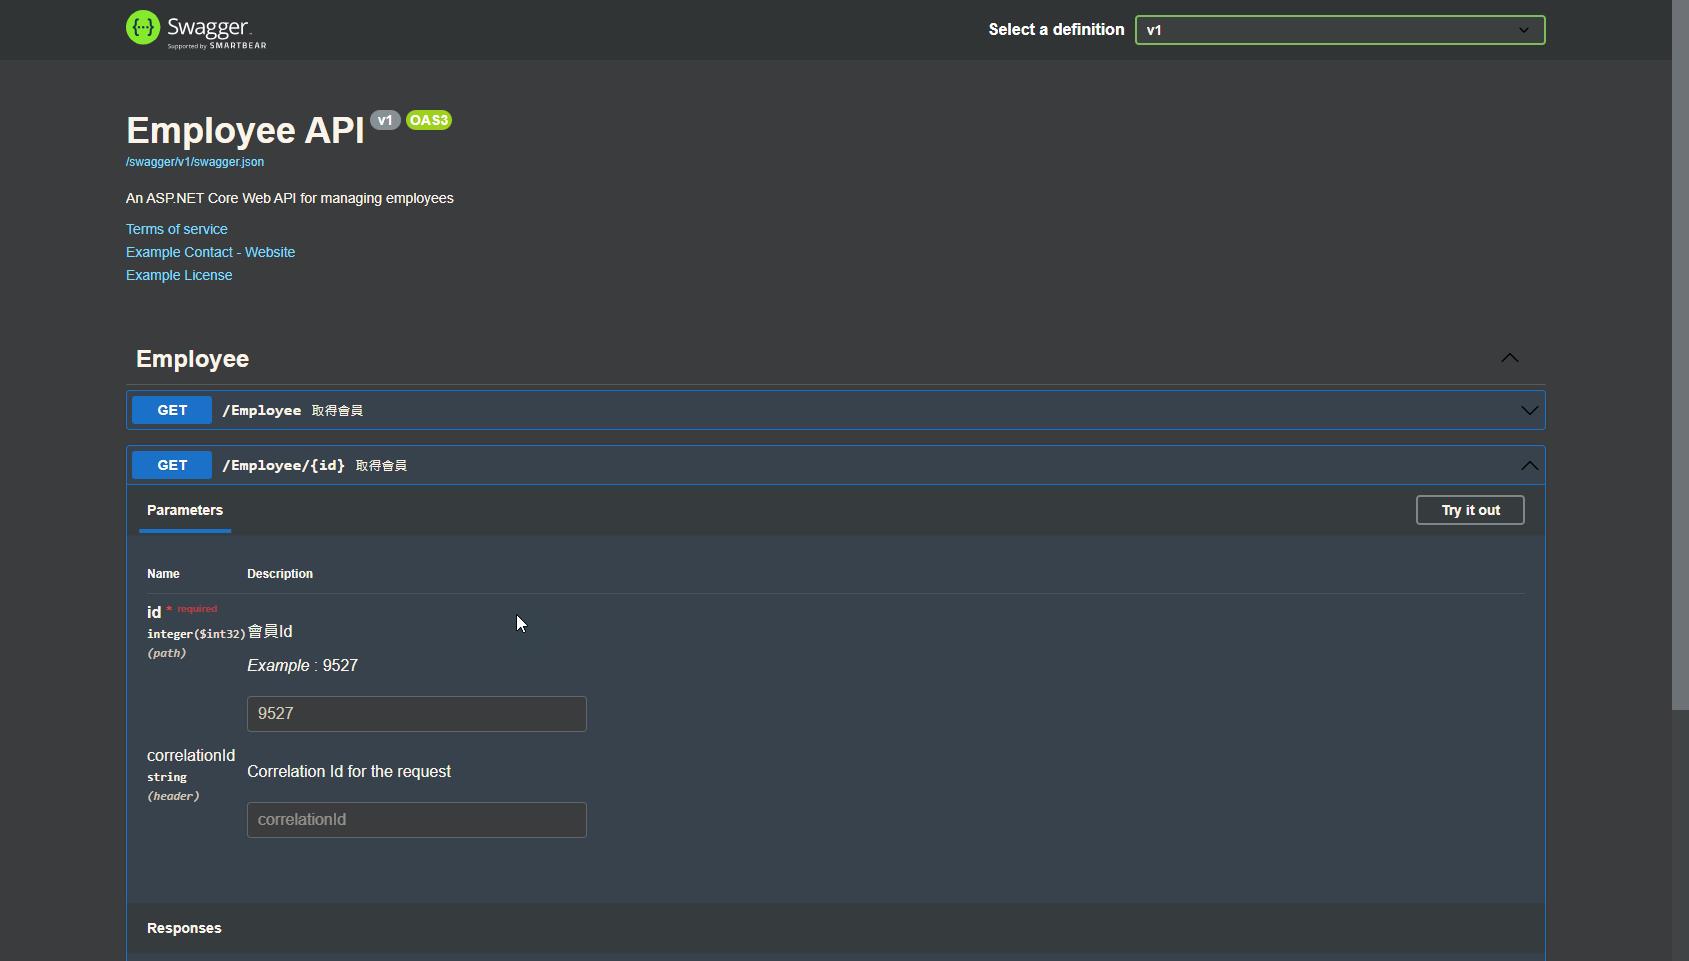
請求說明-簡單型別
/// <summary>
/// 取得會員
/// </summary>
/// <param name="id" example="9527">會員Id</param>
/// <returns></returns>
[HttpGet("{id}")]
public async Task<IActionResult> Get(int id)
{
	return this.Ok();
}
執行結果如下:
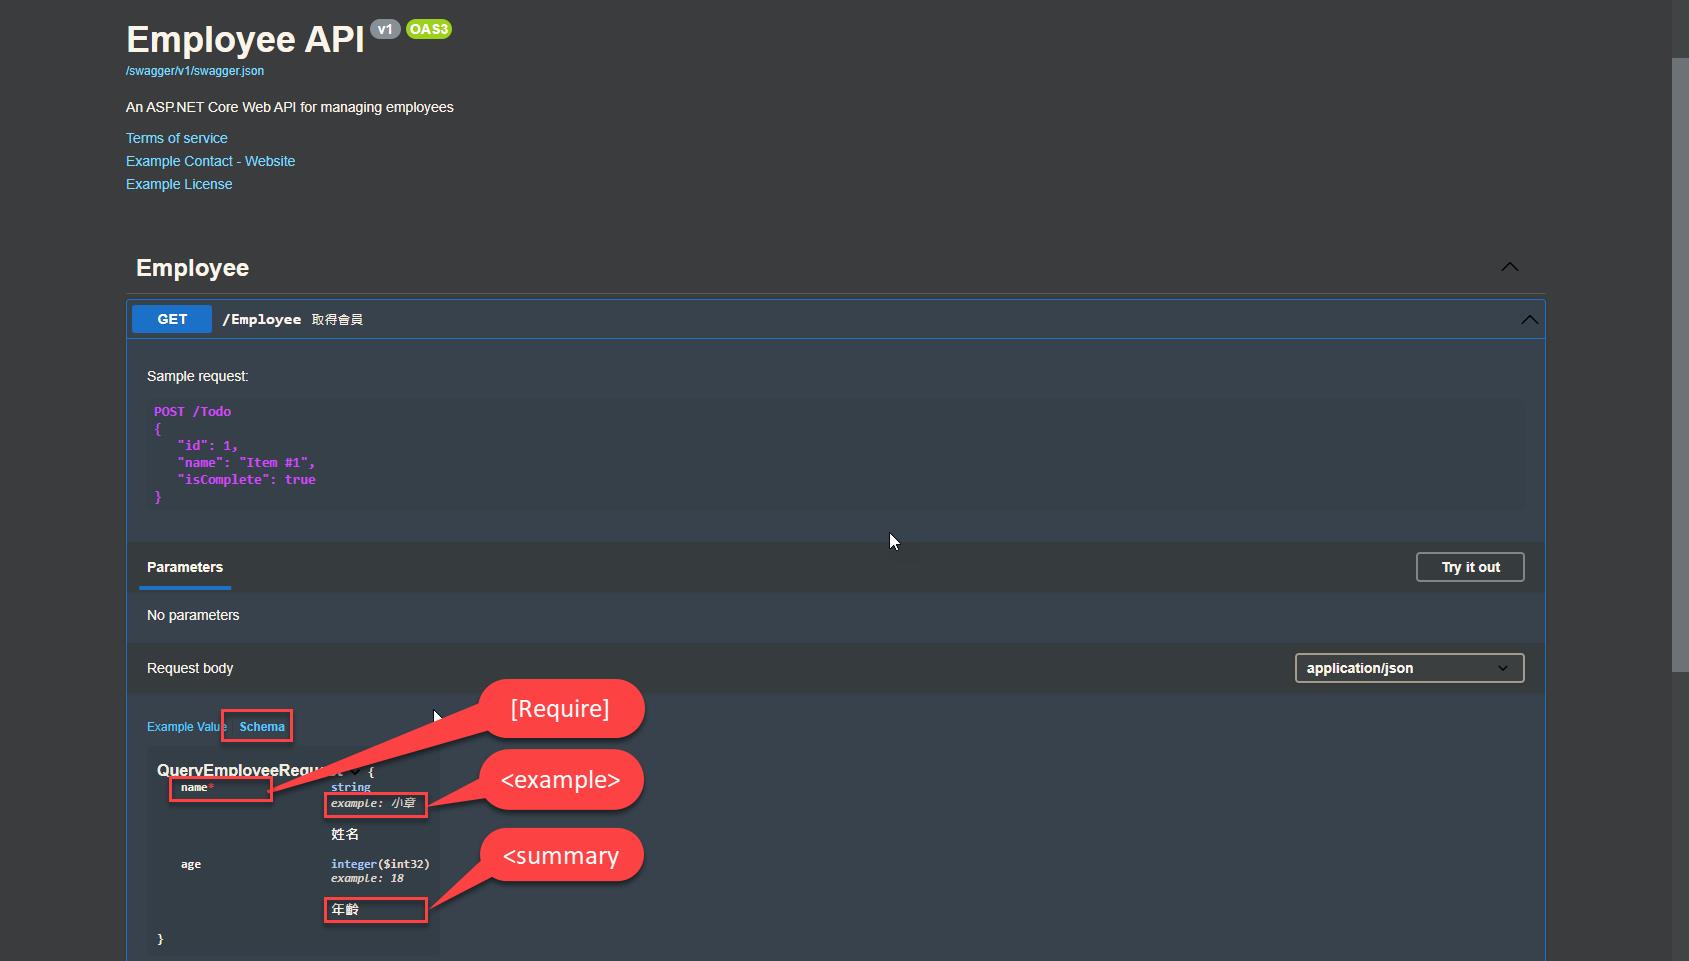
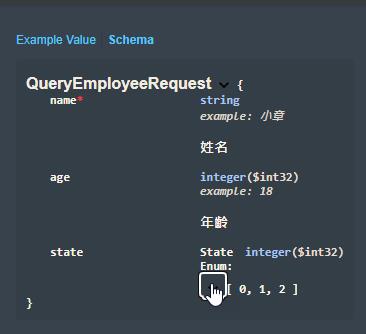
請求說明-複雜型別 / Schama
在欄位上面使用 summary 以及定義 attribute
public class QueryEmployeeRequest
{
    /// <summary>
    /// 姓名
    /// </summary>
    /// <example>小章</example>
    [Required]
    public string Name { get; set; }

    /// <summary>
    /// 年齡
    /// </summary>
    /// <example>18</example>
    public int Age { get; set; }
}
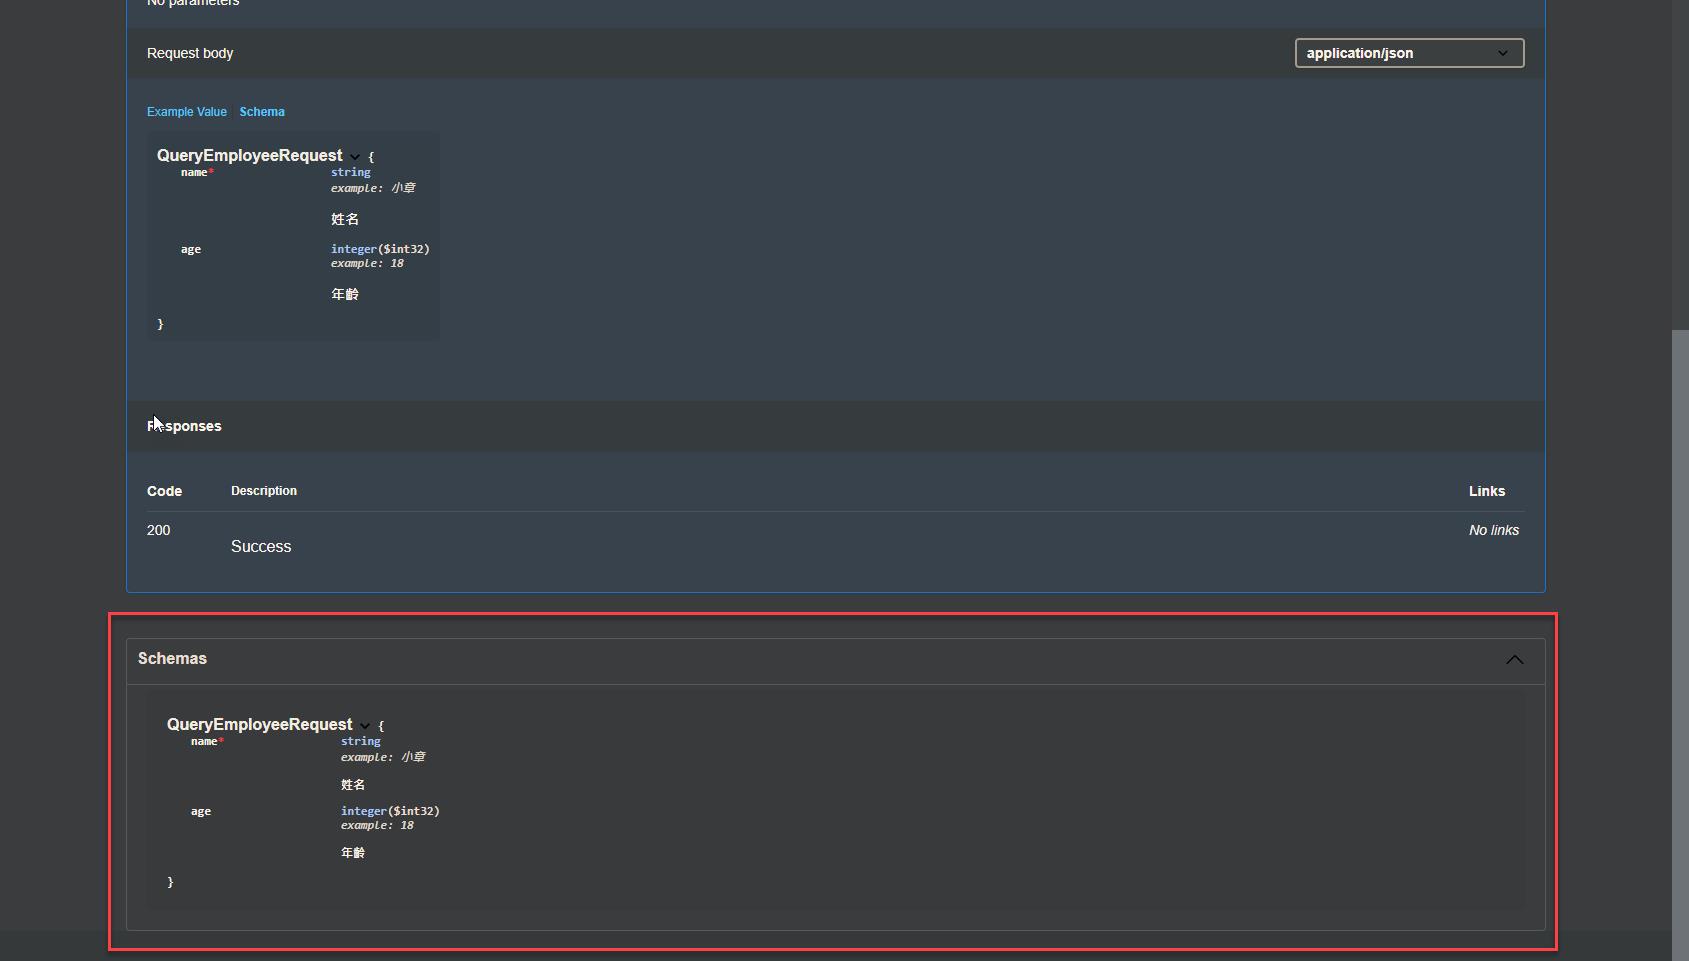
執行結果如下,在 endpoint 可以看到 EmployeeRequest 的結構說明
在 Swagger UI 最下方的 Schemas 區塊也有相同的描述,如果不喜歡,我記得是可以關掉它的
Valid Attribute
System.ComponentModel.DataAnnotations 提供了許多的驗證機制讓我們使用,在 Swagger 也可以使用,除了 Require 之外我再列出我常用的Attribute
- EmailAddressAttribute
- MaxLengthAttribute
- MinLengthAttribute
- RangeAttribute
- RequiredAttribute
- StringLengthAttribute
- UrlAttribute
回應說明
呼叫 API 的人應該是最關心回應內容和錯誤碼
只需要預設的內容和狀態碼,使用 <response code="xxx"> 就夠了
/// <summary>
/// 取得會員
/// </summary>
/// <response code="201">請求已被建立</response>
/// <response code="400">請求參數錯誤</response>
[HttpGet]
public async Task<IActionResult> Get(QueryEmployeeRequest request)
{
}
也可以使用 [ProducesResponseType] 來描述回應的內容
/// <summary>
/// 取得會員
/// </summary>
[HttpGet]
[ProducesResponseType(typeof(EmployeeResponse),StatusCodes.Status200OK)]
public async Task<IActionResult> Get(QueryEmployeeRequest request)
{
}
public class EmployeeResponse
{
    /// <summary>
    /// 編號
    /// </summary>
    public Guid Id { get; set; }

    /// <summary>
    /// 姓名
    /// </summary>
    public string Name { get; set; }

    /// <summary>
    /// 年齡
    /// </summary>
    public int Age { get; set; }

    /// <summary>
    /// 註解
    /// </summary>
    public string Remark { get; set; }
}
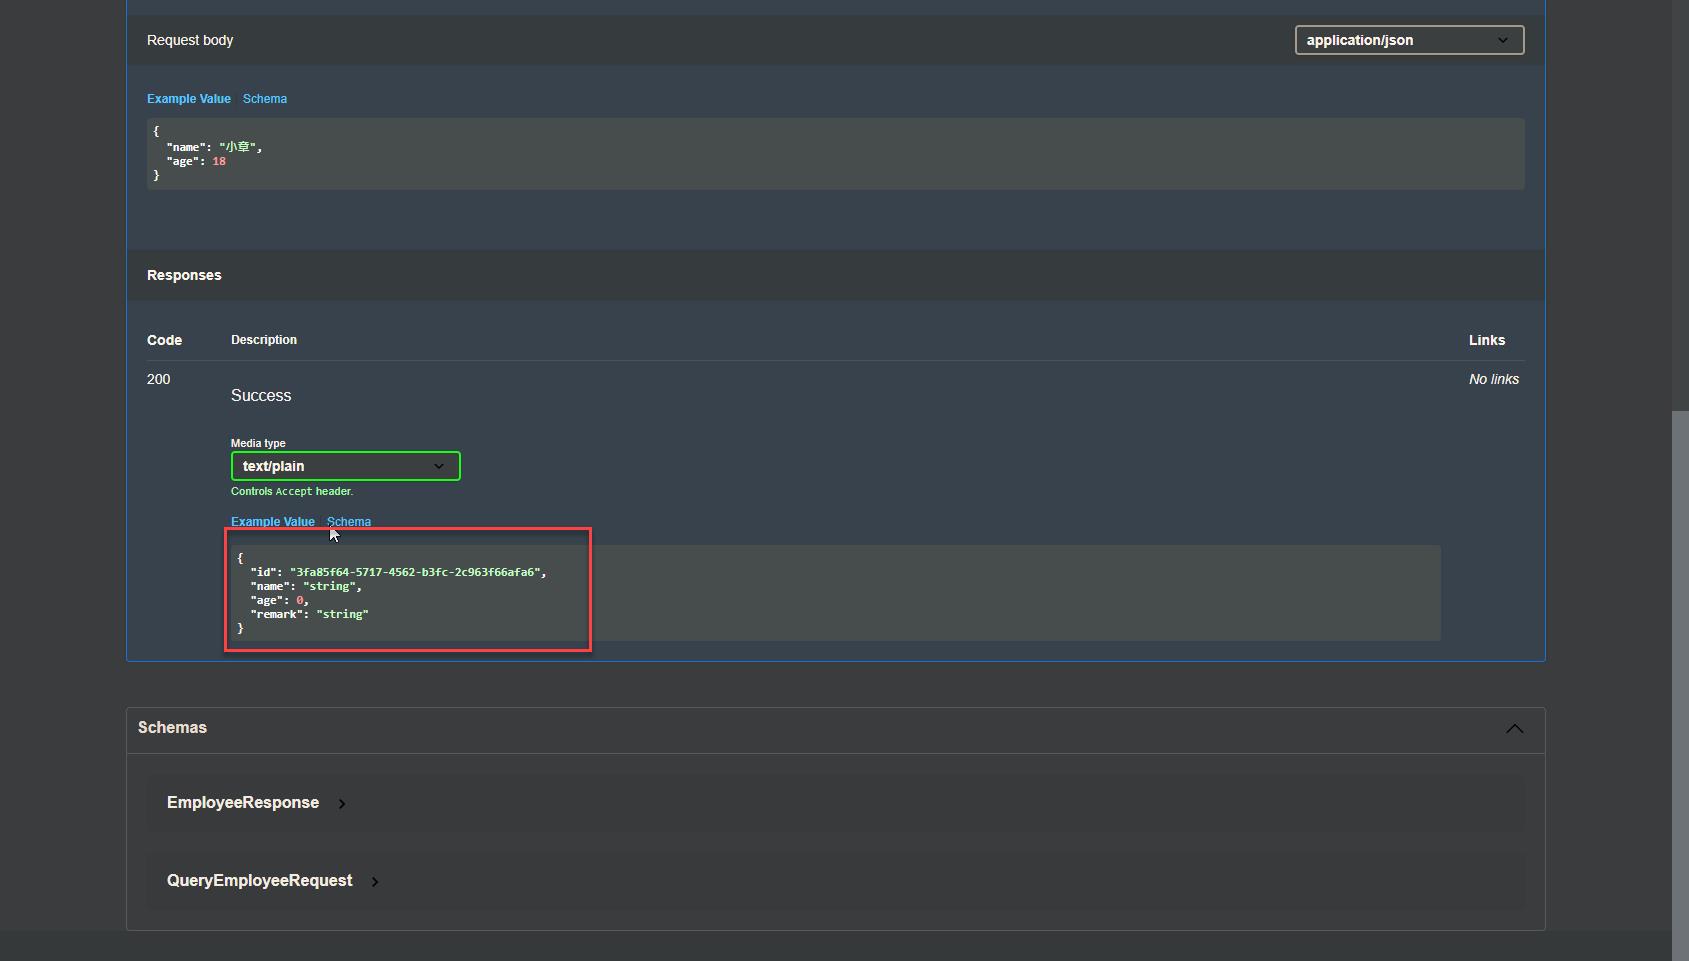
執行結果如下,UI 呈現的內容 Name: "string"、Remark: "string",不夠明確,解決方法在本篇的 Example 段落
[Produces("application/json")]:宣告回應類型為 json
[Produces("application/json")]
[ProducesResponseType(typeof(EmployeeResponse),StatusCodes.Status200OK)]
public async Task<IActionResult> Get(QueryEmployeeRequest request)
{
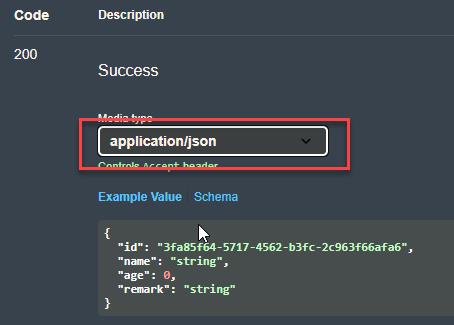
}沒有設定的話,下拉選單會有三個項目,用 [Produces("application/json")] 就能明確描述回應的 Media Type
簡單型別-Example
在 summary 加上<example>,這可以用在欄位、Endpoint 的參數,上面的例子就已經可以看得出來
複雜型別-Example
剛剛有介紹說明裡面的 <example>,不過他只能支援單一欄位,如果是一個複雜型別有多欄位就可以改用 NuGet Gallery | Swashbuckle.AspNetCore.Filters 7.0.2
安裝套件
dotnet add package Swashbuckle.AspNetCore.Filters --version 7.0.2專案位置
這專案提供 Request/Response 的 example,還有驗證
看起來跟以前 Net Fx 的用法是一樣的
- 實作 IExamplesProvider
- 在 Action 使用 SwaggerRequestExample / SwaggerResponseExample
- 註冊 Filter
實作 IExamplesProvider
public class EmployeeResponseExample : IExamplesProvider<EmployeeResponse>
{
    public EmployeeResponse GetExamples()
    {
        return new EmployeeResponse
        {
            Id = Guid.Parse("00000000-0000-0000-0000-000000000001"),
            Name = "小章",
            Age = 18,
            Remark = "說明"
        };
    }
}
public class QueryEmployeeRequestExample : IExamplesProvider<QueryEmployeeRequest>
{
public QueryEmployeeRequest GetExamples()
{
return new QueryEmployeeRequest
{
Name = "小章",
Age = 18
};
}
}
在 Action 套用 Example
[HttpGet]
[Produces("application/json")]
[ProducesResponseType(typeof(EmployeeResponse),StatusCodes.Status200OK)]
[SwaggerRequestExample(typeof(QueryEmployeeRequest), typeof(QueryEmployeeRequestExample))]
[SwaggerResponseExample(200,typeof(EmployeeResponse), typeof(EmployeeResponseExample))]
public async Task<IActionResult> Get(QueryEmployeeRequest request)
{
}
註冊 Examples
builder.Services.AddSwaggerGen(options =>
{
    options.ExampleFilters();
});
builder.Services.AddSwaggerExamplesFromAssemblies(Assembly.GetEntryAssembly());
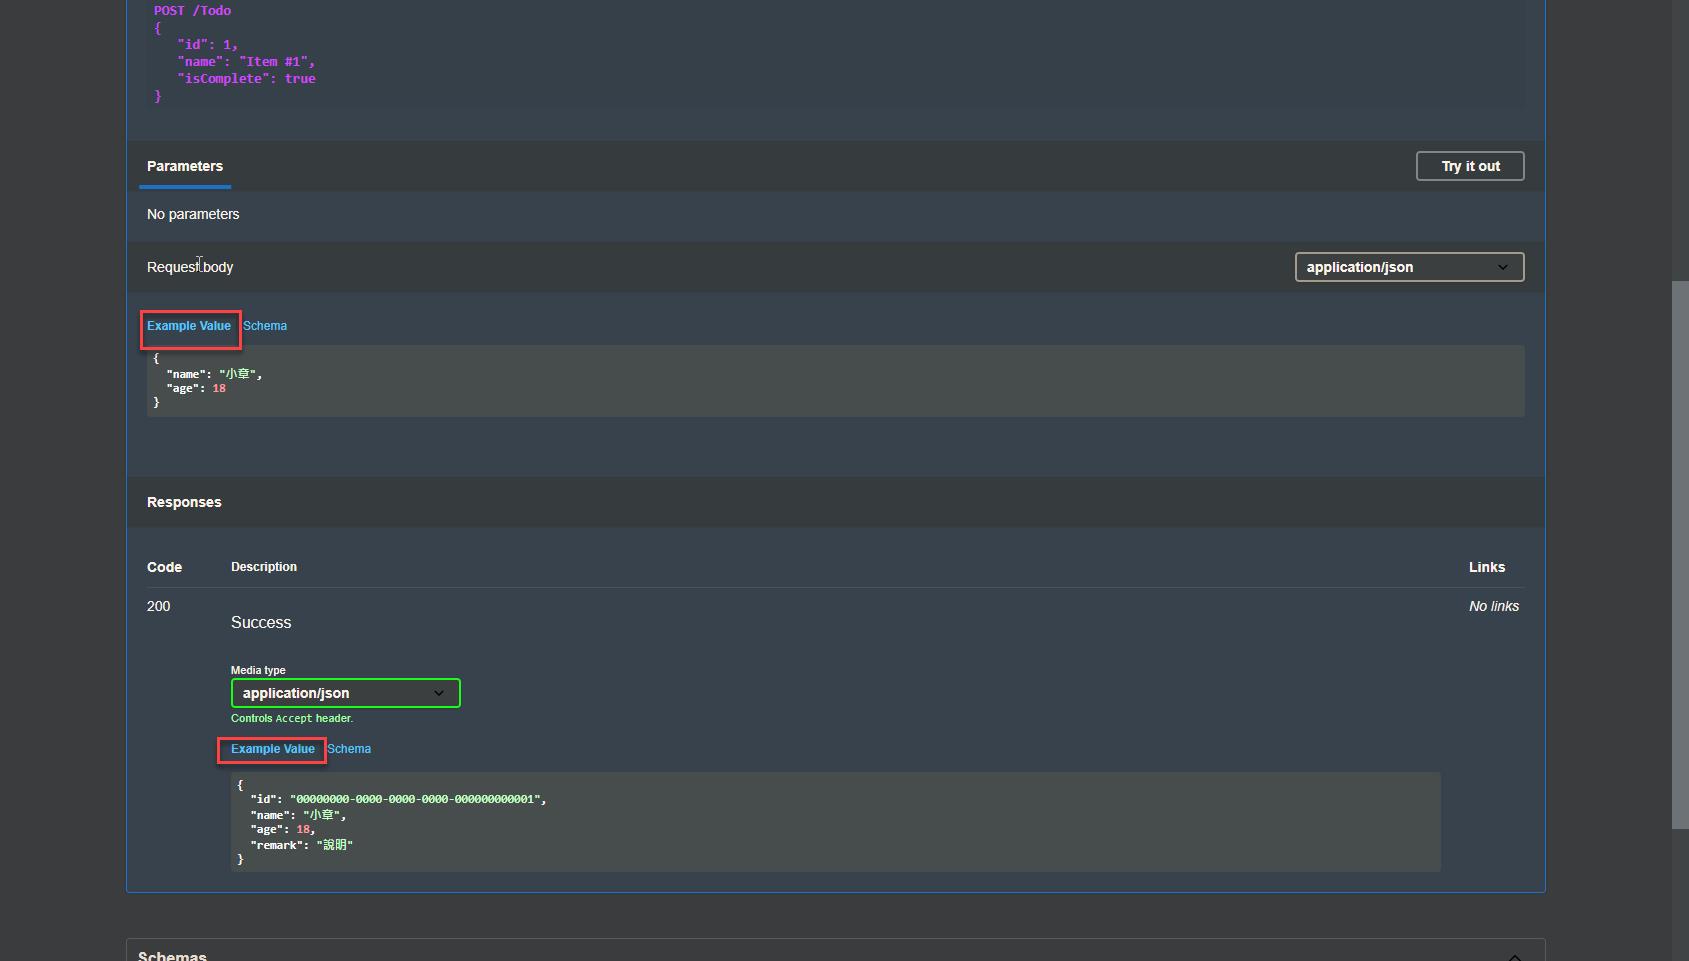
執行結果如下:
Annotations
當微軟內建的無法滿足需求的時候可以改用 NuGet Gallery | Swashbuckle.AspNetCore.Annotations 6.3.0,
套件安裝
dotnet add package Swashbuckle.AspNetCore.Annotations --version 6.3.0SwaggerResponse用法如下:
[SwaggerResponse(200, "The list of countries", typeof(IEnumerable<Country>))]
// or, like this [ProducesResponseType(typeof(IEnumerable<Country>), 200)]
[SwaggerResponseExample(200, typeof(CountryExamples))]
[SwaggerResponse(400, type: typeof(IEnumerable<ErrorResource>))]
public async Task<HttpResponseMessage> Get(string lang)
{
}
Enum to String
預設,enum 會被轉換成 Array
public enum State
{
    None = 0,

    /// <summary>
    ///     Approved
    /// </summary>
    /// <remarks>Approved</remarks>
    Approved = 1,

    /// <summary>
    ///     Rejected
    /// </summary>
    Rejected = 2
}
執行結果如下:
如果需要呈現欄位而不是 Value,可以把他們轉成字串,有關轉換的討論可以參考下篇文章
其中有一項是使用 Macross.Json.Extensions
https://www.nuget.org/packages/Macross.Json.Extensions/
用法
https://github.com/Macross-Software/core/tree/develop/ClassLibraries/Macross.Json.Extensions
[JsonConverter(typeof(JsonStringEnumMemberConverter))] // This custom converter was placed in a system namespace.
public enum State
{
    [EnumMember(Value = "UNKNOWN_DEFINITION_000")]

    None = 0,

    /// <summary>
    ///     Approved
    /// </summary>
    /// <remarks>Approved</remarks>
    // [Description("Approved")]
    [EnumMember(Value = "Approved")]
    Approved = 1,

    /// <summary>
    ///     Rejected
    /// </summary>
    [EnumMember(Value = "Rejected")]
    Rejected = 2
}
轉換之後的效果如下

範例位置
sample.dotblog/WebAPI/Swagger/Lab.SwaggerDoc at master · yaochangyu/sample.dotblog (github.com)
延伸閱讀
Swashbuckle 與 ASP.NET Core 使用者入門 | Microsoft Docs
如何在 ASP․NET Core 3 完整設定 NSwag 與 OpenAPI v3 文件 | The Will Will Web (miniasp.com)
若有謬誤,煩請告知,新手發帖請多包涵

Microsoft MVP Award 2010~2017 C# 第四季
Microsoft MVP Award 2018~2022 .NET
