當 SpecFlow 的測試步驟需要依賴其他物件時,SpecFlow 支援 Context Dependency Injection,只要在 Step 的建構函數開洞,SpecFlow 就會自動幫你注入
開發環境
- Windows 11
- .NET 6
- Rider 2022.2.4
環境準備
先依照以下步驟準備測試專案的環境
新增一個測試專案
dotnet new mstest --language "C#" --framework "net6.0" -o Lab.StepDependencyInjection
安裝套件
dotnet add package SpecFlow.MsTest --version 3.9.74
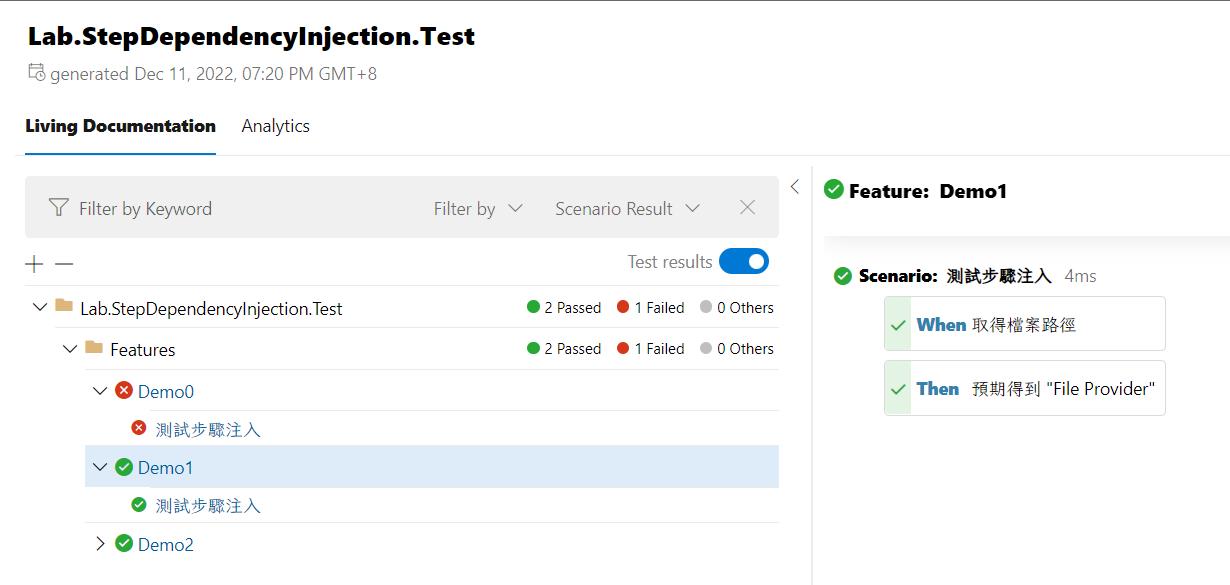
新增 Demo1 的 feature
Feature: Demo1

    Scenario: 測試步驟注入1
        When 取得檔案路徑
        Then 預期得到 "File Provider"
新增 FileProvider
public class FileProvider
{
    public string GetPath()
    {
        return "File Provider";
    }
}
Context Dependency Injection
SpecFlow 提供 Context Dependency Injection 的功能,讓 TechTalk.SpecFlow.Binding 物件彼此之間可以使用相同的物件,只要在建構子依賴該物件,SpecFlow 的框架就會自動幫你實例化,如下範例
[Binding]
[Scope(Feature = "Demo0")]
public class Demo0Steps
{
    private readonly FileProvider _fileProvider;

    private ScenarioContext ScenarioContext { get; }

    public Demo2Steps(ScenarioContext scenarioContext, FileProvider fileProvider)
    {
        this.ScenarioContext = scenarioContext;
        this._fileProvider = fileProvider;
    }

    [When(@"取得檔案路徑")]
    public void When取得檔案路徑()
    {
        var path = this._fileProvider.GetPath();
        this.ScenarioContext.Set(path, "actual");
    }

    [Then(@"預期得到 ""(.*)""")]
    public void Then預期得到(string expected)
    {
        var actual = this.ScenarioContext.Get<string>("actual");
        Assert.AreEqual(expected, actual);
    }
}
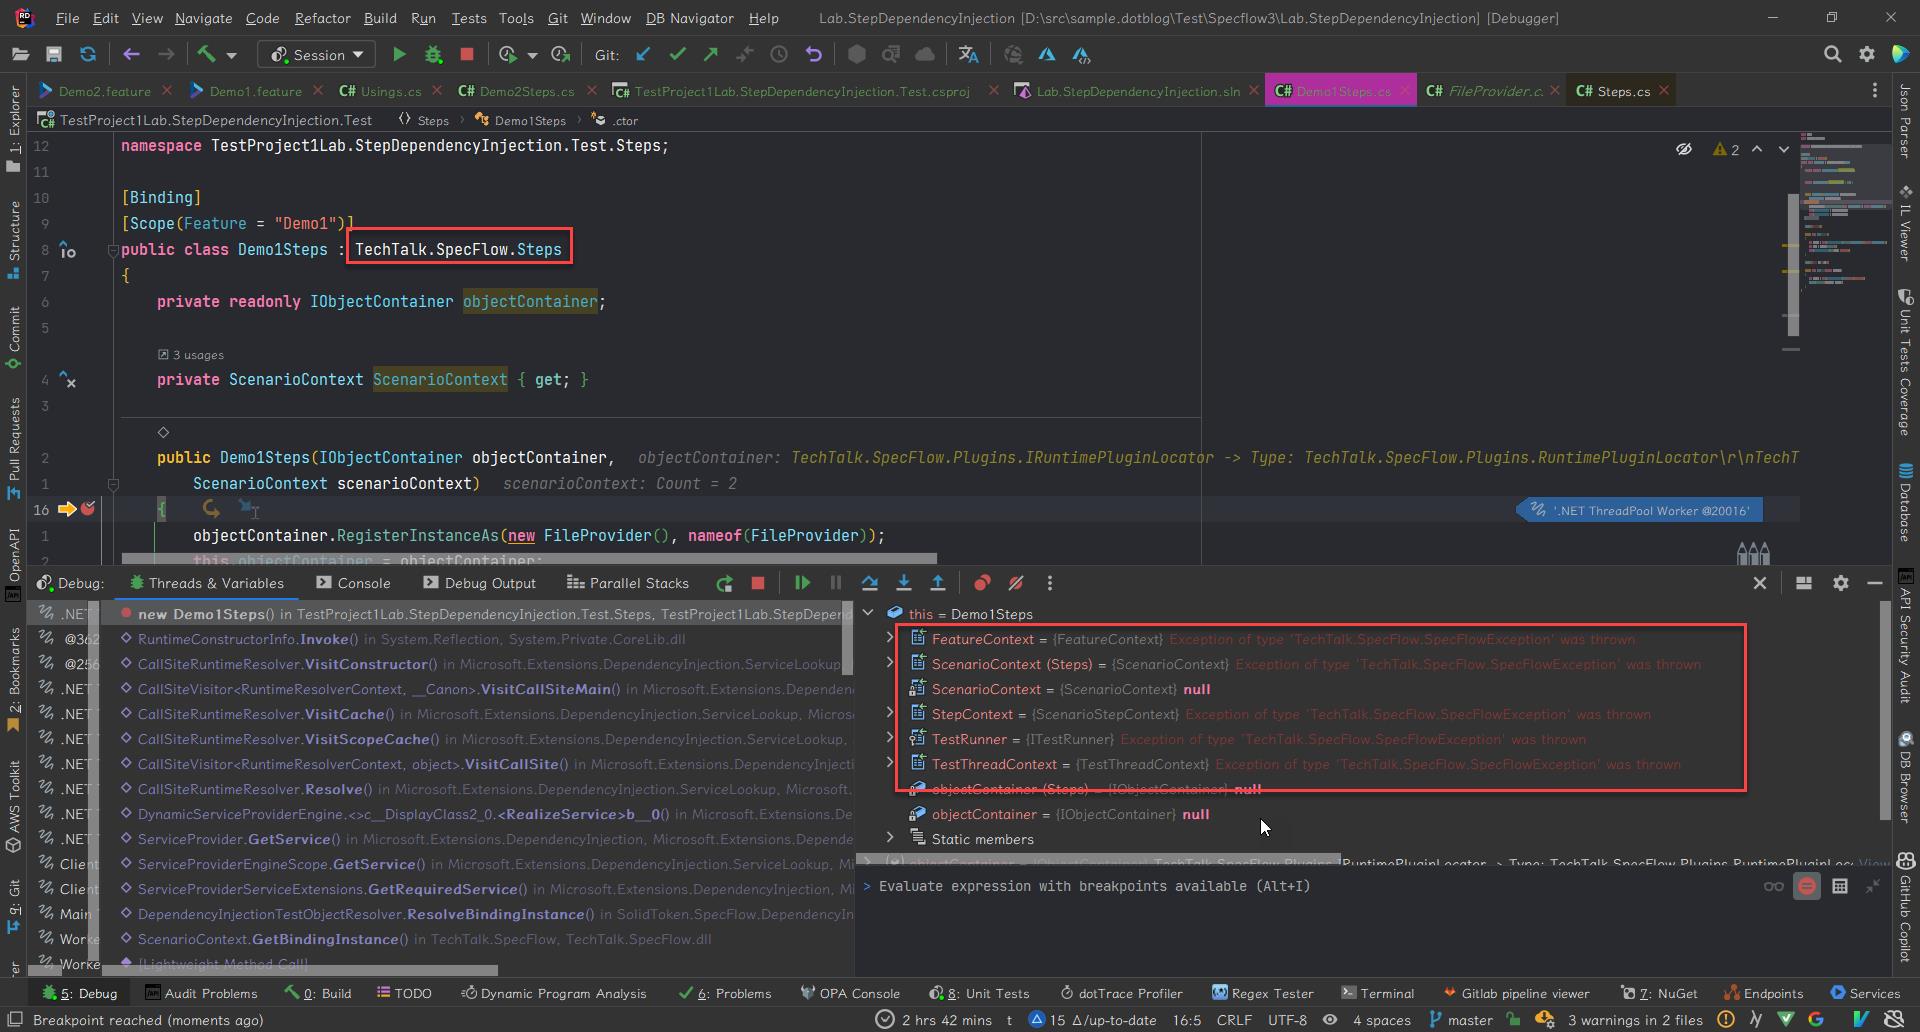
若物件有建構子,預設沒有辦法幫你自動實例化
Step 有建構子,實作 TechTalk.SpecFlow.Steps,相關的物件都不會被建立,有需要使用 ScenarioContext、ScenarioStepContext、FeatureContext 需要自行在建構函數開洞
IObjectContainer
如果物件初始化的方式很複雜,SpecFlow 也有提供 IObjectContainer(DI Container),有四種註冊方式,使用方式也不難
- IStrategyRegistration RegisterTypeAs<TType, TInterface>(string name = null) where TType : class, TInterface;
- void RegisterInstanceAs<TInterface>(TInterface instance, string name = null, bool dispose = false) where TInterface : class;
- void RegisterInstanceAs(object instance, Type interfaceType, string name = null, bool dispose = false);
- IStrategyRegistration RegisterFactoryAs<TInterface>(
Func<IObjectContainer, TInterface> factoryDelegate,
string name = null);
四種解析物件
- T Resolve<T>();
- T Resolve<T>(string name);
- object Resolve(Type typeToResolve, string name = null);
- IEnumerable<T> ResolveAll<T>() where T : class;
簡單範例如下
註冊:objectContainer.RegisterInstanceAs(new FileProvider(), nameof(FileProvider));
取得:var target = this.objectContainer.Resolve<FileProvider>(nameof(FileProvider));
[Binding]
[Scope(Feature = "Demo1")]
public class Demo1Steps : TechTalk.SpecFlow.Steps
{
    private readonly IObjectContainer objectContainer;

    private ScenarioContext ScenarioContext { get; }

    public Demo1Steps(IObjectContainer objectContainer,
        ScenarioContext scenarioContext)
    {
        objectContainer.RegisterInstanceAs(new FileProvider(), nameof(FileProvider));
        this.objectContainer = objectContainer;
        this.ScenarioContext = scenarioContext;
    }

    [When(@"取得檔案路徑")]
    public void When取得檔案路徑()
    {
        var target = this.objectContainer.Resolve<FileProvider>(nameof(FileProvider));
        var path = target.GetPath();
        this.ScenarioContext.Set(path, "actual");
    }

    [Then(@"預期得到 ""(.*)""")]
    public void Then預期得到(string expected)
    {
        var actual = this.ScenarioContext.Get<string>("actual");
        Assert.AreEqual(expected, actual);
    }
}
SpecFlow.DependencyInjection
除了官方內建的 DI Container,還有一些第三方的 DI Container,如果你想要創造自己的 DI Container 那可以參考 SpecFlow.Autofac
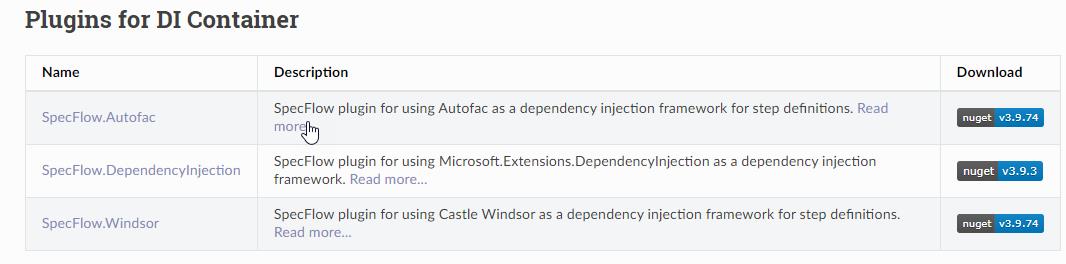
支援 Microsoft.Extensions.DependencyInjection 的 DI Container,也是基於 SpecFlow.Autofac 發展而來的 SpecFlow.DependencyInjection
安裝
dotnet add package SolidToken.SpecFlow.DependencyInjection --version 3.9.3
使用方法很簡單,在 SpecFlow 專案中創建一個回傳 Microsoft.Extensions.DependencyInjection.IServiceCollection 的靜態方法,並掛上 [ScenarioDependencies] Attribute,這樣 SpecFlow 所綁定的步驟就可以使用了
[ScenarioDependencies]
public static IServiceCollection CreateServices()
{
    var services = new ServiceCollection();
    services.AddSingleton<FileProvider>();
    return services;
}
範例如下:
public class SysFileProvider
{
    private readonly string _name;

    public SysFileProvider(string name)
    {
        this._name = name;
    }

    public string GetPath()
    {
        return $"{this._name}:SysFileProvider";
    }
}
[Binding]
[Scope(Feature = "Demo2")]
public class Demo2Steps
{
    private readonly SysFileProvider _sysFileProvider;

    public Demo2Steps(SysFileProvider sysFileProvider, ScenarioContext scenarioContext)
    {
        this._sysFileProvider = sysFileProvider;
        this.ScenarioContext = scenarioContext;
    }

    private ScenarioContext ScenarioContext { get; }


    [ScenarioDependencies]
    public static IServiceCollection CreateServices()
    {
        var services = new ServiceCollection();
        services.AddSingleton(new SysFileProvider("fake provider"));
        return services;
    }

    [When(@"取得檔案路徑")]
    public void When取得檔案路徑()
    {
        var path = this._sysFileProvider.GetPath();
        this.ScenarioContext.Set(path, "actual");
    }

    [Then(@"預期得到 ""(.*)""")]
    public void Then預期得到(string expected)
    {
        var actual = this.ScenarioContext.Get<string>("actual");
        Assert.AreEqual(expected, actual);
    }
}
要注意的是,如果使用 SolidToken.SpecFlow.DependencyInjection,所的注入行為都會統一,原本 SpecFlow 預設的注入行為就會失效。
參考
Context Injection — documentation (specflow.org)
範例位置
若有謬誤,煩請告知,新手發帖請多包涵

Microsoft MVP Award 2010~2017 C# 第四季
Microsoft MVP Award 2018~2025 .NET
